Tool details palette
Updated: 03/03/2026
5.4 alpha Now Available. Click here to visit the announcement page for the alpha version.
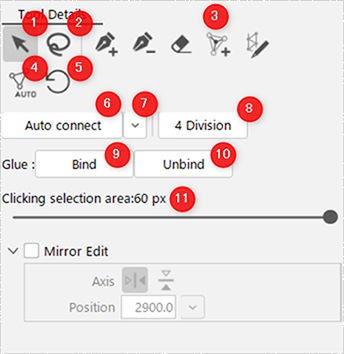
The Tool Details palette displays detailed items for each selected tool and allows various settings.
Edit Mesh manually
| Number | Item | Details |
|---|---|---|
| (1) | Select/Edit | Select or move mesh vertices. |
| (2) | Lasso | Select multiple mesh vertices using a lasso. |
| (3) | Add points | Increase the number of vertices as if tracing with a brush. |
| (4) | Automatic Mesh generator | Opens the automatic mesh generator dialog box. |
| (5) | Reset mesh | Restore the mesh to the state immediately after the ArtMesh is created. |
| (6) | Auto connect | Automatically connects vertices to vertices. Two options are available from the buttons on the right. |
| (7) | Select an auto connection method | Mesh reconstruction: If enabled, it redraws the mesh line considering only the vertices. If you want to keep the lines you have constructed, disable it. Protect Edge exterior: If enabled, it will automatically generate while keeping the outer perimeter. This is effective when used with irregularly-shaped textures (eyelashes, hair, etc.) because it prevents excess lines from being tied together. To perform auto generation with [Protect Edge exterior] enabled, all the perimeters of the vertices must be connected beforehand. |
| (8) | Mesh 4 Division | The mesh is divided into four parts while maintaining its shape. |
| (9) | Binding of glue | Binds (adsorbs) the “glue.” |
| (10) | Unbinding of glue | Unbind (un-adsorb) the “glue.” |
| (11) | Selection range on click | If a vertex is difficult to select, increase the numerical value to make it easier to select. |
| Number | Item | Details |
|---|---|---|
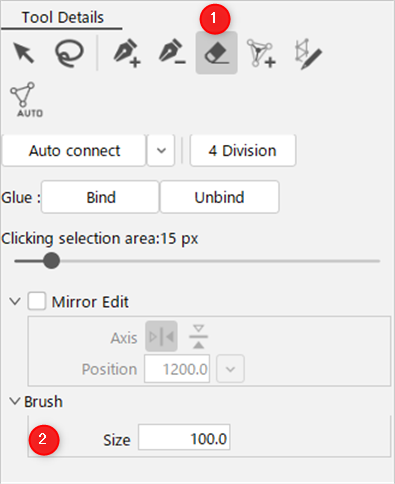
| (1) | Eraser | Delete mesh vertices and edges (lines) while dragging. |
| (2) | Size | Change the size of the brush. You can also change it using [B] + drag. |
| Number | Item | Details |
|---|---|---|
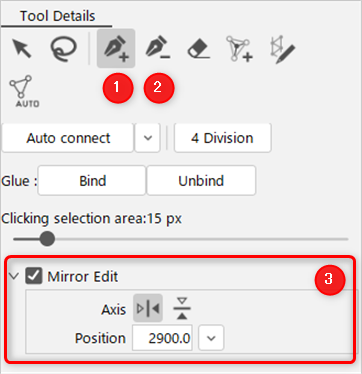
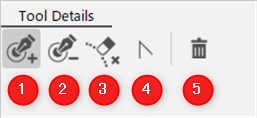
| (1) | Add Vertex | Add mesh vertices. |
| (2) | Delete Vertex/Edges (line) | Delete mesh vertices and edges (lines). |
| (3) | Mirror edit | Mirror Edit: If checked, mirror edit is available. Axis: [Vertical] or [Horizontal] displays the axis on which the editing will be based. Axis position: Adjusts the position in pixels where the axis is displayed. By clicking the button on the right, you can choose whether the axis should appear in the [Center of the Canvas] or in the [Center of Selected Vertices]. |
| Number | Item | Details |
|---|---|---|
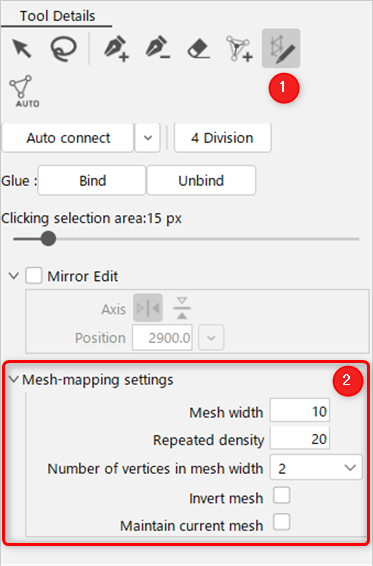
| (1) | Stroke mesh-mapping (beta) | A mesh is generated based on the path created by dragging. |
| (2) | Mesh-mapping settings | Mesh width: The overall width of the mesh can be adjusted around the stroke. Repeated density: The spacing between mesh-mappings can be adjusted. The value is the distance between intervals, so the smaller the value, the narrower the interval, and the larger the value, the wider the interval. Number of vertices in mesh width: You can choose from three different mesh split methods. Invert mesh: Flips the direction of the first and last mesh edges when the number of vertices in the mesh width is two. Maintain current mesh: When unchecked, the overlapping edges and vertices are deleted. Also, when checked, it is not deleted but maintained. |
See “Edit Mesh manually” for more information.
Deform Path edit
| Number | Item | Details |
|---|---|---|
| (1) | Add control point | Add a control point. |
| (2) | Delete control point | Delete a control point. |
| (3) | Delete path | Delete only the path, leaving the control points in place. |
| (4) | Fold line | The clicked control point area is made into a fold line. |
| (5) | Delete deform paths at the current Level edit | Delete all deform paths corresponding to the currently selected drawable object at the current Level edit. |
See “Deform Paths” for more information.
Brush selection tool, deform brush tool
| Brush selection tool | Deform brush tool |
 |  |
| Number | Item | Details |
|---|---|---|
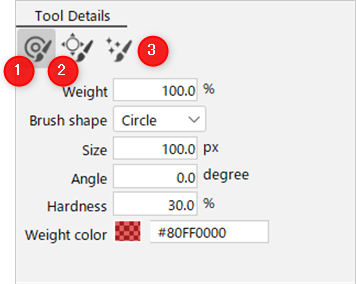
| (1) | Deformed Brushes | You can deform the vertices as if you were painting with a brush. |
| (2) | Expansion brush | You can deform the vertices as if you were painting with a brush to make them look expanded. |
| (3) | Warp deformer shaping brushes | You can align the division points of the warp deformer as if you were painting with a brush. |
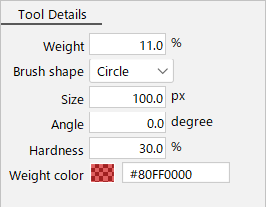
| Weight | Change the weight of the brush. The larger the percentage, the darker the [Weight color] (red by default). Note: When you are using the brush selection tool, you can also adjust this with the Pressure on the Pen tab. The larger the percentage, the more likely it is to be pulled when moving with the [Arrow tool]. | |
| Brush shape | The following brush shapes can be selected. • Circle • Square • Line | |
| Size | Change the size of the brush. You can also change it using [B] + drag. | |
| Angle | Change the angle of the brush. You can also change it using [C] + drag. | |
| Hardness | Change the brush hardness. You can also change it using [V] + drag. | |
| Weight color | You can change the color of the selection state. Default: #80FF0000 |
See “Deform brushes” for more information.
Edit Glue
| Number | Item | Details |
|---|---|---|
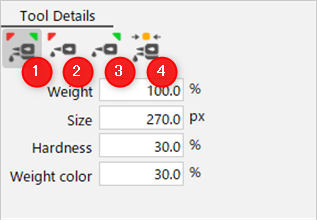
| (1) | Glue Weight A:B | Drag and adjust the weight ratio of the two vertices. When merging, the ratio is 50% each, but the ratio is adjusted to determine which side the weight should be placed on to a total of 100%. |
| (2) | Glue Weight A | Adjust only the weight ratio of the vertices of the ArtMesh that are colored red. |
| (3) | Glue Weight B | Adjust only the weight ratio of the vertices of the ArtMesh that are colored green. |
| (4) | Re-merge Glue Vertices Tool | Recombine the two vertices that have been separated by the adjustments in (2) and (3) by dragging them together. |
| Weight | The higher the %, the faster the adjustment speed. For fine adjustment, lower the % for slower adjustment. You can also adjust this with the Pressure on the Pen tab. | |
| Size | By changing the brush size, you can change the area of influence during adjustment. You can also change it using [B] + drag. | |
| Hardness | Change the brush hardness. You can also change it using [V] + drag. | |
| Weight color | Set the opacity of the weighted color portion that visually represents the state. |
See “Glue” for more information.
ArtPath Tools
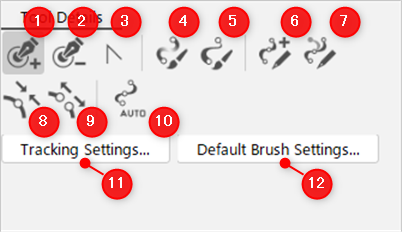
| Number | Item | Details |
|---|---|---|
| (1) | Add control point | Add a control point. |
| (2) | Delete control point | Delete a control point. |
| (3) | Fold line | The clicked control point is made into a fold line. |
| (4) | Adjust the opacity set for the control point | Set the opacity of the control point. |
| (5) | Adjust the thickness set for the control point | Set the line width of the control point. |
| (6) | Stroke ArtPath | Create the ArtPath as you draw it by dragging it on the View. |
| (7) | Re-stroke ArtPath | Edit to select and draw the vertices of the ArtPath you want to deform. |
| (6) | Open ArtPath Auto Generation Dialog | Open the ArtPath Auto Generation Dialog. |
| (8) | Join ArtPaths | Connect the selected control points to each other. |
| (9) | Split ArtPath | Disconnect the selected control points. |
| (10) | ArtPath Auto Generation | Open the ArtPath Auto Generation Dialog. |
| (11) | Tracking Settings | Open the Tracking Settings menu. |
| (12) | Default brush settings | Open the Default Brush Settings dialog box. |
For details, please refer to “About ArtPaths.”
Parameter Controller
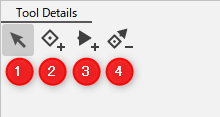
| Number | Item | Details |
|---|---|---|
| (1) | Select/edit controller | Click a controller on the view to select it. When a controller is selected, the inspector palette displays information about the controller. Multiple controllers can be selected, and the selected controllers are highlighted with a red frame. By selecting and dragging a controller, you can move the coordinates of the controller on the ArtMesh. |
| (2) | Add single-point controller | Set a single-point controller on the model. Clicking the model in the view adds a single-point controller to the foremost ArtMesh. |
| (3) | Add direction controller | Set a controller with directional information on the model. When a model is dragged in the view, the starting controller is placed at the start of the drag, and the ending controller is set at the end of the drag. The ArtMesh designated as the end point must belong to the same model track as the start point. |
| (4) | Delete controller | Click the parameter controller to delete it. |
See “About the parameter controller” for details.
Was this article helpful?
YesNo