Glue
Updated: 12/09/2025
Glue is a function that binds (adheres) the vertices of two ArtMeshes together.
First, please watch the video showing what can be done with the glue function.
What is the Glue Function?
Illustrative explanatory video
Watch the video below to learn about the glue function.
Glue Function Terms
This section explains terms related to the glue function.
Bind
Binding is the process of attaching the “overlapping vertices” of two ArtMeshes together.
Glue weight
The setting of which side of the two ArtMeshes the bound “overlapping vertices” are affected by.
Weights can be set per vertex, but not per keyform control.
Details are explained in “Adjustment of Glue Weight” later in this section.
Compatibility
The compatibility of glue is the degree of effectiveness of the glue setting.
Lowering the value of the compatibility weakens the effect of the glue.
Unlike weights, they cannot be controlled per vertex, but a numerical value can be set for each keyform.
Details are explained in “Glue compatibility” later in this section.
Difference between glue weight and compatibility
| Glue weight | Compatibility | |
| Vertex-by-vertex adjustment | ✓ | ✗ |
| Settings per keyform | ✗ | ✓ |
How to Set Up Glue
This section explains how to set the glue on the ArtMesh.
Below are comparison images with and without glue.
| With glue | Without glue |
 |  |
Here is the procedure for setting up the glue.
| No. | Images | Description |
| (1) |
|
Select the two ArtMeshes you want to bind. In Edit mode, the Add Vertex Tool is selected by default.
|
|
|
In Mesh Edit mode, the mesh lines of each ArtMesh are displayed in a different color. How to edit multiple meshes at the same time: • To unselect an ArtMesh, click on an empty space with the Select Tool.
• Without selecting anything, clicking on an empty space will display a Pop-up window. You can select any ArtMesh from the Pop-up to make it active. • You can click directly on any ArtMesh with the Select Tool to make it active. |
|
| (2) | 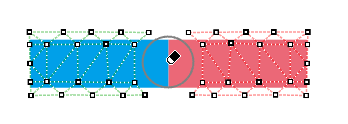 |
Reset the vertices of the area to be adhered with glue to “two overlapping vertices.” Use an Eraser or Lasso Tool to erase the vertices in the area to be adhered. |
| (3) |
|
Add a new vertex to the area where the vertex was deleted. A vertex with two overlapping edge colors is added to both ArtMeshes, resulting in “two overlapping vertices.” Once you have inserted the vertices you want to glue together, it is convenient to click [Auto connect] to automatically connect the vertices. |
| (4) |
|
Focus on each ArtMesh separately and check to see if the mesh surrounds the texture and if any edges are left unconnected. |
| (5) |
|
Select the vertex you want to adhere and click on the [Tool Details] palette -> [Bind]. Binding “two overlapping vertices” with [Bind] will cause the vertices to adhere to each other and change the color of the vertices. Click the green check mark in the upper left corner of the View area to exit Mesh Edit mode. |

|
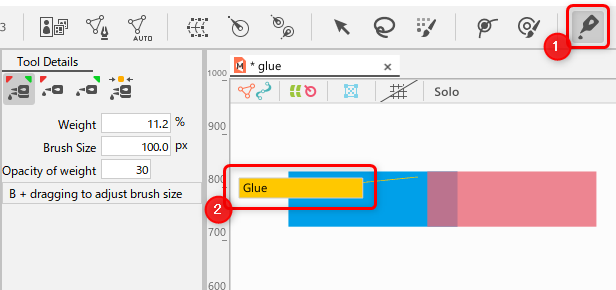
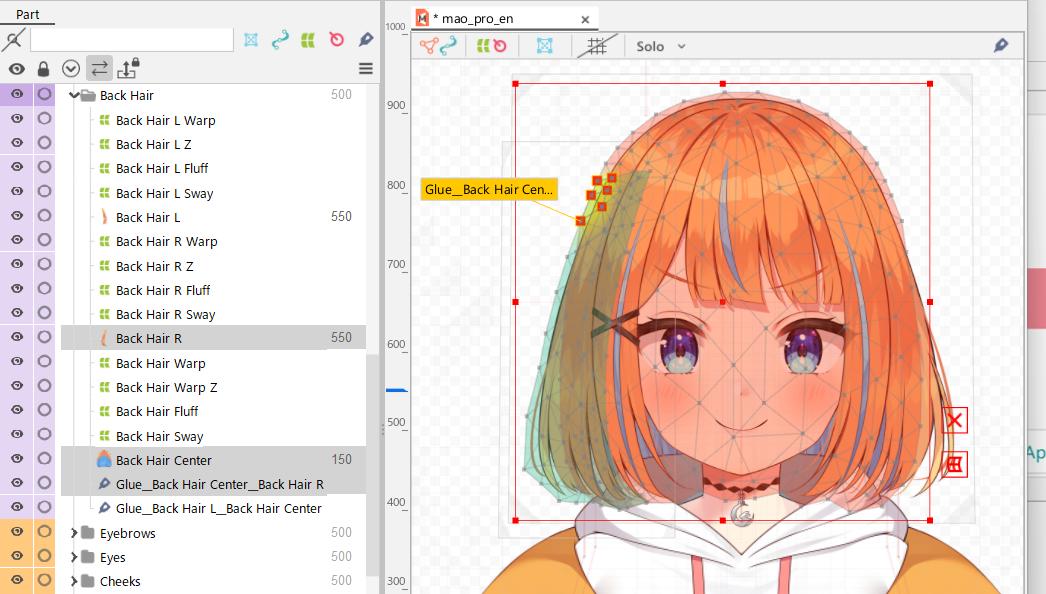
|
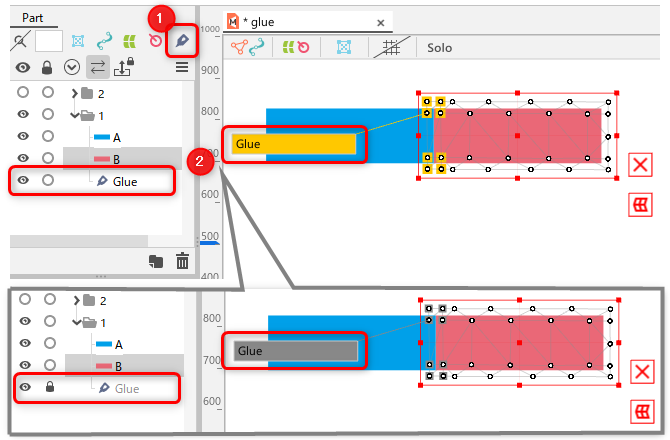
Once the Glue is set 1. A yellow “Glue” tag (2) appears in the View area. When a glue object is locked in the [Part(s)] palette, the tag turns gray and the glue cannot be edited. TIPSThe glue objects in the palette can be shown or hidden using the Add Filter button (1) in the upper right corner of the [Part(s)] palette. |
TIPS
If multiple glues are set for a single ArtMesh, multiple “Glue” tags will be displayed.
TIPS
Multiple glues can be set for a single ArtMesh. For example, for the “torso” ArtMesh, you can set three locations such as “neck,” “right shoulder,” and “left shoulder.”
Precautions
When editing a mesh after setting glue, unbind the glue and then edit the mesh, or the mesh shape may be incorrect.
Adjustment of Glue Weight
The glue weight can be adjusted between 0-100%.
The table below compares the following conditions: No glue, 100% weight A, 100% weight B, and 50% weight A:B.
| No glue | 100% weight A | 100% weight B | 50% weight A:B |
 |
 |
 |
 |
|
Both A and B move to the left and right with the same amount of movement. |
Since the movement of A has 100% priority, the object B is extended. In this case, the weight of B is 0%. |
Since the movement of B has 100% priority, the object A is extended. In this case, the weight of A is 0%. |
The vertices, pulled and bound to each other, are midway between their original positions. In this case, the vertices do not move because the amount of movement is the same. |
The stronger the weight, the more priority is given to the object’s movement.
By adjusting the weights, the shape can be arranged as shown in the following image.
| Without weight adjustment | With weight adjustment |
 |  |
About weight adjustment
For descriptions of the various palettes used to adjust glue weights, please refer to the following pages.
When selecting a glue tool: See [Edit Glue] in [Tool details palette].
When selecting a glue object: See [Display when a glue is selected] in [Inspector palette].
How to adjust the weight ratio of two vertices
| No. | Image | Description |
| (1) |
|
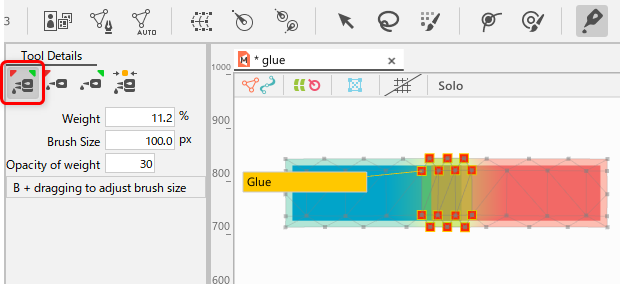
Select the ArtMesh with the glue set, or click on the Edit Glue (1). Click the [Glue] tag (2) that appears to switch to the Weight Adjustment mode. TIPSYou can also switch to the Weight Adjustment mode by clicking on the corresponding glue object from the [Part(s)] palette. |
| (2) |
|
In the Weight Adjustment mode, the degree of influence of the weights is displayed in color. In the [Tool Details] palette, click [Glue Weight A:B] icon. |
| (3) |
|
Drag the brush over the out-of-shape areas to shape them. Drag: [Shift] + drag: Click on [Toolbar] -> [Arrow tool] and click on an empty space in the View area to exit Weight Adjustment mode. |
Tips
The higher the % setting of the brush weight, the quicker the adjustment, but start out low and get used to the adjustment. The larger the brush size, the wider the area to be adjusted, but it is recommended to start out small and make incremental adjustments.
Tips
After setting the glue, try moving the parameters that affect it and check carefully to make sure that the shape has not been lost.
Tips
By adjusting [Weight color], you can set the opacity of the weighted color portion.
How to adjust the weight ratio of a single vertex
The weights can be adjusted to separate bound vertices from each other.
| No. | Images | Description |
| (1) |
|
Click on the yellow “Glue” tag displayed on the ArtMesh where the glue is set, or click on the corresponding glue object in the [Part(s)] palette to switch to Weight Adjustment mode. To adjust the weight ratio of a single vertex, use the [Tool Details] palette -> [Glue Weight A] or [Glue Weight B]. |
| (2) |
|
By dragging vertices bound by glue with the [Glue Weight A] or [Glue Weight B] icon selected, vertices can be separated from each other. Glue Weight B: |
| (3) |
|
Re-merge Glue Vertices Tool: TIPSNote that both functions will not be performed unless the vertices are within the brush size range. |
Glue compatibility
The compatibility of glue is the degree of effectiveness of the glue setting. Lowering the value of the compatibility weakens the effect of the glue.
Unlike weights, compatibility cannot be controlled vertex by vertex, but can be controlled by keying parameters.
Duplication of ArtMeshes with glue set
To duplicate ArtMeshes with glue set, select the target glue on the parts palette and copy it.
This operation also automatically selects and copies the ArtMeshes associated with the glue.
Pasting then duplicates the ArtMeshes while maintaining the glue settings.
Note: If only the ArtMesh is copied, the glue is not duplicated.
Delete Glue
Click the [Glue] icon in the Parts palette or on the View area to confirm that the glue you want to erase is selected.
Press [Delete] or [BackSpace] to delete.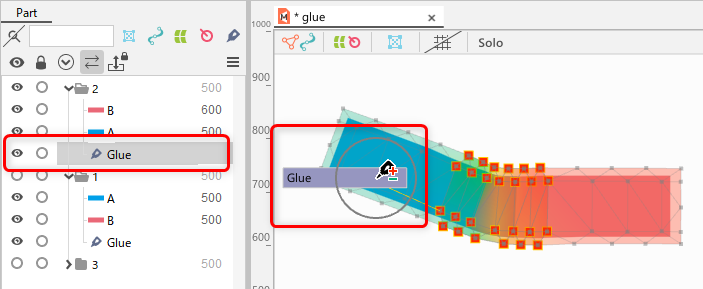
It can also be deleted by right-clicking the [Glue] icon in the View area and selecting [Delete].
Tips
If you use [Edit Mesh manually] to unbind vertices directly in an already glued ArtMesh, an empty glue will remain.
In such cases, the same procedure as above can be used to delete it.
Check Glue Status
You can check the glue status by clicking the [Glue Status On/Off Toggle] icon in the upper right corner of the View area.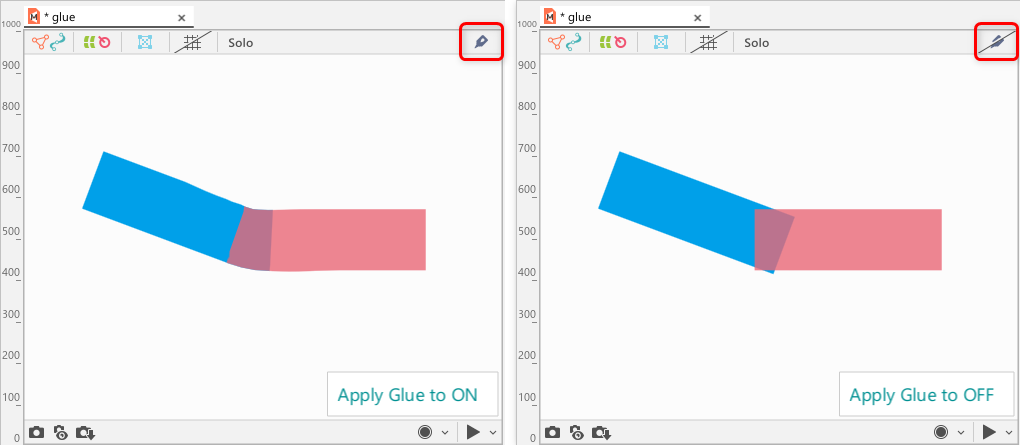
Load When Incorporating Glue
The following is a comparison of the computational load when “Glue,” “Rotation Deformer,” and “Warp Deformer” are incorporated, in the following order.
Warp Deformer > Rotation Deformer > Glue
Note: Except for extreme cases such as binding all vertices with glue
The glue can be used to simplify parameter and deformer structure settings to reduce the weight of model data.
(Example)
• An object with glue set with two parameter assignments has a lower load than an object with three parameter assignments.
• The load is lower when a deformer with two parameters is set in one level of glue than when a deformer with two parameters is set in two levels of glue.