Scene management and settings
Updated: 08/26/2025
Animation scenes are managed in the [Scene palette].
Scenes can be switched within the Animation Workspace with a single click.
It is possible to add more tabs by right-clicking on a tab -> Add Tab.
Scene Palette Structure and Operation
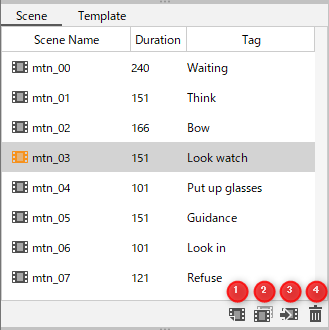
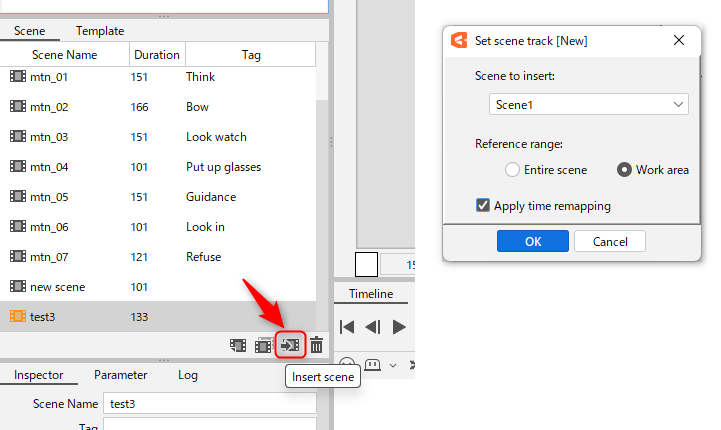
The [Scene palette] displays a list of the [Scene name], [Duration], and [Tag] of the scenes you have created.
| No. | Item | Details |
|---|---|---|
| 1 | Create new scene | Create a new scene. |
| 2 | Copy selected scene | Duplicate the selected scene. |
| 3 | Insert scene | Insert any scene into the selected scene. |
| 4 | Delete selected scene | Delete the selected scene. Undo is not available. |
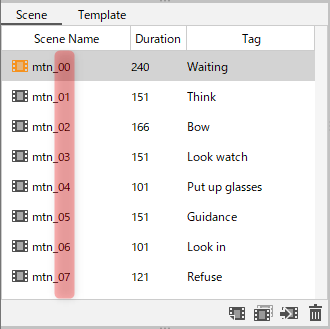
Scene Name
The scene name can be changed when creating a new scene, duplicating a scene, or from the tag input box in the [inspector palette].
Scene names can be reordered by inserting a number at the end.
Tag
Scenes can be tagged as well as named.
The tag can be changed when creating a new scene, duplicating a scene, or from the tag input box in the [inspector palette].
Specific movements can be explained in the input box.
Setting Scenes
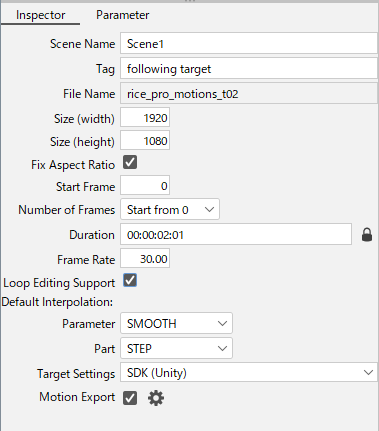
Scene settings can be viewed and edited in the [inspector palette].
The items that can be edited are as follows:
| Item | Details |
| Scene Name | Enter a scene name. |
| Tag | Enter a tag. |
| File Name | Display the name of the CAN3 file. |
| Size (width) | Enter the size. |
| Size (height) | |
| Fix Aspect Ratio | If checked, the aspect ratio of the size is fixed. |
| Start Frame | Change the starting position. |
| Number of frames | Select the start of the frame from [Start from 0] or [Start from 1]. The default value is [Start from 0]. |
| Duration | Enter the length of the scene. The value changes when switching between time display and frame count display. Click the Lock button to lock the length of the scene. Click the button again to unlock the length.  |
| Frame rate | Enter the frame rate. |
| Loop editing support | Enable/disable loop editing support. See the “Loop editing support” page for more information. |
| Default Interpolation: Parameters |
Within the Graph Editor, select the default curve for the parameter. |
| Default Interpolation: Part(s) |
Within the Graph Editor, select the default curve for the part. |
| Target Settings | Select the target version of the animation. For details, please refer to the “Select Target Version” page. |
| Motion export |
Enable/disable motion export. |
Tips
If you select [SDK (Unity)] in the Target Settings,
Bezier handles in the Graph Editor are converted to the optimal length for SDK embedding.
As a result, the overall shape of the graph may change to an unintended shape.
If you check the box after the animation is complete, please note the change in shape.
For details, please refer to the “Precautions when Embedding the SDK” page.
Scene Track
This function places a scene as a track within another scene.
Scenes can be used as materials or multiple scenes can be joined together to create an animation.
Scenes can also be nested by placing scenes containing scene tracks as scene tracks.
Apply a time remapping to the scene track to add effects such as speeding up, slowing down, reversing, or easing the playback of the referenced scene.
In addition, by placing the created scene as a scene track and applying a time remapping, the timing of the overall movement can be adjusted.
The scene track has a repeat function, allowing the referenced scene to be played back repeatedly.
It can be used to repeatedly display short scene materials, such as simple effects or screen superimpositions.
How to use the scene track
Create a new scene track:
- Move the indicator to the frame where you want to place the scene track.
- Click on the Insert scene button at the bottom of the Scene palette to open the settings dialog box.
- In the settings dialog box, you can set three settings: [Scene to insert], [Reference range], and [Apply Time Remapping].
These settings can also be changed after the track is created.
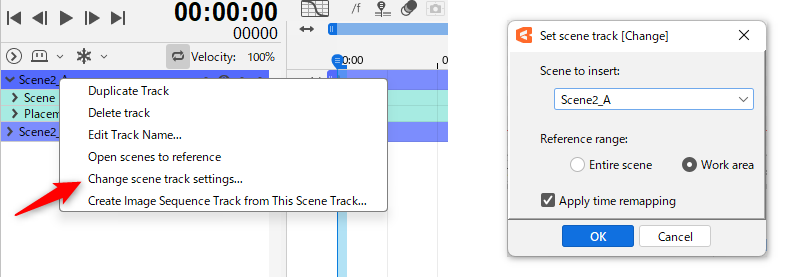
Change scene track settings and replace reference scenes:
- Right-click on a scene track and click [Change Scene Track Settings] to open the settings dialog box.
- The settings dialog box allows you to set [Scene to insert], [Reference range], and [Apply Time Remapping] in the same way as when creating a new scene.
- The reference scene can be replaced by changing the scene to be inserted.
In this case, keyframe information such as time remapping, movement, rotation, etc. will remain as is.
Repeat function:
Repeat is toggled using the [Repeat] button to the left of the track’s display button (eyeball button).
For a scene track with repeat set, drag the end point to the right to repeat playback of that section.
Other:
- By right-clicking on a scene track and selecting [Open Referenced Scene], you can navigate to the scene to which the scene track refers.
- By right-clicking on a scene track and selecting [Create image sequence track from scene track], you can add a scene track as an image sequence track, which can be used as a proxy for heavy drawing due to excessive use of scene tracks.
- The reference range of the scene can be trimmed.
When time remapping is not applied, drag the start and end points of the scene track to adjust the reference range.
When time remapping is applied, change the number of frames at the beginning and end of the time remapping keyframe to adjust the reference range. - When deleting a scene, if there is a scene track that references that scene, a confirmation dialog box will appear to alert you.
If the referenced scene is deleted, the name of the scene track becomes red text and the scene track cannot be displayed.
Setting details
- When specifying the scene to be inserted, you cannot specify the same scene as the one to be placed (or a scene that contains a scene track that references the scene to be placed).
- Audio output from scene tracks is not available when time remapping is applied.
- If you deactivate the application of time remapping, the time remapped items will be removed from the timeline, and any keyframes you have created will also be deleted.
Scene Import
The function to copy and add part or all of a scene from another animation file.
Reference information for materials such as models and image files is also copied as needed.
How to use scene import
With the animation file(s) open, drag and drop the animation file(s) into the project palette.
Alternatively, you can select an animation file from the [Animation] menu -> [Scene] -> [Import scene].
A confirmation dialog box for scene import execution will appear. Select [Yes] to proceed to the scene import dialog box for the animation file indicated in the title of the dialog box.
Select [No] to proceed to the next scene import of animation files, or [Cancel All] to cancel all scene import processes and exit.
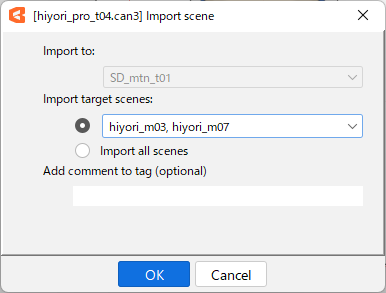
When the scene import settings dialog box opens, select the animation file (currently open in Editor) you want to import to in the [Import to] field, and the scene(s) you want to import in the [Import target scenes] field.
Setting details
- If the animation file to be imported has an unspecified target version or a broken link in the material, a confirmation and settings dialog boxes will open, respectively.
(This is the same as if you had opened the animation file in an editor.) - If you want to import all scenes at once, check the [Import All Scenes] checkbox to avoid having to specify each scene individually.
- If there is only one animation file currently open or only one scene to import, the [Import to] and [Import target scenes] items will remain fixed and selected.
- In the [Add Comment to Tag] section, you can add any comment following the tag of the imported scene.
(Please use this function when you want to identify scenes that have been imported and added with tags.)
Precautions
- Typically, scene import does not import anything other than what is in the scene.
- If there are broken links for materials, etc., the following actions must be taken and the import must be performed again.
- Repair broken links in the “Broken Link Confirmation Dialog” that opens when importing
- Fix broken links in the original file or delete tracks containing files with broken links
(However, material that is not in the scene will not be imported even if broken links are fixed.)