Parts palette
Updated: 11/14/2025
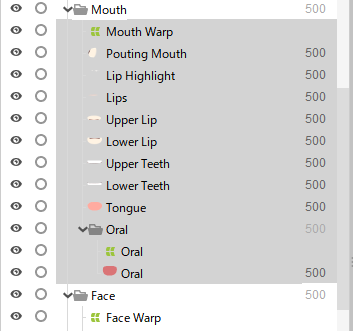
The Parts palette allows objects to be managed by classifying parts, such as bangs, eyes, and mouth, into broad categories.
It is displayed in the layer order of the imported PSD and is used to select, display, and lock objects and to check the parts to which they belong.
Tips
Groups of characters divided by their components (eyes, nose, etc.) are called “Parts.”
In the Parts palette, they are displayed as folder-like icons.
Parts palette
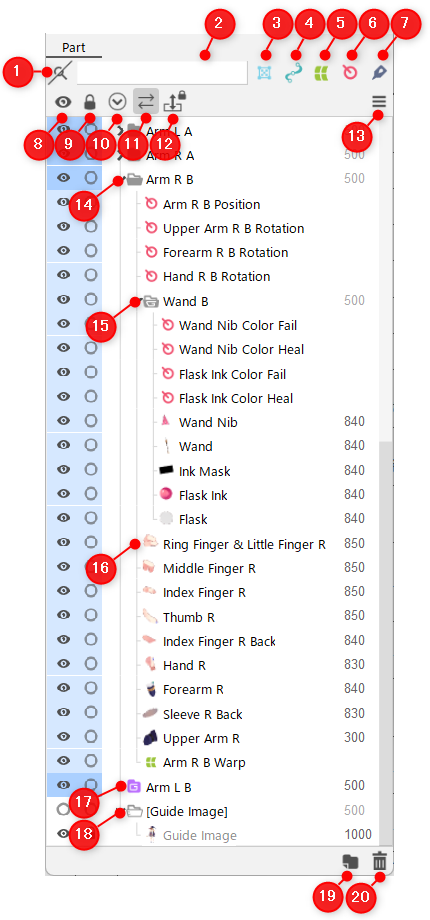
| Number | Item |
|---|---|
| 1 | Filter by Text Search by name or ID. |
| 2 | Input box for filtering by text |
| 3 | Show/hide ArtMeshes |
| 4 | Show/hide ArtPaths |
| 5 | Show/hide warp deformers |
| 6 | Show/hide rotation deformers |
| 7 | Show/hide glue |
| 8 | Show/hide all Show/hide all parts at once. |
| 9 | Lock/unlock all Lock/unlock all parts at once. |
| 10 | Expand/collapse all Expand/collapse all parts at once. |
| 11 | Expand tree when selected The tree opens in conjunction with the selection state of the deformer palette and View area. |
| 12 | Prohibit drag and drop Disable drag-and-drop operations. |
| 13 | Palette menu Displays the Parts palette menu. |
| 14 | Part(s) For details, please refer to “About parts.” |
| 15 | Draw order group See “Draw order group” for more information. |
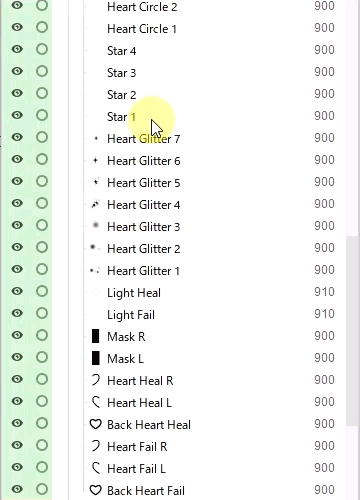
| 16 | Icons indicating object type/object name/draw order The icon at the top displays a thumbnail of the image in the case of an ArtMesh. |
| 17 | Offscreen drawing See “Offscreen drawing” for more information. |
| 18 | Guide image parts For details, please refer to “Guide image parts.” |
| 19 | Create new part |
| 20 | Delete selected parts/objects |
Individual operation:
Clicking each object’s button in the part allows you to show/hide, lock/unlock, and expand/collapse the object individually.
Multiple operations:
Dragging on the eye or key icons toggles between showing, hiding, locking, and unlocking multiple items at the same time.
You can also hold down the [Ctrl] key and click to show/hide or lock/unlock objects in the same hierarchy at once.
By clicking “Show/hide all” and “Lock/unlock all” while holding down the [Ctrl] key, you can toggle the visibility and lock states of all objects in the hierarchy, including child hierarchies.
Tips
If you cannot find an object in the Parts palette that should be present, check to see if you have hidden the object using the button in the upper right corner of the palette.

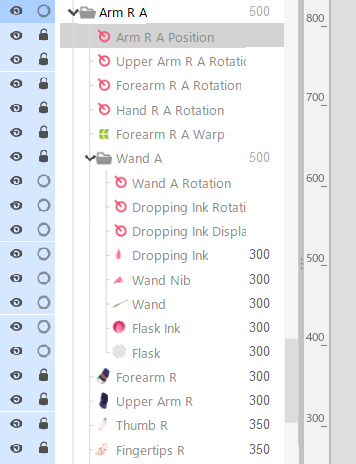
Lock objects
Locking an object means that the object cannot be selected in the View area.
However, operations can still be performed on the palette. See the table below for detailed information.
| Item | Possible operations |
|---|---|
| View area | Uneditable |
| Parts/Deformer palette | Move, establish a parent-child hierarchy, and open the right-click menu |
| Inspector palette | All items Note: It is also possible to disable editing by using [Lock the inspector when an object is locked]. |
Create a new part
Click on the [New Part] icon in the lower-right of the Parts palette to display the following dialog box, which allows you to create a new part.
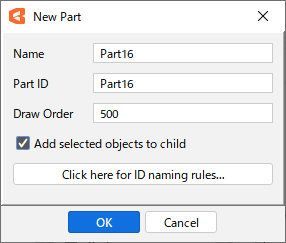
| Item | Details |
|---|---|
| Name | Parts can be given easy-to-understand names. |
| Part ID | IDs can be attached to parts. Only single-byte alphanumeric characters and _ (underscore) characters can be used. |
| Draw order | You can specify the order in which the parts are drawn. |
| Put selected objects into children | You can set whether the selected object is to be included in the children of the new part. If you open the dialog box in the following way, the checked state will be the default value. • By selecting multiple objects and clicking the [New Part] icon • By clicking the [New Part] icon while holding down [Shift] key • By executing the [New Part] shortcut |
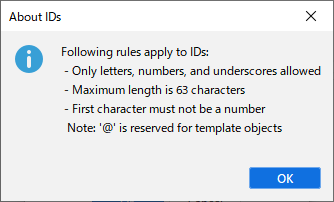
Click the [Show ID Rules] button to display the notes.
Delete parts or objects
Clicking the trash can icon after selecting a part or object allows you to delete it after a confirmation dialog box appears.
After selecting a part or object, press the [Delete] key or the [Back space] key to delete it without prompting a confirmation dialog box.
You can also set the shortcut [Delete Selected Parts (Child objects will remain)] to leave child objects when deleting a part.
Change draw order/parts belonging to palette
By selecting an object on the Parts palette and dragging and dropping it in the desired position, you can rearrange the order in the Parts palette and change the parts that belong to the palette.
Even if the order in the Parts palette is rearranged, the display on the canvas does not change because the value of the draw order has priority.
However, for ArtMeshes in the same drawing order, the one that is higher up in the Parts palette will also appear in the foreground on the canvas.
In addition, by enabling [Prohibit drag and drop], you can prevent accidental operations that unintentionally rearrange the order.
Context menu
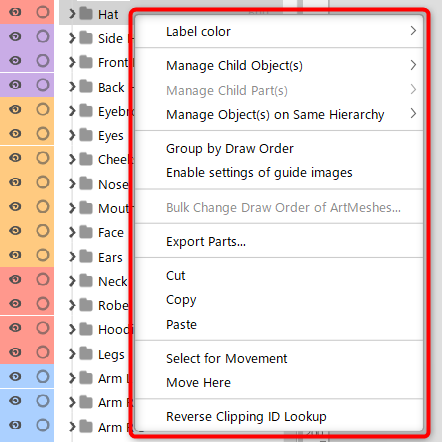
Label color
Color can be set for parts.
Right-click on the part -> click [Label Color] to select a color.
If you want to use a color other than those listed, you can adjust it in the [Label Color Settings] dialog box from the [Advanced Settings] menu.
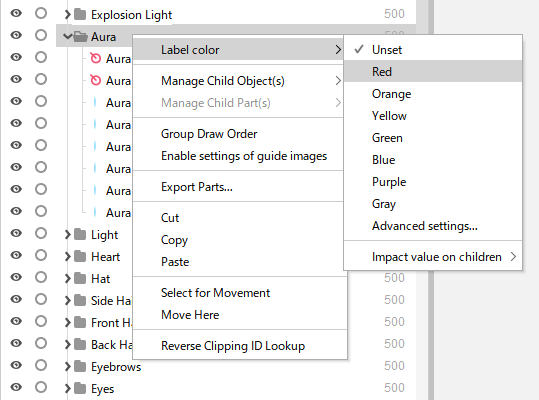 | 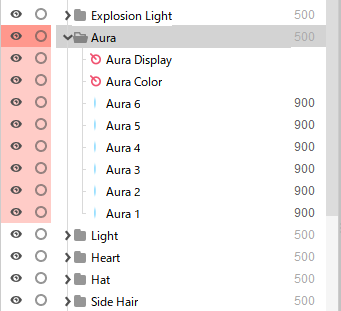 |
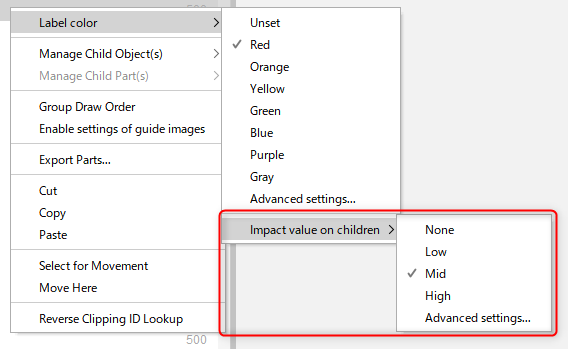
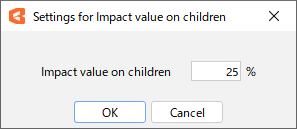
[Influence on Children] allows you to adjust the color shade of the parts and objects belonging to the children in the part.
In the Advanced Settings, you can fine-tune the settings from the [Child Influence Settings] dialog box.
 |  |
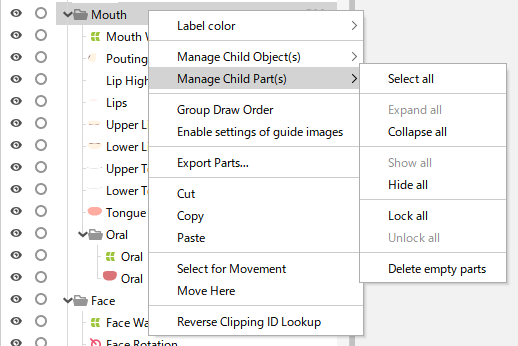
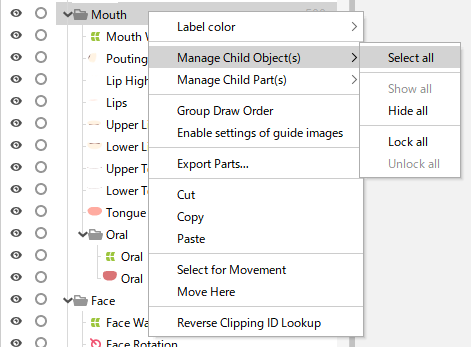
Operations on child objects/parts under child
With the part selected, right-click and select [Child Object Manipulation] and [Manipulation of Child Part(s)] from the context menu. You can select, expand, lock, and switch display states all at once.
You can also delete all empty parts with [Delete empty parts].
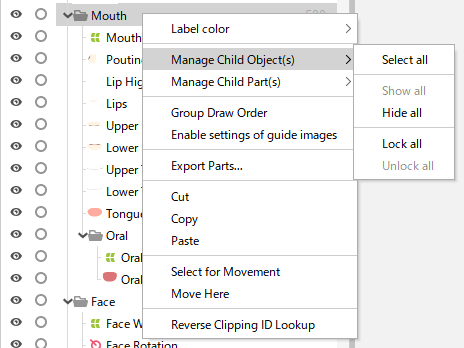 |  |
In [Child object manipulation], click [Select all] if you want to select all of the objects in the part at once.
The same operation can be performed by holding down the [Alt] key while clicking the part.
Also, if [Select all] is selected under [Manipulation of Child Part(s)], all parts are selected.
 |  |
Tips
Clicking while holding down the [Shift] key selects all objects between the first click and the last click, and clicking while holding down the [Ctrl] key selects only objects that are clicked.
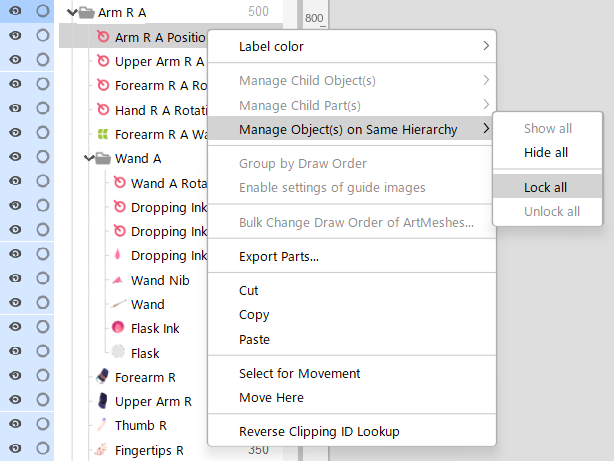
Operations on objects in the same hierarchy
By right-clicking on a selected object and selecting [Operations on objects in the same hierarchy] from the context menu, you can toggle the display state or lock on all objects in the same hierarchy at once.
The same operation can be performed by [Ctrl] + clicking the Show/Hide or Lock/Unlock icon.
 |  |
Group by Draw Order
You can group parts by right-clicking with the part selected and clicking [Group by Draw Order] from the context menu.
During grouping, the draw order set for the part itself is reflected in all objects within it.
Perform the same operation again to ungroup.
See “Draw order group” for more information.
Enable/disable guide image settings
Select a part and activate it to set it as a guide image part.
Select a guide image part and disable it to set it as a part.
Batch change of ArtMesh draw order
Select ArtMeshes and open the [Batch change of ArtMesh draw order] dialog box.
For details, see “About draw order.”
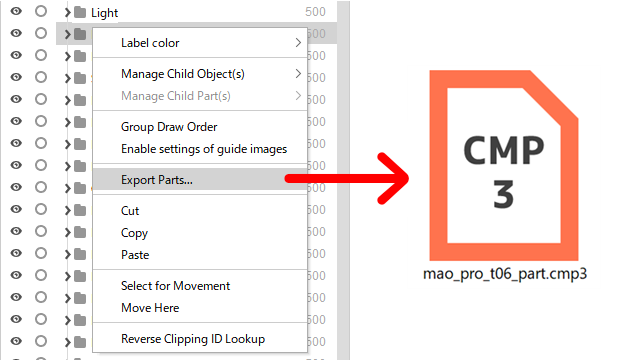
Export parts
CMO3, CAN3, and CMP3 files are backward compatible.
Please note the following points, as older files can be used with newer versions, but the reverse is not supported.
Model files, animation files, and part files created or saved with a newer version of the Editor may not open properly with older versions of the Editor and may become corrupted.
When you edit data created with a newer version of the Editor with an older version of the Editor, you do so at your own risk.
With the part selected, right-click on it and click on [Export Parts] from the context menu to save a portion of the model as part data (.cmp3).
This feature makes it possible to add only some parts from another model.
Cut
Cut only the selected object in the Parts palette.
Copy
Copy only the selected object in the Parts palette.
Paste
Paste in the Parts palette.
Subject to move / move here
In the Parts palette, select the object to be moved, select [Subject to move], and then click [Move here] to move it to the desired location.
Reverse clipping
Select an object that is using the selected object as a clipping mask.
See “Clipping Mask” for more information.
Palette menu
Click the menu icon in the upper right corner of the Parts palette to display the following menu.
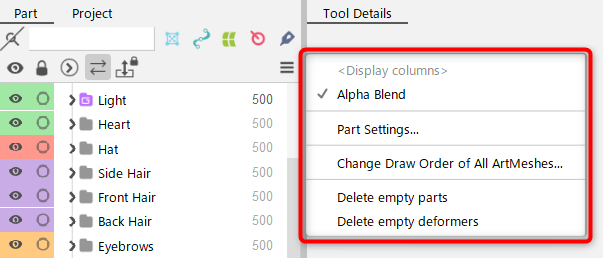
Show columns
You can show/hide icons on the Parts palette.
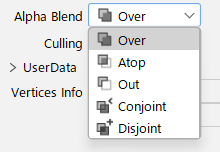
Alpha blend:
When this checkbox is selected, objects with the alpha blend set to anything other than “Over” will display an icon for the alpha blend you have set.
Parts Settings
You can check the list of parts.
You can change the [Name] and [Part ID].
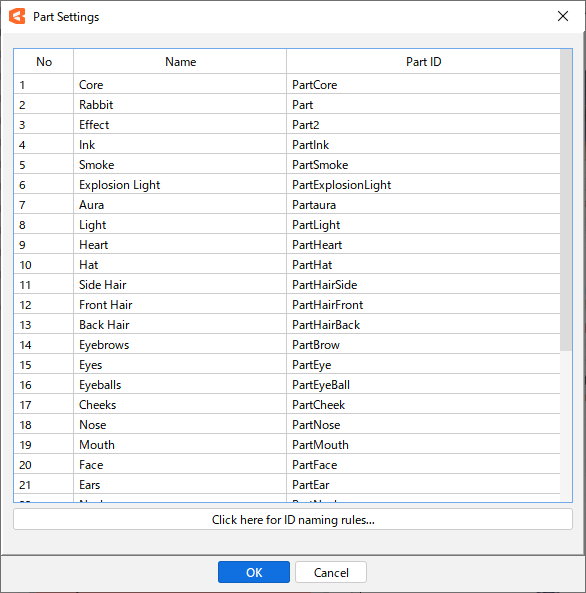
Tips
IDs are subject to several rules when being entered.
Check [Show ID Rules] at the bottom of the dialog box.
Change the draw order of all ArtMeshes
Opens the [Change the draw order of all ArtMeshes] dialog box.
For details, see “About draw order.”
Delete empty parts
Deletes all parts in the model being edited that do not have a single child element.
Parts that will be empty due to the above will also be deleted.
Delete empty deformers
Deletes all deformers in the model being edited that are not set as parent deformers by any object.
Deformers that will be empty due to the above will also be deleted.
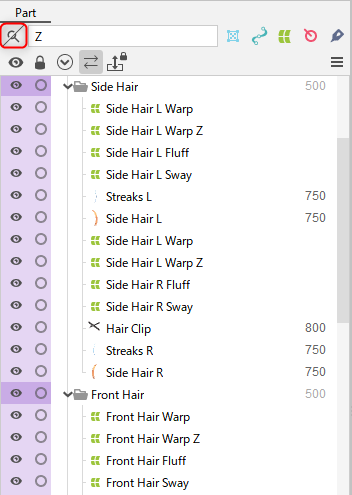
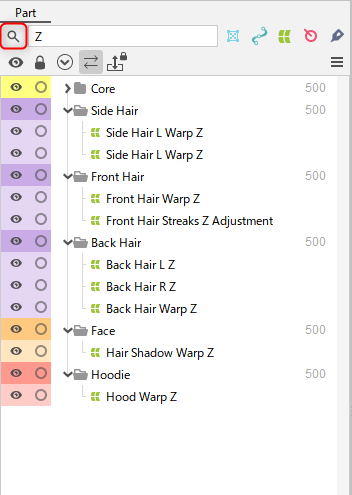
Filter by name/ID in the parts palette
Filtering can be done by entering a name or ID in the input box to the right of the magnifying glass button in the upper left corner of the Parts palette.
Enter the name or ID you want to filter in the input box and only objects containing that phrase will be displayed. (Affiliated parts are displayed regardless of the phrase.)
Click the magnifying glass button to temporarily remove filtering.
 |  |  |
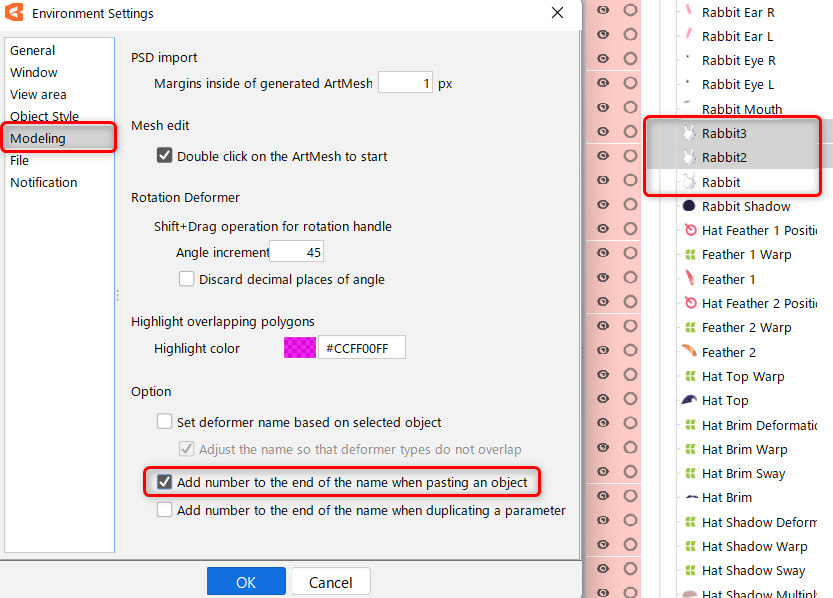
Number at the end of the name when pasting
When objects are copied and pasted in the Parts palette, a number can be added to the end of the name of the created object.
This setting can be enabled/disabled by doing the following.
Open the [File] menu -> [Environment settings].
Under [Modeling], select/clear the [Numbering at the end of names when pasting objects] check box.
For more information on environment settings, see “Environment settings.”