Tracking Function
Updated: 04/18/2022
This page describes the tracking function of the Cubism 4 AE Plugin.
The tracking function is a feature introduced in R5 beta1.
Tracking Function
The tracking function allows the layer to follow a specific ArtMesh.
Images and effects can follow the model’s movements, allowing for the efficient addition of rendering.
Precautions
When using the Cubism AE plug-in, After Effects may crash when the expression language setting is [Extend Script].
The project language setting should be set to [JavaScript].![]()
Note that when using Expression to reference the properties of a part/parameter, an expression error may be displayed.
See “About Expression” for more information.
Open Cubism Tracker
Open the [Live2D Cubism Renderer] effect on the model layer where the animation was set, and click [Tracking] -> [Open].![]()
When the [Cubism Tracker] panel opens, expand it so that you can see the entire panel (because the panel is displayed at a reduced size).![]()
If the panel does not appear, check the [Window] menu -> [Extensions] -> [Cubism Tracker].![]()
Cubism Tracker Panel
![]()
| No. | Function | Details |
|---|---|---|
| 1 | Panel menu | Open the Cubism Tracker panel menu. |
| 2 | Model layer selection | Select the model layer to be edited. All model layers in the project that have the Live2D Cubism Renderer set up can be selected. The working state is saved for each model layer. |
| 3 | Undo | Undo the previous action. |
| 4 | Redo | Redo the last undone action. |
| 5 | Export | Output/save a [.jsx] file that stores tracking information. After saving, the model layer name without the extension will be displayed. |
| 6 | Display of attach point name | Display/change the name of the selected attach point. Attach points can be selected from the menu on the right. (They can also be toggled using the Tab key.) |
| 7 | Deletion of attach points | Delete an attach point by clicking on the button while it is selected. You can also delete it using the Delete key. |
| 8 | Model View | The area where the model is displayed. Edit the attach point. |
| 9 | Attach point | Set an attach point on the ArtMesh you want to track. |
| 10 | Layer Transform | The layer’s Transform information is reflected in the Model View. |
| 11 | Transparent Grid | Toggles the grid transparency On/Off. |
| 12 | APPLY | Clicking the button with an attach point selected applies tracking to the selected layer. |
| 13 | Deactivation of tracking | Deactivates tracking of the selected layer. |
Set Attach Points
Set an attach point on the ArtMesh you want to track.
Hover the mouse over the Model View to change the color of the ArtMesh, then drag to set the attach point.
Attach points can be positioned and oriented by setting a start point and an end point.
(Orientation is indicated by an arrow in the center of the line connecting the start and end points.)
The start and end points of the attach points should fit into the ArtMesh to be tracked.![]()
You can also set a start point and an end point for each of the two ArtMeshes.![]()
Holding down [Alt] while moving an attach point will place it only within the ArtMesh that was set before the move.
ArtMeshes can be placed even if they are not visible in the current frame or are hidden behind other ArtMeshes.![]()
Save Tracking Information
When you have completed setting the attach points, click the [Export] button to save the tracking information.
Tracking information is output as a [.jsx] file.![]()
Once you output/save a [.jsx] file in [Export], the model layer name without the extension will be displayed.![]()
If you want to change the export destination, select [Export As…] from the menu on the right of the button to save the file under another name.![]()
Once the export is complete, a [.jsx] file containing the tracking information will be saved.
Be careful not to delete the [.jsx] file.![]()
Multiple attach points can be set, and can be selected from a list by clicking the ▼ button (1).
(Selecting an attach point turns the set ArtMesh red.)![]()
![]()
If you re-edit on the Cubism Tracker panel, re-export to save your settings.![]()
Apply Tracking
Select the layer you want to track (1) and the “attach point” (2) in the Cubism Tracker panel.![]()
Click the [APPLY] button (3) in the Cubism Tracker panel to add effects and expressions to control tracking on the selected layer.![]()
The target layer could be tracked to an ArtMesh with attach points set.![]()
Precautions
- When tracking a model that is on a 3D layer, the model to be applied must also be on a 3D layer.
- The [.jsx] file is added to the composition at Apply time.
Be careful not to delete it, as it is required for encoding with Adobe Media Encoder.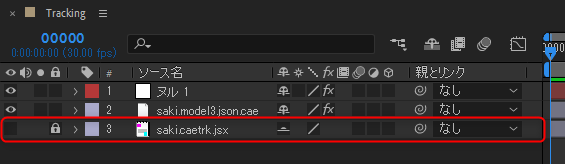
Update Tracking Information
Tracking information is created for the motion of the model at the time of export.
Re-export is required when the motion is changed.![]()
Update and save the tracking settings by clicking on [Tracking] -> [Export] in the [Live2D Cubism Renderer] effect.![]()
If you want to adjust only the motion, this is a convenient feature because you can update the tracking even when the Cubism Tracker panel is closed.
Example of Use Utilizing a Null Layer
Tracking can be applied to a null layer for efficient editing.
For example, it can handle only some parameters or be flexible to changes in structure.
Null layer and parent/child attachment
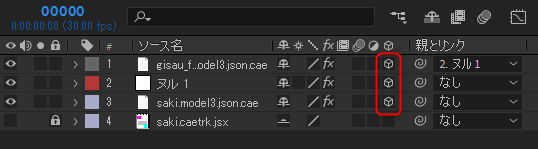
Parent and child another layer (2) that you want to track to the null layer (1) to which you have applied tracking information.
When you want to track multiple layers, for example, you only need to adjust the parent null layer, which makes later editing easier.![]()
![]()
This is an example of parent-child attachment of a Cubism model layer to a null layer.![]()
Link the coordinates of the null layer with the expression
If you want to track an effect or something similar, it will be easier to handle if you link the “property that handles coordinates in the effect” with the coordinates of the “null layer to which tracking is applied.”
This is an example of linking particles to the coordinates of a null layer by expression.
TIPS
The model to be tracked and its target layer should be placed in the same composition.
Additional Adjustments
More detailed settings can be made in [Cubism Tracking Control] under the Effects Control panel.![]()
(1) Tracking Rate
Adjusts the impact of tracking.
0% to be untracked.
(2) Rotation
Sets whether rotation is tracked or not.
Unchecking the box will prevent rotation.
(3) Offset: Origin
Adjusts the tracking position between the start and end of the attach point.
The default is to track to the starting point, so if you want to track to the end point (tip), set to 100%.
(5) Offset: Angle
Adjusts the orientation specified by the attach point.
(6) Time: Delay [sec]
Adjusts the delay time to start tracking.
It can be utilized for expressions such as following late.
(7) Time: Out of Range
Start/End frame:
The same values as the start and end frames of tracking are used for position and rotation.
Use Keyframes:
Keyframe values are used for position and rotation.
(8) Model Layer
Select the Model Layer to be referenced during tracking.
(9) Reset settings
Reset the [Cubism Tracking Control] settings.