Pose Settings
Updated: 07/03/2020
Create a settings file in JSON format to reflect the arm switching mechanism created in the model and motion.
[Note on pose setting]
The curve types in the “Live2D Parts Visibility” property in the animation data must be set to Step.
(Default is set to Step.)
Step
If another curve type is set, there is a possibility of unintended movement.
Add Pose Setting
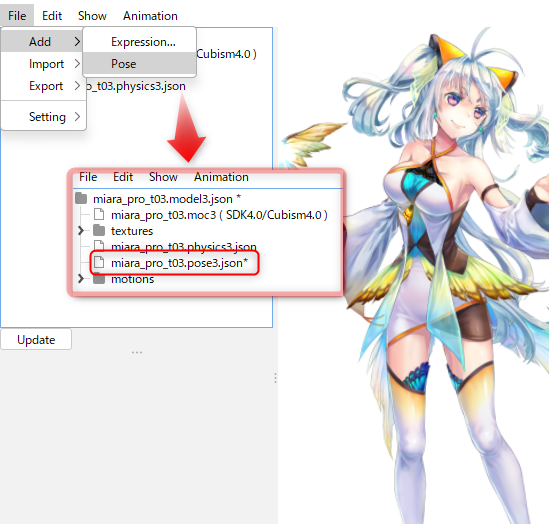
Click [Menu Bar] -> [File] -> [Add] -> [Pose].
A pose setting called “pose3.json” will be added.
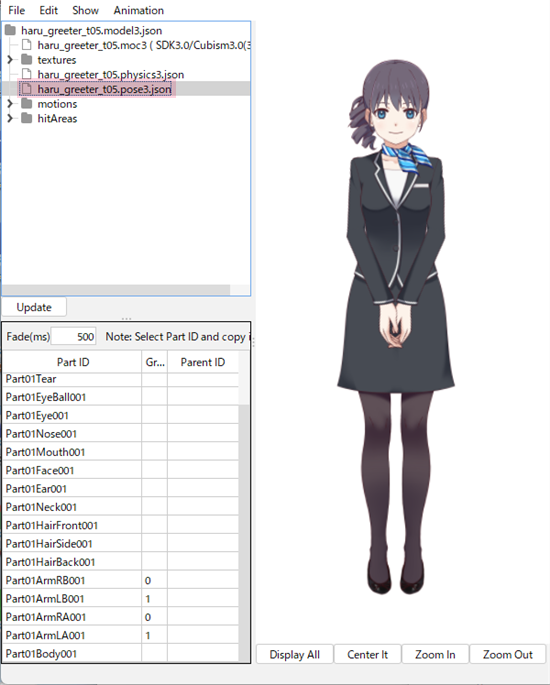
Pose Group Settings
The list of part IDs that can be seen by clicking on pose.json are all the part IDs created by cmo3.
Even if you’ve created multiple MOC3 files for different outfits, you can create a single pose settings file that can be used in common.
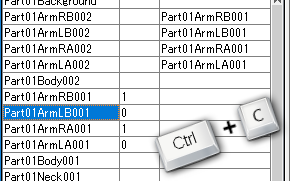
Find the arm part ID and set the group No.
When multiple parts belong to the same group number, only one of the parts will be displayed for the group.
The parts configuration of the sample is as follows, so the group configuration is as shown in the above image.
- Part01ArmLA001 -> Left Arm Arm Set A Costume 1 -> 0
- Part01ArmRA001 -> Right Arm Arm Set A Costume 1 -> 1
- Part01ArmLB001 -> Left Arm Arm Set B Costume 1 -> 0
- Part01ArmRB001 -> Right Arm Arm Set B Costume 1 -> 1
The arms in the sample are made with separate parts for the left arm and the right arm, but for a simple configuration where parts are made for each set of arms, set up as follows.
- Part01ArmA001 -> Arm Set A Costume 1 -> 0
- Part01ArmB001 -> Arm Set B Costume 1 -> 0
Once the settings are made, load and playback the motion corresponding to the arm changeover.
If the setting is successful, the arms will switch.
See “Create Motion with Pose Switching” for instructions on how to set up motion for arm transitions in the Animator.
Pose Parent-child Settings
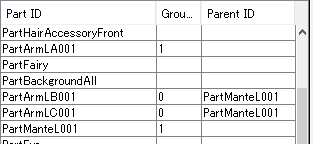
Set “parent ID” for the arm parts of other outfits other than the arm parts you set to show or hide in motion to create a parent-child hierarchy.
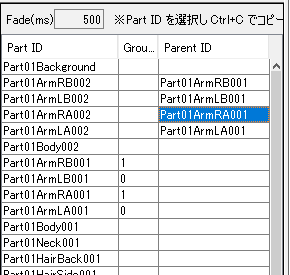
Arm parts with a parent set in the parent ID field will have the same switching behavior as their parent parts.
The parts configuration of the sample is as follows, so the group configuration is as shown in the above image.
- Part01ArmLA002 -> Left Arm Arm Set A Costume 2 -> Part01ArmLA001
- Part01ArmRA002 -> Right Arm Arm Set A Costume 2 -> Part01ArmRA001
- Part01ArmLB002 -> Left Arm Arm Set B Costume 2 -> Part01ArmLB001
- Part01ArmRB002 -> Right Arm Arm Set B Costume 2 -> Part01ArmRB001
For the simple configuration described earlier, where parts are made for each set of arms, set up as follows.
- Part01ArmA002 -> Arm Set A Costume 2 -> Part01ArmA001
- Part01ArmB002 -> Arm Set B Costume 2 -> Part01ArmB001
Tips
Select the part ID you want to set as the parent and press the “Ctrl” and “C” keys simultaneously to copy the text of the ID.
Tips
If you want to register multiple parent IDs, first consider whether parent-child reversal is possible.
It may be possible to represent it in Viewer by swapping the parent and child.
Before replacement
Arm A -> No Costume
Arm B -> Costume Available
Arm C -> Costume Available
After replacement
Arm A
Costume Available -> Arm B
Costume Available -> Arm C
At this time, set the number of the child’s pose setting to be smaller.
In the Framework for processing poses, the calculation is performed starting with the lowest number.
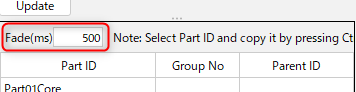
Set Pose Fade Time
The “Fade(ms)” slider allows you to set the fade time for switching poses.
The default value is 500.
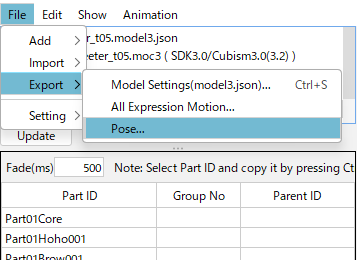
Export JSON Settings Files
You can export a JSON settings file by clicking on the [File] menu -> [Export] -> [Pose Settings].