List of shortcut keys
Updated: 05/14/2026
This section describes how to use the Shortcuts Settings dialog box and the initial settings.
How to edit shortcut keys
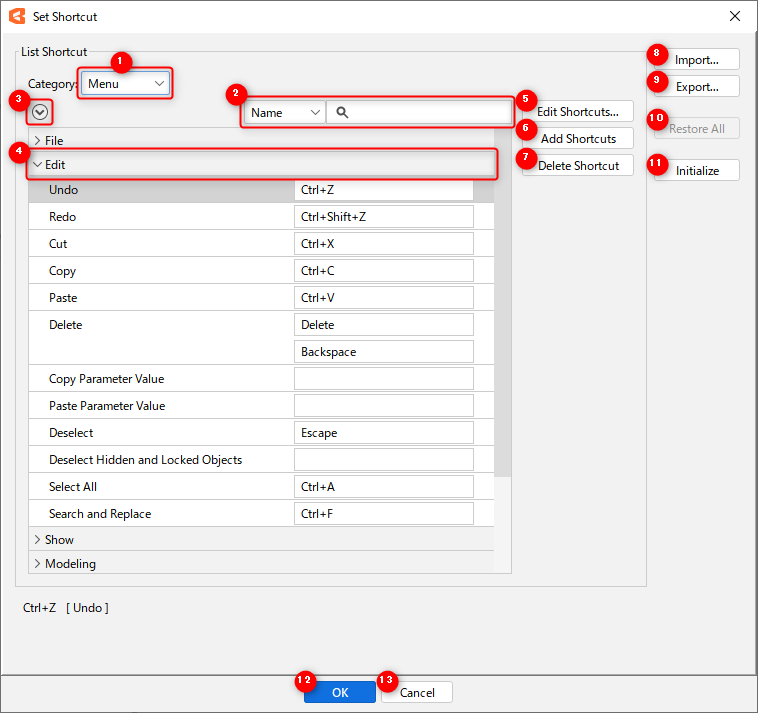
Click the [File] menu -> [Keyboard Shortcuts] to open the Shortcuts Settings dialog box.
In the Shortcuts Settings dialog box, you can customize all shortcut keys to your preference, including the default ones.
| Number | Item | Description |
|---|---|---|
| (1) | Category switching | Use the combo box to switch between categories. |
| (2) | Search box | Filter the items to be set by [Name] or [key]. |
| (3) | Expand/collapse all | Expand or collapse all groups. |
| (4) | Group | Expand or collapse a group by clicking on the open/close button on the far left or double-clicking on anything else. |
| (5) | Edit Shortcut | Open the Shortcuts Settings dialog box. |
| (6) | Add Shortcut | Add a shortcut. |
| (7) | Delete Shortcut | Delete the currently selected shortcut. If shortcuts have been added, delete those lines as well. |
| (8) | Import | Load the saved shortcut key settings. |
| (9) | Export | Export shortcut key settings. |
| (10) | Restore all | Restore the settings as they were before the edit (when you opened the dialog box). |
| (11) | Initialization | Reset all shortcut keys to their initial state. |
| (12) | OK | Save the configuration changes and close the settings dialog box. |
| (13) | Cancel | Close the settings dialog box without saving the configuration changes. |
How to search for an item
Each category includes the following items.
Menu:
Items included in the menu
Tools:
Items displayed on the toolbar
View area:
Items related to the View area
Palette:
Items displayed on any of the palettes
If you select [Name] or [Key] from the list on the left of the search box and type a letter in the search box, you can filter by each item.
You can also perform AND searches by separating terms with spaces.
You can reset your search by deleting all characters in the search box or by clicking the X button on the right.
How to set up shortcuts
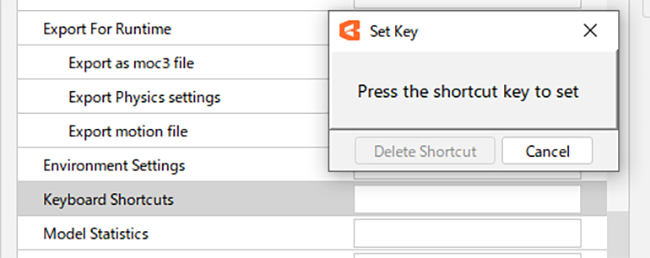
By clicking on the entry field for the shortcut you want to edit or the [Edit Shortcut] button, the Shortcuts Settings dialog box will appear.
In this state, press the shortcut key you want to set.
(If there are duplicate keys, a warning will be displayed. Please change to another combination as it may not work properly.)
Tips
The shortcut keys in Cubism Editor treat the numeric keys at the top of the keyboard (*1) and the numeric keys in the numeric keypad section as separate keys.
For example, if you set [Shift] + [1] as a shortcut, the differences are as follows.
- If you use the number keys at the top of the keyboard, [Shift] + [1] will be displayed.
- If you use the numeric keypad, [NumPad-1] will be displayed.
*1. For 106/109 keyboards, this refers to the numeric keys from 1 to 0, located to the upper left of the Q key of the alphabet.
Tips
Configuration files can be shared between Windows and Mac.
Precautions
Please note that the initialization must be performed once by pressing the [Initialize] button in order to reflect the addition.
List of shortcut keys
Category: Menu
File
| Item | Initial setting | Details |
|---|---|---|
| New | — | — |
| Model | [Ctrl]+[N] | Create a new model file. |
| Animation | [Ctrl]+[Shift]+[N] | Create a new animation file. |
| Open | [Ctrl]+[O] | Open a file that has already been created. |
| Open Recent File | [Ctrl]+[Shift]+[O] | Open a previously opened file. |
| Close | [Ctrl]+[W] | Close the selected tab. |
| Close all | Close all currently open files. | |
| Save | [Ctrl]+[S] | Save the currently displayed file. |
| Save as | [Ctrl]+[Shift]+[S] | Save the currently displayed file with a different file name. |
| Image and video export | — | — |
| Images | Export the currently displayed model as a PNG file. | |
| GIF animation | Export the currently displayed scene as a GIF animation. | |
| Still image (sequential number) | [Ctrl]+[I] | Export the currently displayed scene as a sequentially numbered still image. |
| PSD image (beta) | [Ctrl]+[P] | Export a PSD of the source image of the model. |
| Video | [Ctrl]+[Shift]+[M] | Export the currently displayed scene as a video. |
| Export Embedded File | — | — |
| Export as MOC3 file | [Ctrl]+[Alt]+[S] | Export the currently displayed model as a MOC3 file. |
| Export Physics settings | Export the physics settings for the currently displayed model. | |
| Exporting motion files | [Ctrl]+[Alt]+[Shift]+[S] | Export the currently displayed animation data as a motion file. |
| Environment settings | Open the Environment settings dialog box. | |
| Keyboard Shortcuts | [Ctrl]+[Alt]+[Shift]+[K] | Open the Keyboard Shortcuts Settings dialog box. |
| External application integration settings | Open the external application integration settings dialog box. | |
| Model Statistics | Display the model statistics. | |
| Canvas settings | Open the Canvas Settings dialog box. | |
| Resize Model | Resize the model. | |
| Exit | [Alt]+[F4] | Exit Cubism Editor. |
Edit
| Item | Initial setting | Details |
|---|---|---|
| Undo | [Ctrl]+[Z] | Restores the state immediately before the last operation. |
| Redo | [Ctrl]+[Y] | Executes the operation performed before going back one step using [Undo]. |
| [Ctrl]+[Shift]+[Z] | ||
| Cut | [Ctrl]+[X] | Cut the selected element. |
| Copy | [Ctrl]+[C] | Copy the selected element. |
| Paste | [Ctrl]+[V] | Paste the copied element. |
| Delete | [Delete] | Delete the selected element. |
| [Backspace] | ||
| Copy parameter values | Copy the parameter values of the currently displayed model. | |
| Paste parameter values | Paste the model parameter values. | |
| Deselect | [Escape] | Deselect. |
| Deselect Hide and Lock | Deselects only the currently selected objects that are hidden and locked. | |
| Select All | [Ctrl]+[A] | Select all. |
| Search and Replace | [Ctrl]+[F] | Open the Search and Replace dialog box. |
Display
| Item | Initial setting | Details |
|---|---|---|
| Grid | — | — |
| Show Grid (Modeling View) | Toggle between showing and hiding the grid. | |
| Grid settings | Open the Grid Settings dialog box. | |
| Guide Lines | — | — |
| Show Guide Lines (Modeling View) | Toggle between showing and hiding the Guide Lines (Modeling View). | |
| Show Guide Line (Animation View) | Toggle between showing and hiding the Guide Lines (Animation View). | |
| Add guide lines in the center | Add horizontal and vertical guide lines to the center of the canvas. | |
| Add a guide line to the coordinates of the selected vertex | Add a guide line to the coordinates of the selected vertex. | |
| Guide Line (Modeling View) settings | Open the Guide Line (Modeling View) Settings dialog box. | |
| Snap Moving Vertices to Guide Line | The moving vertex is adsorbed to the guide line. | |
| Show ArtMesh vertices | Show/hide the vertices of the ArtMesh. | |
| Show ArtMesh’s Vertex Number | Show the ArtMesh’s vertex number. | |
| Highlight Vertices Which Stick Out From the Parent Deformer | Highlights vertices that extend beyond the parent deformer. | |
| Highlight Deformer’s Child Elements | [Ctrl]+[Shift]+[D] | Highlight child elements of the selected deformer. |
| Highlight overlapping polygons | Highlight overlapping polygons in a single ArtMesh with advanced blend mode set. | |
| Show Child Elements When Resizing Warp Deformer | Toggle between highlighting/hiding of child elements during warp deformer resizing. | |
| Display name of object at cursor position | Displays the name of the object at the cursor position on the View. | |
| Hide selected state | Hide the selection state of objects and the UI of ArtMeshes, ArtPaths, and deformers. | |
| Focus on the Selected Object | [F] | Focuses on the selected object. |
| Display Type | — | — |
| Model Guide Image | Switch the display method to the Model Guide Image. | |
| Texture Atlas | Switch the display method to the Texture Atlas. | |
| Show Quality | — | — |
| Full Scale | Switch the Show Quality to Full Scale. | |
| 1/2 | Switch the Show Quality to 1/2. | |
| 1/4 | Switch the Show Quality to 1/4. | |
| 1/8 | Switch the Show Quality to 1/8. | |
| Show/Hide Bounding Box | Toggle between showing and hiding the bounding box. | |
| Onion Skin | — | — |
| Modeling View | Enable onion skin in the Modeling View. | |
| Animation View | Enable onion skin in the Animation View. | |
| Form Animation View | Enable onion skin in the Form Animation View. | |
| Onion skin settings | Open the Onion Skin Settings dialog box. | |
| Track Trajectory | — | — |
| Animation View | Toggles between on and off for Track Trajectory. | |
| Track Trajectory Settings | Opens the Track Trajectory Settings dialog box. |
Modeling
| Item | Initial setting | Details |
|---|---|---|
| Deformer | — | — |
| Create Warp Deformer | Create a warp deformer. | |
| New Rotation Deformer | Create a rotation deformer. | |
| Auto generation of deformer | Open the Auto generation of deformer dialog box. | |
| Select Deformer for Parent | [Ctrl]+[D] | Select the parent deformer of the selected element. |
| Select deformer child elements | [Ctrl]+[Alt]+[D] | Select the child elements of the selected deformer. |
| Delete Deformer and its Content | [Ctrl]+[Delete] | Delete the selected deformer including its child elements. |
| Apply deformer to child elements | Delete the selected deformer and reflect the parameters, opacity, multiply color, and screen color to the child elements. | |
| Validate Deformer | Open the Deformer Validation dialog box. | |
| Align the angle of the bounding box | The bounding box deforms to match the angle of the warp deformer. | |
| Texture | — | — |
| Mesh edit | [Ctrl]+[E] | Switch to the Mesh Edit mode. |
| Automatic Mesh generator | [Ctrl]+[Shift]+[A] | Opens the Automatic Mesh generator dialog box. |
| Edit Texture Atlas | [Ctrl]+[T] | Open the Edit Texture Atlas dialog box. If selected for the first time, a Texture Atlas will be created. |
| Switch between Source Image and Texture Atlas | [T] | Toggle between the source image view and the texture atlas view. |
| Apply Texture Atlas to Source Image (Beta) | The state of the texture atlas is reflected in the source image. | |
| Parameters | — | — |
| Reset to default values | [Ctrl]+[1] | Reset all parameters to their default values. |
| Lock default forms | [Ctrl] + [Shift] + [1] | Lock the keyform set to the default value in the parameter. |
| Synchronize parameter values across tabs | Synchronizes common parameter values of the displayed model. | |
| Parameter Settings | Open the Parameter Settings dialog box. | |
| Parameter group settings | Open the Parameter Group Settings dialog box. | |
| Set all parameter values as default | Set the current values of all parameters as default. | |
| Automatic Generation of Four Corner Forms | [Ctrl]+[4] | Automatically generates the shapes of the four corners of the combined parameters. |
| Motion Mirroring | Flip the movement of the selected parameter. | |
| Auto generation of facial motion | — | — |
| Create a face deformer | Opens the Auto generation of facial deformer dialog box. | |
| Generate facial motion | Opens the Auto generation of facial motion dialog box. | |
| Auto generation of sway motion | Open the Auto generation of sway motion dialog box. | |
| Application of 3D rotation expression | Open the dialog box for Application of 3D rotation expression. | |
| Multiple Keys Editing | Open the Multiple Keys Editing dialog box. | |
| Batch Reflect | Open the [Batch Reflect] dialog box. | |
| Select object associated with key | Select the object associated with the parameter key. | |
| Arrange Parameter Configuration for Selected Object | Align the parameter configuration of selected objects. | |
| Settings for eye blinking and lip-sync | Open the Settings for Eye Blinking and Lip-sync dialog box. | |
| Extended Interpolation | Open the Extended Interpolation dialog box. | |
| Limit settings for blend shape weights | Open the Limit settings for blend shape weights dialog box. | |
| Motion-sync Settings | Opens the Motion-sync Settings dialog box. | |
| Validation of mapped parameters | Opens the Validation of mapped parameters dialog box. | |
| ArtMesh | — | — |
| Change the draw order of all ArtMeshes | Opens the [Change the draw order of all ArtMeshes] dialog box. | |
| Batch change of ArtMesh draw order | Opens the [Batch change of ArtMesh draw order] dialog box. | |
| Create ArtMesh for collision detection | Generate an ArtMesh for the collision detection. | |
| ArtPath | — | — |
| ArtPath Auto Generation | — | — |
| Automatic generation from a single ArtMesh | Automatically generate an ArtPath around the perimeter of a single selected ArtMesh. | |
| Automatic generation from multiple ArtMeshes | Automatically generate an ArtPath around the perimeter of multiple selected ArtMeshes. | |
| Highlight elements of ArtMesh | — | — |
| Highlight color | Reflect the color of the selected line ArtMesh on the ArtPath. | |
| Highlight opacity | Reflect the opacity of the selected line ArtMesh on the ArtPath. | |
| Highlight line width | Reflect the line width of the selected line ArtMesh on the ArtPath. | |
| Highlight everything | Reflect the color, opacity, and line width of the selected line ArtMesh on the ArtPath. | |
| Follow along the line of the ArtMesh | The control points are automatically repositioned to follow the line ArtMesh. | |
| Follow along the filled ArtMesh | The control points are automatically repositioned to align with the filled ArtMesh. | |
| Add control points to align with the ArtMesh | Control points are automatically added where they are missing. | |
| Add a point in the middle of all control points | Add a point in the middle of all control points in the ArtPath. | |
| Add a point in the middle of the selected control points | Add a point in the middle of the selected control points. | |
| Open ArtPath Auto Generation Dialog | Open the ArtPath Auto Generation Dialog. | |
| Create Deform Paths from ArtPath | Automatically generate control points for the deform paths at the positions of the control points of the selected ArtPath. | |
| Bake deformation of ArtMesh to ArtPath | Bake in the shape so that the ArtPath follows the deformation applied to the selected ArtMesh. | |
| Tracking Settings | — | — |
| Follow all | Set tracking for all control points in the selected ArtPath. | |
| Cancel all | Release tracking for all control points in the selected ArtPath. | |
| Follow selected control points | Set tracking for the selected control points. | |
| Release selected control point | Release tracking for the selected control points. | |
| Open ArtPath Brush Settings dialog box | Open the ArtPath Brush Settings dialog box. | |
| Glue | — | — |
| Glue On/Off | Toggle between on and off for glue. | |
| Skinning | — | — |
| Skinning | Set skinning on the selected ArtMesh. | |
| Use deform paths for Skinning | Generate skinning from deform paths. | |
| Create parameters for rotation deformer | Generate parameters together in a rotation deformer used for skinning. | |
| Edit Form | — | — |
| Copy Form | [Ctrl]+[Shift]+[C] | Copy polygon and warp deformer forms. |
| Paste Form | [Ctrl]+[Shift]+[V] | Paste polygon and warp deformer forms. |
| Blend Form | [Ctrl]+[Shift]+[B] | Blend polygon and warp deformer forms. |
| Options for Paste Form Special | Open the Options for Paste Form Special dialog box. | |
| Confirm target for pasting multiple forms | When copying/pasting a form with multiple objects selected, the [Where to apply form pasting] dialog box will appear. Note: If the menu is disabled, the dialog box will not appear. | |
| Flip | Flip the selected object. | |
| Zoom In/Zoom Out Specifying Magnification | Scale the selected object by a specified magnification. | |
| Shape warp deformer along Bezier handles | Adjust the division points of the selected warp deformer so that it is smooth based on the Bezier handle position. | |
| Extend warp deformer so that child does not stick out | If a child element extends beyond the parent deformer, the warp deformer is automatically extended to match the child element’s keyform. | |
| Revert to original | Restore the selected object to its original shape. | |
| Update original shape of deformer | Manually update the original shape of the selected deformer. | |
| Delete original shape of all deformers | Delete all “Original shapes” of recorded deformers. | |
| Temporary deform tool | — | — |
| Zoom In/Zoom Out | Start the Temporary deform tool zooming in and out. | |
| Rotation | Start the rotation of the Temporary deform tool. | |
| Free transform | Start the free transform of the Temporary deform tool. | |
| Perspective | Start the perspective deformation of the Temporary deform tool. | |
| Distort | Start the distortion deformation of the Temporary deform tool. | |
| Temporary warp deformation | Start a temporary warp deformation. | |
| Add columns | Increase the number of columns in the lattice during temporary warp deformation. | |
| Remove columns | Reduce the number of columns in the lattice during temporary warp deformation. | |
| Add rows | Increase the number of rows in the lattice during temporary warp deformation. | |
| Remove rows | Reduce the number of rows in the lattice during temporary warp deformation. | |
| Temporary path deformation | Start a temporary path deformation. | |
| Deselect the Temporary deform tool | Release the temporary deform tool. | |
| Clipping ID | — | — |
| Select clipping mask | Executing this shortcut key with an object selected will select the object masking it. (e.g., black eye is selected -> shortcut key is executed -> white eye is selected) | |
| Reverse clipping | Executing this shortcut key with an object selected will select the object clipping to it. (e.g., white eye is selected -> shortcut key is executed -> black eye is selected) | |
| Model template | — | — |
| Apply Template | Open the Model template selection dialog box. | |
| Export Template | Open the model template export dialog box. | |
| Lock | — | — |
| Lock/unlock selected objects | [Ctrl]+[2] | Lock/unlock the selected objects. |
| Lock the unselected objects | [Ctrl]+[Shift]+[2] | Lock the unselected objects. |
| Unlock all | [Ctrl]+[Alt]+[2] | Unlock all objects. |
| Show/Hide | — | — |
| Show/hide selected objects | [Ctrl]+[3] | Toggle between showing and hiding the selected objects. |
| Hide the unselected objects | [Ctrl]+[Shift]+[3] | Hide the objects that are not selected. |
| Show all | [Ctrl]+[Alt]+[3] | Display all objects. |
| Restore to Latest Visibility Status | Restore the previous display state of all objects. | |
| Convert Model ID | Open the Model ID Conversion Settings dialog box. | |
| Bulk setting of model objects | — | — |
| Export | Open the Export Model Objects dialog box. | |
| Import | Open the Import Model Objects dialog box. | |
| Bulk setting of model parameters | — | — |
| Export | Open the Export Model Parameters dialog box. | |
| Import | Open the Import Model Parameters dialog box. | |
| Physics settings | Opens the Physics settings dialog box. |
Animation
| Item | Initial setting | Details |
|---|---|---|
| Material | — | — |
| Reload materials of selected tracks | Reload the materials of the selected tracks. | |
| Replace materials of selected tracks | Replace the materials of the selected tracks. | |
| Replace materials of selected tracks (all scenes) | Replace the materials of the selected tracks in all scenes. | |
| Scene | — | — |
| New Scene | Create a new scene. | |
| Import scene | Import a scene. | |
| Generating scenes automatically from the audio files | Automatically generate scenes from the audio files. | |
| Enable/disable loop editing support | Enables/disables the loop editing support. | |
| Track | — | — |
| Animation baking of parameter controllers | Bakes the results of the parameter controller’s target tracking into the animation. | |
| Motion-sync Animation Bake | Opens the Motion-sync Animation Bake Settings dialog box. | |
| Apply Lip-sync from the Audio File | Generate lip-sync from the audio files. | |
| Bake Animation from Physics | Bake the results of physics operations into the animation. | |
| Set current position to the beginning of track | [Shift]+[B] | Move the current position to the beginning of the track. |
| Set current position to the end of track | [Shift]+[N] | Move the current position to the end of the track. |
| Move track to current position | [Shift]+[M] | Move the track to the current position. |
| Timeline | — | — |
| Move to the beginning | [Home] | Move to the beginning of the timeline. |
| Move to the end | [End] | Move to the end of the timeline. |
| Move to the start frame of the work area | [Shift]+[Home] | Move to the beginning of the Work Area. |
| Move to the end frame of the work area | [Shift]+[End] | Move to the end of the Work Area. |
| Previous frame | [Page Up] | Move back one frame. |
| Next frame | [Page Down] | Move forward one frame. |
| Previous Keyframe | [J] | Return to the previous keyframe in the property. |
| Next Keyframe | [K] | Move one keyframe ahead in the property. |
| Previous Keyframe in Track | [Shift]+[J] | Return to the previous keyframe in the track. |
| Next Keyframe in Track | [Shift]+[K] | Move to one keyframe ahead in the track. |
| Return to previous marker | [Ctrl]+[J] | Skip the indicator bar to the previous marker. |
| Go to next marker | [Ctrl]+[K] | Skip the indicator bar to the next marker. |
| Return to the previous onion skin marker | [Ctrl]+[Shift]+[J] | Skip the indicator bar to the previous onion skin marker. |
| Go to the next onion skin marker | [Ctrl]+[Shift]+[K] | Skip the indicator bar to the next onion skin marker. |
| Set at the start frame of the work area | Move the indicator to the beginning of the Work Area. | |
| Set at the end frame of the work area | Move the indicator to the end of the Work Area. | |
| Show the entire Work Area | [Shift]+[F] | Displays the entire work area. |
| Show the entire scene | Displays the entire scene. | |
| Reset zoom in/out | Reset to the default display scale. | |
| Fade | — | — |
| Fade-in/out settings | Open the [Fade-in/out settings] dialog box. | |
| Apply fade-in/out settings to other scenes | Open the [Apply fade-in/out settings to other scenes] dialog box. | |
| Parameter Controller | — | — |
| Parameter controller calculation unit settings | Opens the parameter controller calculation unit settings dialog box. | |
| Flipping the direction controller | Flips the direction controller. | |
| Converting a direction controller to two single-point controllers | Converts a direction controller into two single-point controllers. | |
| Converting two single-point controllers into a direction controller | Converts two single-point controllers into a direction controller. | |
| Follow target | Turns target tracking on/off. | |
| Calculate collectively before playback | Turns collective calculation on/off before playback. | |
| Display controller | Turns the controller display on/off. | |
| Controller display settings | Opens the parameter controller display settings dialog box. | |
| Parameter Bookmarks | — | — |
| Show in selected parameters | Display Parameter Bookmarks with the currently selected parameter. | |
| Delete Label from Current Track | Delete the label from the currently selected track. | |
| Duplicate labels in batches (tracks of the same model) | Duplicates labels on the same model track in all scenes. | |
| Duplicate Labels Individually | Opens the Duplicate Labels Individually dialog box. | |
| Hide All Labels | Hide all labels. | |
| Parameter Bookmarks Display Settings | Open the Parameter Bookmarks Display Settings dialog box. | |
| Add Marker | Add a marker. | |
| Playback | [Enter] | Play the animation. Pressing the button again during playback will stop the animation. |
| Switch Edit Mode | [C] | Switch the Edit mode. |
| Gather files | Collect files. |
Form Animation
| Item | Initial setting | Details |
|---|---|---|
| Add Form Edit Keyframe | Add a Form Edit Keyframe for the selected object. | |
| Animation preview setting | Open the Animation preview setting dialog box. |
Window
| Item | Initial setting | Details |
|---|---|---|
| Workspace | — | — |
| Modeling | Switch to the Modeling Workspace. | |
| Animation | Switch to the Animation Workspace. | |
| Form Animation | Switch to the Form Animation Workspace. | |
| Reset current layout | Reset the current layout to the initial layout set for the selected custom workspace. | |
| Update initial layout | Update the initial layout of the Custom Workspace selected in the list by replacing the initial layout with the current layout. | |
| Workspace Settings | Opens the Workspace Settings dialog box. | |
| Hide/Show palette | Hide/show the palette. | |
| Switch to Previous Tab | Switch to the previous tab. | |
| Switch to Next Tab | Switch to the next tab. | |
| Duplicate Tab | Duplicate the tab. | |
| Set All Views to Same Display Position | Align the display position of all Views. | |
| Reset Status | Reset the state of the View area. | |
| Deformer | Display the deformer palette. | |
| Inspector | Display the inspector palette. | |
| Tool Details | Displays the Tool Details palette. | |
| Log | Display the log palette. | |
| Parameters | Display the Parameter palette. | |
| Part(s) | Display the Parts palette. | |
| Project | Display the project palette. | |
| Timeline | Display the timeline palette. | |
| Scene | Display the scene palette. | |
| Template | Display the template palette. |
Help
| Item | Initial setting | Details |
|---|---|---|
| User Manual | Open the manual page. | |
| Live2D Web Page | Open the Live2D home page. | |
| Product Page | Open the Live2D product page. | |
| Download Page | Open the Cubism download page. | |
| Sample Model | Open the sample model download page. | |
| Creators’ forum | Open the Creators’ forum page. | |
| Live2D Help | Open the Live2D help page. | |
| Tutorial Video | Open the dialog box that guides you to the tutorial video. | |
| Home | Open the home dialog box. | |
| License activation | Register a license. | |
| Deactivate License | Deactivate the license. | |
| Online License Authentication | Open the Online License Authentication dialog box. | |
| Open Purchase Page | Open the Cubism purchase page. | |
| Display Operation | Make the operation visible. | |
| Open log file | Open the log file. | |
| Open Auto Backup Folder | Open the automatic backup folder. | |
| Update history | Open the Update history page. |
Mesh Edit mode
| Item | Initial setting | Details |
|---|---|---|
| Finish Mesh editing | [Ctrl]+[E] | Exit the Mesh Edit mode. |
| Automatic Mesh generator (Mesh Edit mode) | Generate the mesh automatically. | |
| Auto connect edges (line) | [Ctrl]+[R] | Connect edges. |
| Flip horizontally | Flip the mesh horizontally. | |
| Flip vertically | Flip the mesh vertically. | |
| Invert Axis | Flip the mesh along the axis. | |
| Merge vertices | Merge the vertices. | |
| Glue/bind the selected vertices | [Ctrl]+[G] | Binds the selected vertex with glue. |
| Unglue/unbind the selected vertices | [Ctrl]+[Shift]+[G] | Unbind the glue on the selected vertex. |
| Stroke Mesh-mapping (beta) | — | — |
| Increase mesh width | Increase the mesh width of the Mesh-mapping setting by strokes. | |
| Reduce mesh width | Decrease the mesh width of the Mesh-mapping setting by strokes. | |
| Increase divisions | Increase the number of divisions in the Mesh-mapping setting by strokes. | |
| Reduce divisions | Reduce the number of divisions in the Mesh-mapping setting by strokes. | |
| Change the number of vertices in the mesh width | Change the number of vertices in the mesh width of the Mesh-mapping setting by strokes by 1 each time the shortcut key is pressed. | |
| Confirm strokes | [Shift]+[E] | Finalizes the strokes being edited. |
| SubTools | — | — |
| Arrow Selection | Use the Selection and Editing tools. | |
| Add Vertex | Use the Add Vertex tool. | |
| Delete Vertex | Use the Delete Vertex tool. | |
| Eraser | Use the Eraser tool. | |
| Lasso | Use the Lasso tool. | |
| Add points | Use tools to increase the number of points. | |
| Stroke Mesh-mapping (beta) | Use the Stroke Mesh-mapping (beta) tool. |
Category: Tools
Level edit
| Item | Initial setting | Details |
|---|---|---|
| Level 1 (details) | [1] | Set the Level edit to 1. |
| Level 2 (normal) | [2] | Set the Level edit to 2. |
| Level 3 (rough) | [3] | Set the Level edit to 3. |
Tools
| Item | Initial setting | Details |
|---|---|---|
| Rotation Deformer Creation Tool | Use the rotation deformer creation tool. | |
| Arrow tools | [A] | Use the arrow tool. |
| Lasso Tool | [L] | Use the Lasso tool. |
| Brush Selection tool | [B] | Use the Brush Selection tool. |
| Deform Path edit | [P] | Use the Deform Path edit tool. |
| Add control point | Use the Add Control Points tool on the currently selected ArtMesh. | |
| Delete control point | Use the Delete Control Point tool on the currently selected ArtMesh. | |
| Delete path | Use the Delete Path tool on the currently selected ArtMesh. | |
| Fold line | Use the Fold Line tool on the currently selected ArtMesh. | |
| Deform Brush Tool | Use the Deform Brush tool. | |
| Deform brushes | Use the Deform brush. | |
| Expansion brush | Use the expansion brush. | |
| Warp deformer shaping brushes | Use the Warp deformer shaping brushes. | |
| Edit Glue | Switch to the Edit Glue. | |
| Weight brush A:B | Use the Weight Brush A:B tool on the selected ArtMesh. | |
| Weight brush A | Use the Weight Brush A tool on the selected ArtMesh. | |
| Weight brush B | Use the Weight Brush B tool on the selected ArtMesh. | |
| Re-merge Glue Vertices Tool | Use the Re-merge Glue Vertices tool on the selected ArtMesh. | |
| ArtPath Tools | Switch to the ArtPath Tools. | |
| Add control point | Use the Add Control Points tool. | |
| Delete control point | Use the Delete Control Point tool. | |
| Adjust the opacity of control point | Use the Adjust the opacity of control point tool. | |
| Adjust the width of control point | Use the Adjust the width of control point tool. | |
| Fold line | Use the Fold Line tool. | |
| Stroke ArtPath | Use the Stroke ArtPath tool. | |
| Re-stroke ArtPath | Use the Re-stroke ArtPath tool. | |
| Join ArtPaths | Switch to Join ArtPaths. | |
| Split ArtPath | Switch to Split ArtPath. | |
| Parameter controller tool | Switch to the parameter controller tool. | |
| Select/edit controller | Use the controller selection and editing tool. | |
| Add single-point controller | Use the single-point controller addition tool. | |
| Add direction controller | Use the direction controller addition tool. | |
| Delete controller | Use the controller deletion tool. | |
| Edit target | Drag to set/unset the target. | |
| Switch to the last tool used | Switch to the last tool used. |
Brush
| Item | Initial setting | Details |
|---|---|---|
| Switch to previous brush shape | Switch from the currently selected brush shape (circle, square, line) to the previous brush. | |
| Switch to next brush shape | Switch from the currently selected brush shape (circle, square, line) to the next brush. |
Category: View area
Option
| Item | Initial setting | Details |
|---|---|---|
| Locking of drawable objects | [Shift]+[A] | Lock the ArtMesh and deform paths. |
| Lock Deformer | [Shift]+[D] | Lock the warp deformers and rotation deformers. |
| Show/Hide Drawable Objects | Toggle between showing and hiding drawable objects. | |
| Show/Hide Grid | Toggle between showing and hiding the grid. |
Solo
| Item | Initial setting | Details |
|---|---|---|
| Solo | [S] | Display an object solo. |
| Highlight opacity | Apply the opacity set for solo display. | |
| Apply multiply color/screen color | Apply the multiply color/screen color set for solo display. |
Snapshot
| Item | Initial setting | Details |
|---|---|---|
| Snapshot | [Ctrl]+[5] | Save the keyform image of the current value in a semi-transparent state (one snapshot can be saved). |
| Show/hide snapshot | [5] | Toggle between showing and hiding the snapshots. |
| Save snapshot guide image | [Ctrl]+[Shift]+[5] | Save the snapshot as an image to the tools palette. |
Temporary snapshots
| Item | Initial setting | Details |
|---|---|---|
| Save [1]-[4] | Save snapshots. | |
| Show [1]-[4] | Display snapshots. |
Random Pose
| Item | Initial setting | Details |
|---|---|---|
| Playback/stop random pose | Toggles playback/stop of random poses. | |
| Random pose settings | Opens the Random Pose Settings dialog box. |
Display
| Item | Initial setting | Details |
|---|---|---|
| Zoom out | Show a zoomed-out view. | |
| Zoom in | Show a zoomed-in view. | |
| Full Scale | Display in full size. | |
| Display All | [Ctrl]+[0] | Display the whole image. |
| Flip canvas | [R] | Flip the canvas horizontally. |
Guide Lines
| Item | Initial setting | Details |
|---|---|---|
| Add a Horizontal Line at Mouse Position | Add a horizontal guide line at the mouse cursor position. | |
| Add a Vertical Line at Mouse Position | Add a vertical guide line at the mouse cursor position. | |
| Add Horizontal/Vertical Lines at Mouse Position | Add horizontal and vertical guide lines at the mouse cursor position. |
Parameter Bookmarks
| Item | Initial setting | Details |
|---|---|---|
| Show with object at cursor position | Displays Parameter Bookmarks with the object at the cursor position. | |
| Select from object at cursor position | Select Parameter Bookmarks from the object at the cursor position. |
Other
| Item | Initial setting | Details |
|---|---|---|
| Select the Objects at the Selected Vertex | Select the object at the selected vertex. |
Category: Palette
Parameters
| Item | Initial setting | Details |
|---|---|---|
| Parameters | — | — |
| Edit | — | — |
| Edit Parameter | Open the Edit Parameter dialog box. | |
| Create Parameter | Open the Create New Parameter dialog box. | |
| Replicate parameters | Duplicate parameter settings. | |
| Create folder | Create a parameter folder. | |
| Delete | Delete a parameter or folder. | |
| Delete empty parameters | Delete all parameters that do not have a key at once. | |
| Delete empty parameter groups | Delete all empty parameter groups at once. | |
| Select | — | — |
| Select Previous | Select the previous parameter. | |
| Select Next | Select the next parameter. | |
| Cancel Selection | Deselect all the Parameter palette selections. | |
| Display | — | — |
| Display only the parameters of the selected object | Only the parameters of the selected object are displayed. | |
| Link/Unbind Parameters | Toggles between linking and unbinding of selected parameters. | |
| Key | — | — |
| Edit | — | — |
| Add 2 keys | Add two keys. | |
| Add 3 keys | Add three keys. | |
| Delete all keys | Delete all keys. | |
| Add Single Keyform | Add a keyform to the currently selected parameter. | |
| Delete Keyform | Delete the currently selected keyform. | |
| Keyform editing | Open the Edit Keyform dialog box. | |
| Adjust | — | — |
| Select | Select objects that have parameters set. | |
| Flip | Flip the key value of the parameter. | |
| Adjust | Display the Adjust Value dialog box. | |
| Change | Change the parameter to another parameter. | |
| Select | — | — |
| Attach to nearby keys | Adsorbs to a key near the selected parameter. | |
| Select First Key | Select the first key of the currently selected parameter. | |
| Select Previous Key | Select the key before the currently selected key for the currently selected parameter. | |
| Select Next Key | Select the next key after the currently selected key for the currently selected parameter. | |
| Select Last Key | Select the last key of the currently selected parameter. | |
| Select Default Key | Select the default key for all selected parameters. | |
| Select the first vertical key (when merging) | Select the first key among the vertical keys of the currently selected joined parameter. | |
| Select the previous vertical key (when merged) | Select the key before the currently selected key among the vertical keys of the currently selected joined parameter. | |
| Select next vertical key (when merging) | Select the next key after the currently selected key among the vertical keys of the currently selected joined parameter. | |
| Select last vertical key (when merging) | Select the last key of the currently selected key among the vertical keys of the currently selected joined parameter. | |
| Other | — | — |
| Prohibit drag and drop | Enable/disable the [Prohibit drag and drop] setting. |
Part(s)
| Item | Initial setting | Details |
|---|---|---|
| New Part | Create a new part. | |
| Delete Selected Parts | Delete the selected part. | |
| Delete Selected Parts (Child objects will remain) | Delete the selected part with its children remaining. | |
| Prohibit drag and drop | Enable/disable the [Prohibit drag and drop] setting. | |
| Parts Settings | Open the Parts Settings dialog box. | |
| Delete empty parts | Delete all empty parts that do not have a single child element at once. | |
| Delete empty parts under child | Delete all empty parts under children of the selected part at once. | |
| Delete empty deformers | Delete all deformers that are not set as parents from any object at once. | |
| Show/hide guide image | [Ctrl]+[Alt]+[Shift]+[3] | You can show/hide guide image parts. |
Deformer
| Item | Initial setting | Details |
|---|---|---|
| Prohibit drag and drop | Enable/disable the [Prohibit drag and drop] setting. | |
| Delete empty deformers under child | Delete all empty deformers under the selected deformer’s children at once. |
Timeline
| Item | Initial setting | Details |
|---|---|---|
| Expand All Tracks | Expand/collapse all tracks. | |
| Freeze | — | — |
| Freeze/unfreeze at current frame | Toggle between freeze and unfreeze at the current frame. | |
| Freeze all | Freeze everything. | |
| Freeze selected properties | Freeze the selected properties. | |
| Freeze properties not selected | Freeze the properties that are not selected. | |
| Cancel all freezes | Unfreeze all freezes. | |
| Common | — | — |
| Lightweight playback | Toggle between on and off for Lightweight playback. | |
| Highlight frames for frame steps | Toggles frame highlighting on/off for frame steps. | |
| Autoscroll to form animation properties of selected objects | Turns on/off the ability for properties in the timeline palette to scroll to the object’s position when an object is selected on the View. | |
| Autoscroll to the properties of the operated parameter controller | When a parameter controller is selected, this function automatically scrolls to the associated properties. | |
| Enable indicator movement outside the scene range | Turns on/off the ability to move the indicator out of range of the scene. | |
| Dope Sheet | — | — |
| Enable keyframe operations for properties hidden with Shy | Enables/disables keyframe operations for properties hidden with Shy. | |
| Select all keys when selecting parameters | Toggles between selecting all keys on and off when selecting parameters. | |
| Exclude frame steps when batch inserting keyframes | Excludes frame steps when batch inserting keyframes. | |
| Display the range of one frame on the indicator | Color the range of one frame on the indicator. | |
| Graph Editor | — | — |
| Display key values | Toggle between showing and hiding key values on the Graph Editor. | |
| Display key name | Toggle between showing and hiding the names of keys on the Graph Editor. | |
| Auto resize | Toggles between auto resize on and off. | |
| Always edit continuous Beziers | Toggle “Always edit continuous Beziers” on/off. | |
| Smart snap using Shift | Toggle Smart Snap on/off with Shift. | |
| Make Beziers by dragging curves | Toggle “Make Beziers by dragging curves” on/off. | |
| Snap to keyframes’ values on Graph Editor | Toggle the snap on/off at the key position of the curve. |