Create Motion with Pose Switching
Updated: 07/03/2020
This section describes how to set up the case in which there are multiple patterns of arms and other parts in the source image, and you want to display each part in a different pattern depending on the motion.
Preparation Required to Switch Poses
The following settings must be in place in order to switch poses.
Note: If you do not plan to embed the software, you do not need to configure it in the “Viewer.”
- Separate the parts to be switched on the model data.
- Set keys in the parts to be switched on the animation file.
When using Original Workflow, the following settings files must be prepared in Viewer in addition to the above.
- Create a pose settings file (pose3.json) in the Viewer.
(See “Pose Settings” for details.)
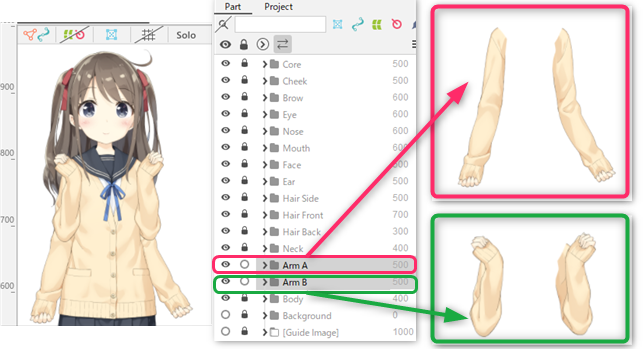
Separate the Parts You Want to Switch on the Model Data
Models with multiple arms should have separate parts for each arm to be switched.
TIPS
When exporting a MOC3 file, make sure to export it with all switching parts displayed.
Alternatively, check the [Export Hidden Parts] checkbox in the [Export Settings] to export all parts that switch.
If the parts to be switched are not exported to a MOC3 file, they cannot be switched properly.
Set keys in the Parts to be Used for Each Scene on the Animation File
Open the [Live2D Parts Visibility] property group in the Model Track.
Insert keyframes for all parts to be switched.
Insert keyframes with a value of 100 for parts to be displayed and 0 for parts to be hidden.
The keyframe for the part display is inserted at frame 0.
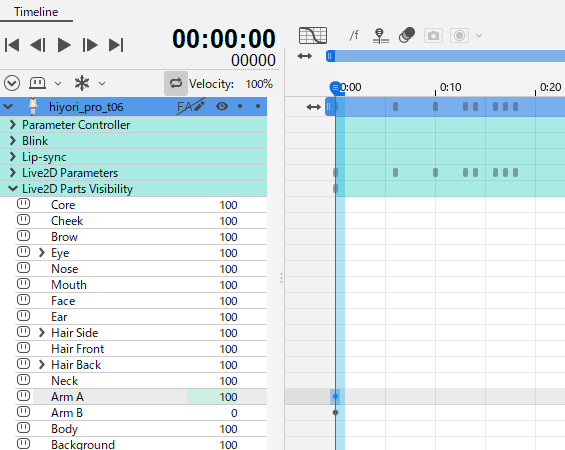
The concept is the same when there are three or more parts to switch.
Insert keyframes with a value of 100 for parts to be displayed and 0 for parts not to be displayed.
TIPS
In the reference image above, both left and right arms are included in one part and the display is switched between them.
It is also possible to switch the display between left and right by separating the parts.
When using Original Workflow for embedded data applications such as apps, a pose settings file (pose3.json) must be created in the Viewer.
See the “Pose Settings” page for details on pose settings in the Viewer.
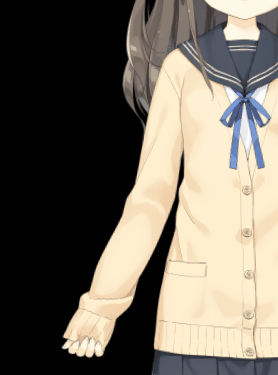
Neatly Switch Display of Arms by Crossfading
When switching between parts by crossfading, such as in an embedded model, the overlapping ArtMesh may be noticeable.
In the following GIF, the texture overlap at the base of the elbows and shoulders is noticeable.

To reduce the prominence of the overlap described above, keep the following points in mind when creating your model.
| Points to keep in mind when creating PSDs for material separation | Points to keep in mind when modeling |
|
|
By paying attention to the above, overlap can be reduced.
How to Check the Overlap between Parts in the Editor
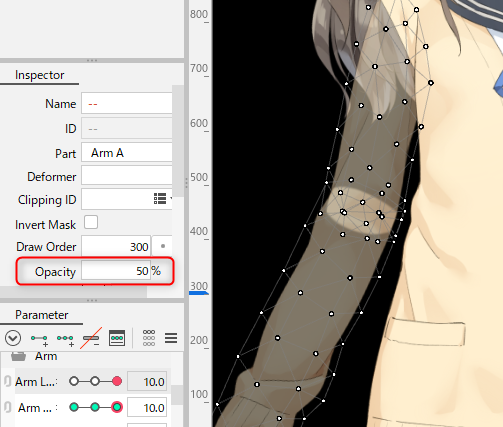
In order to find the prominent areas during fading, we will show you how to make the model’s objects appear translucent to check the overlap.
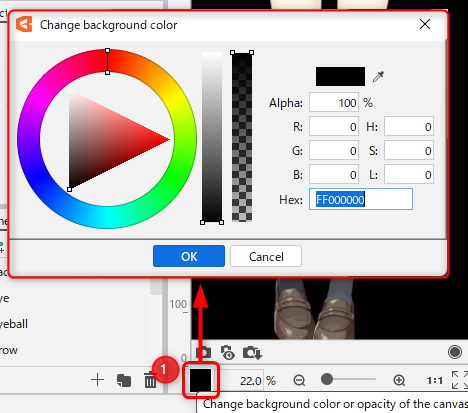
First, change the background color to make the ArtMesh you want to make translucent stand out.
Click in the lower left corner of the [View area] (frame (1) in the image below) to display the [Change Background Color] dialog box.
Next, select all the ArtMeshes you want to make translucent and change the value in the “Opacity” column from the [Inspector] palette. Here it is set at 50%.
If there are noticeable areas where parts overlap, it is a good idea to make modeling adjustments, edit and re-import PSDs to minimize the overlap as much as possible.
For details on re-importing PSDs, see “Re-import PSDs”.