Creating Scenes with Background Music and Audio
Updated: 05/21/2024
This section describes how to create scenes that handle background music and audio files as well as functions that use audio files.
Features introduced in this section
- Loading audio files
- Lip-sync
- Generating scenes automatically from the audio files
Readable audio files
Audio files can only be read in WAV format. Some formats, even [WAV format], are not supported and may not be loaded with a warning message.
In such cases, encoding to the corresponding [WAV format (16 bit, 44100 Hz)] may allow reading.
Also, make sure that the WAV file is not an RF64-compatible file (RF64-compliant File Format). For information on how not to export as an RF64-compatible file, please check the manual of the application that exports the audio, etc.
Loading audio files
Drag and drop an audio file (.wav) onto the [Timeline] palette.
Once successfully loaded, a track of the audio file is added to the timeline.
The loaded audio file will appear in the [Project] palette.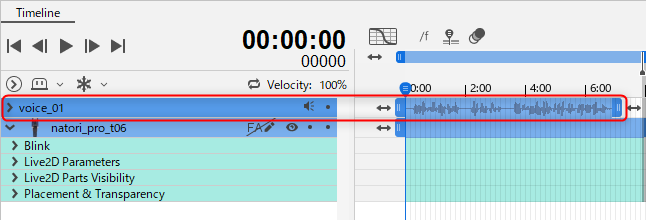
Editing audio files
Right-click on a track in the audio file to edit it.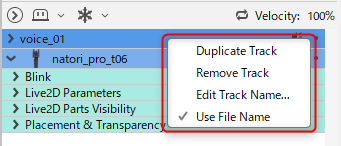
Lip-sync
The mouth movements of a model can be automatically generated from an audio file.
Lip-sync setting
To use the lip-sync function, the model must be configured for lip-sync.
Open the model data in the [Model Workspace] and click on [Settings for Eye Blinking and Lip-sync] in the Palette menu of the [Parameter] palette.
Check the [Lip-sync] checkbox under “Mouth open/close” in the dialog box and click [OK] to save the model data.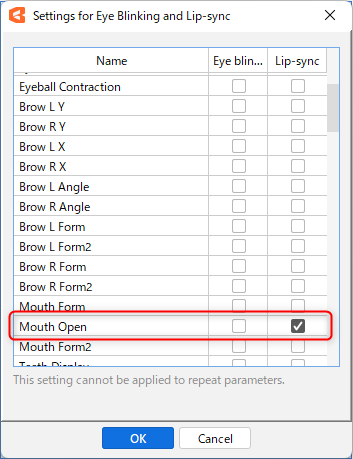
After saving is complete, return to the [Animation Workspace].
Expand the animation data in the [Project] palette and right-click on the model file name.
Click [Reload Data] to apply the lip-sync settings.
Note that a model with lip-sync will have [Lip-sync] added to the properties group.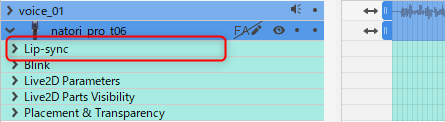
If you perform a lip-sync-related operation without setting up lip-sync, a warning may appear as shown in the figure below.
Perform the lip-sync setup described above, reload the model, and perform the operation again.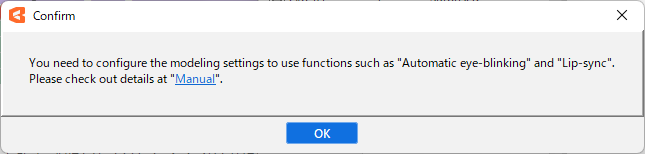
Generating lip-sync from audio files
Make sure the model and audio files are placed on the timeline, then click on the [Animation] menu -> [Apply Lip-sync from the Audio File].
When lip-sync is applied, a volume keyframe is added to the [Lip-sync] of the model track.
Generating scenes automatically from the audio files
This function automatically creates scenes and applies lip-sync to audio files.
Although it can be applied to a single audio file, it is useful when there are multiple audio files.
- Load all the audio files you want to use into the [Project] palette.
- Click on the [Animation] menu -> [Scene] -> [Generating scenes automatically from the audio files].
- Check that the model name displayed in [Select Model] is the name of the model to be applied. If different, select the correct model from the pull-down menu.
- Click [OK] to generate a scene with the same name as the audio file.
The length of the entire scene and the model display will be the same length as the audio file.
When multiple audio files are used in a single scene
This section describes the operation when multiple audio files are placed for a single scene and lip-sync is applied.
- Order the audio tracks on the timeline.
- Click [Animation] menu -> [Track] -> [Apply Lip-sync from the Audio File] for each audio.
If audio files overlap, the lip-sync of the audio file placed on top will take precedence.
If the spacing of audio files is adjusted after lip-sync generation, it is necessary to generate the lip-sync again because the movement of audio files and the lip-sync content will no longer be synchronized.
Lip-sync Property Group
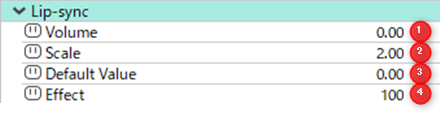
(1) Volume:
The volume extracted from the audio file is set according to the time.
By adjusting the volume keyframe, the mouth opening can be varied.
(2) Scale:
Specifies the magnification factor when volume is assigned to the opening and closing of the mouth.
For example, if the overall volume of an audio file is low and only opens to a maximum of 0.4, to adjust it so that the mouth opens fully at a [Volume] of 0.4, set the scale to 2.5. (1.0 / 0.4 = 2.5)
Note: This value is a constant value (a value that cannot be changed by a key).
(3) Default Value:
The mouth will not open when it is below the specified value.
For example, if [Default Value] is set as 0.2, it will be ignored when [Volume] is less than 0.2 and will not be affected by mouth opening and closing.
This can be utilized when using audio with noise.
Note: This value is a constant value (a value that cannot be changed by a key).
(4) Effect:
You can set what percentage of the effect will be multiplied by the percentage set in Lip-sync.
The effect can be set in the range of 0 to 100, with 0 being disabled.
Typically, it is set at 0 or 100 and is utilized when you want to temporarily disable the effect.
Mute Audio
To mute the audio, click on the [speaker icon] to the right of the track name.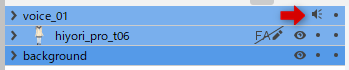
The [speaker icon] will change to an “X” and the audio will be muted.