Controller target settings
Updated: 08/26/2025
The parameter controller can set a target to be automatically followed by the controller.
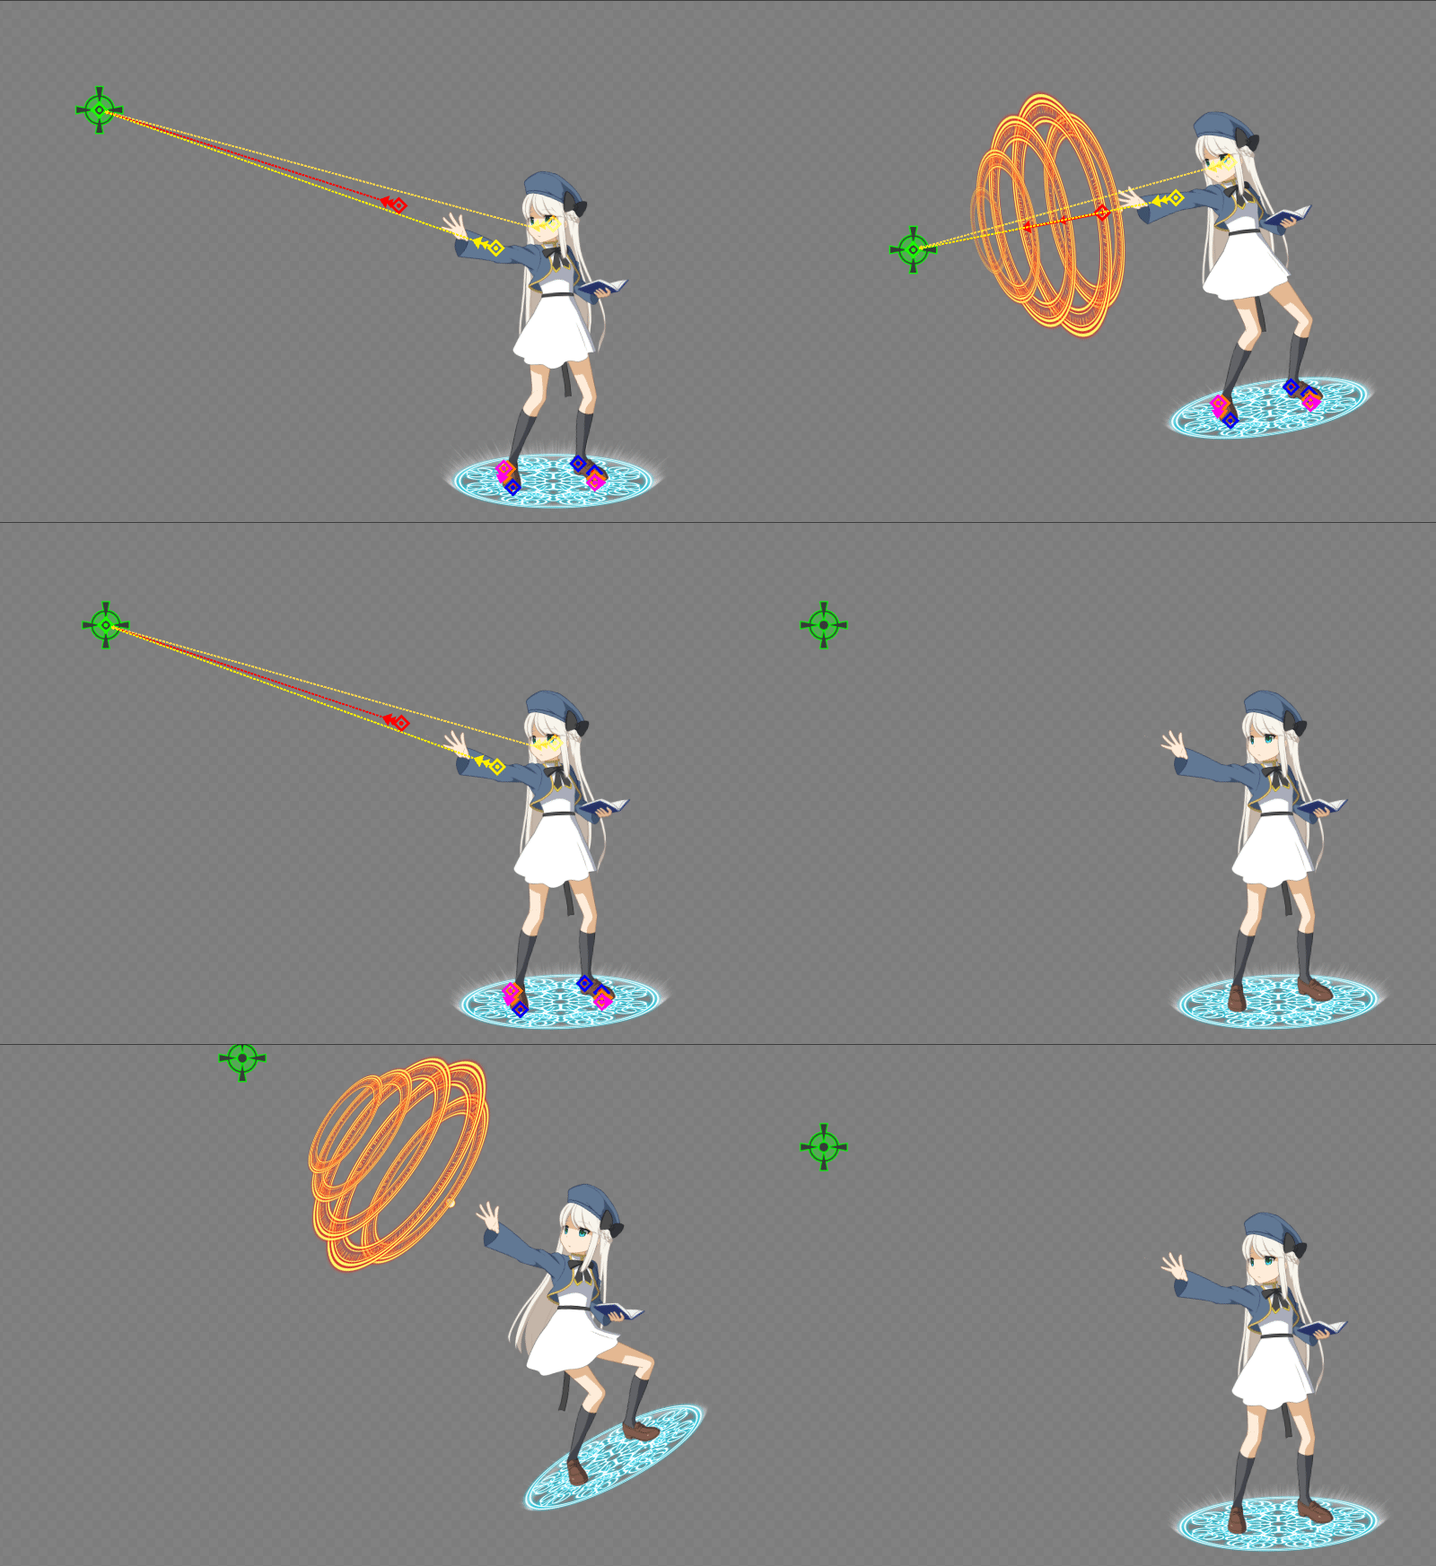
No keyframe is set on the timeline because the motion following the target is automatically calculated.
Point
The motion that follows the target can be exported as keyframes by baking, so it can be used as embedded motion.
Note: Please use the distributed “Sample for Parameter Controller.”
Setting targets
The target will be any controller other than the one currently selected.
Specify the target controller from the combo box for the [Target] section in the inspector palette.
In the following example, the controller for [Haruto_Right shin] is set to follow the controller for the [Seesaw plate] as a target.
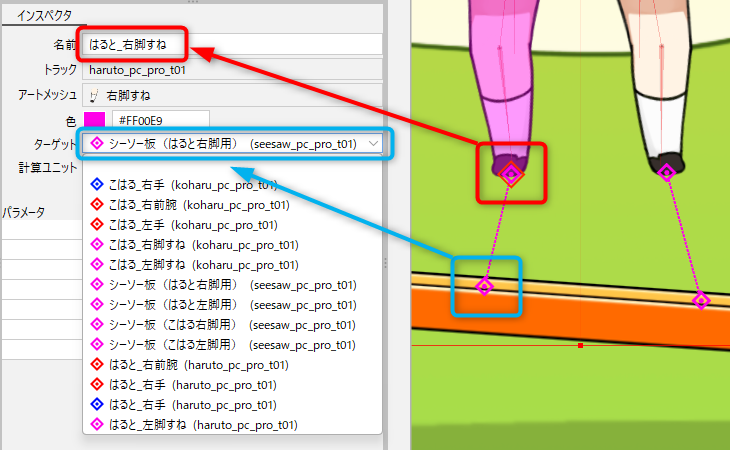
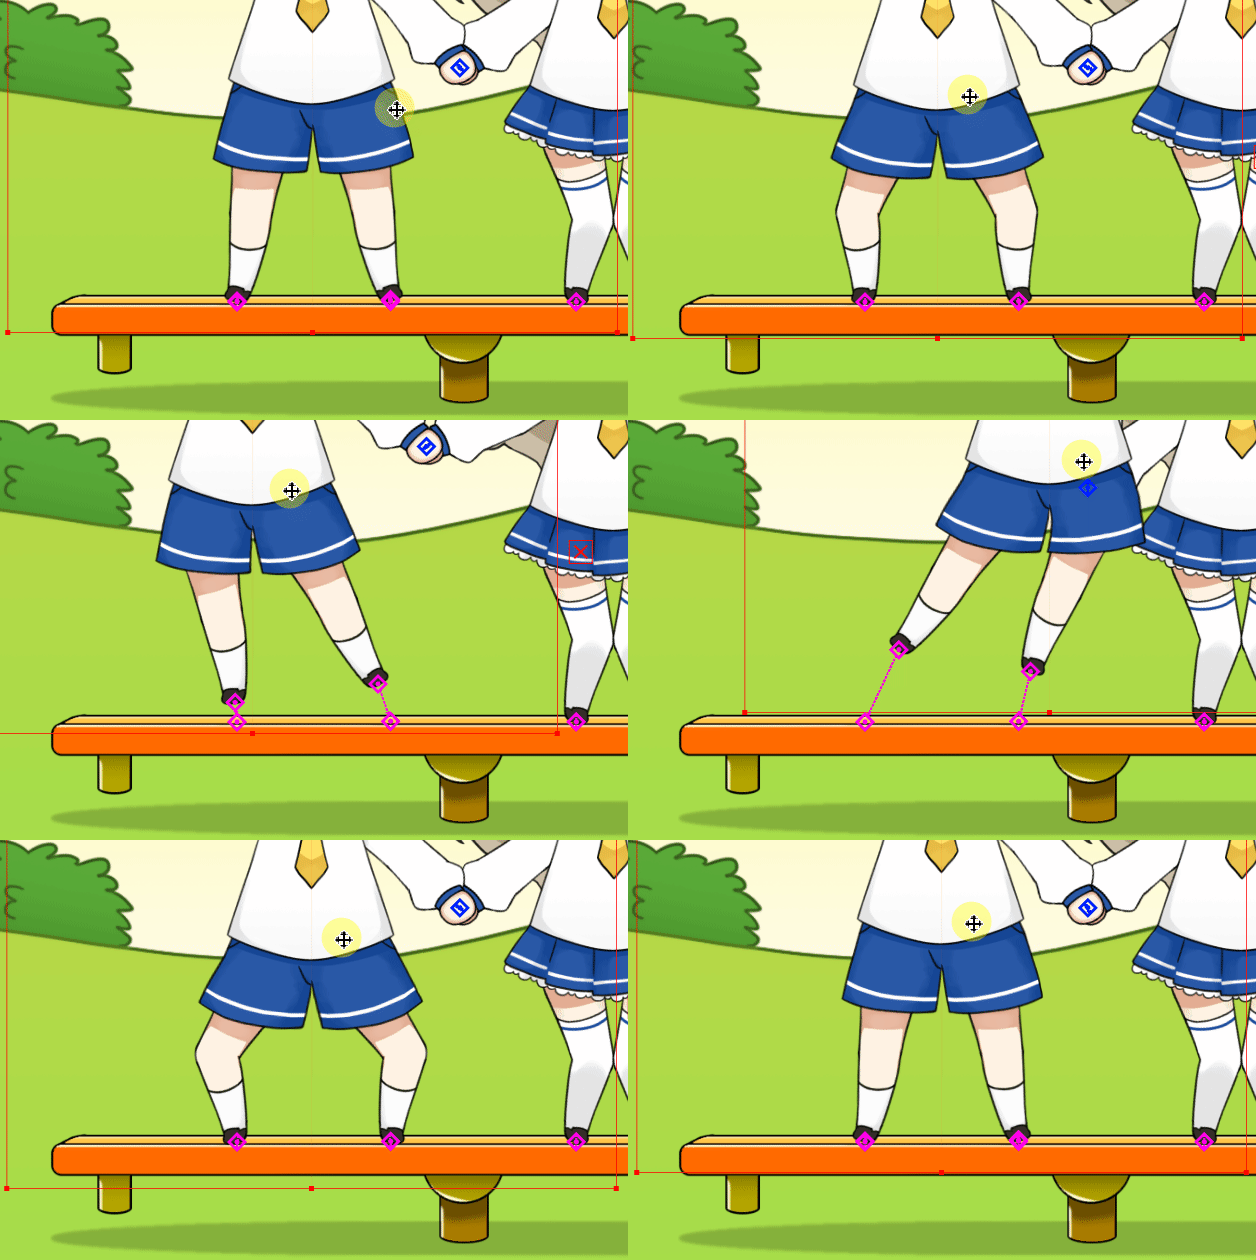
By setting the target in this way, it is easy to create a motion that adsorbs the foot on the ground.
Single-point and direction controllers
Controllers include single-point controllers and direction controllers with start and end points.
Single-point controller
Controller used for position control.
When displayed in the animation view:

When displayed on palettes and dialog boxes:

Direction Controller
Controller used for angle control.
When displayed in the animation view:

When displayed on palettes and dialog boxes:

Direction controller conversion
The direction controller can be converted to the following states from the parameter controller menu.
Reversing the direction controller
With the direction controller selected, click the [Animation] menu -> [Parameter Controller] -> [Reversing the direction controller].
The start and end points of the direction controller are reversed.
Converting a direction controller to two single-point controllers
With the direction controller selected, click the [Animation] menu -> [Parameter Controller] -> [Converting a direction controller to two single-point controllers].
The direction controller is converted into two separate single-point controllers.
Converting two single-point controllers into a direction controller
Select multiple controllers while holding down [Shift].
With two single-point controllers selected, select the [Animation] menu -> [Parameter Controller] -> [Converting two single-point controllers into a direction controller].
Two single-point controllers are connected and converted into a direction controller.
In this case, the two single-point controllers must be on the same track.
Motion when the controller is set as a target
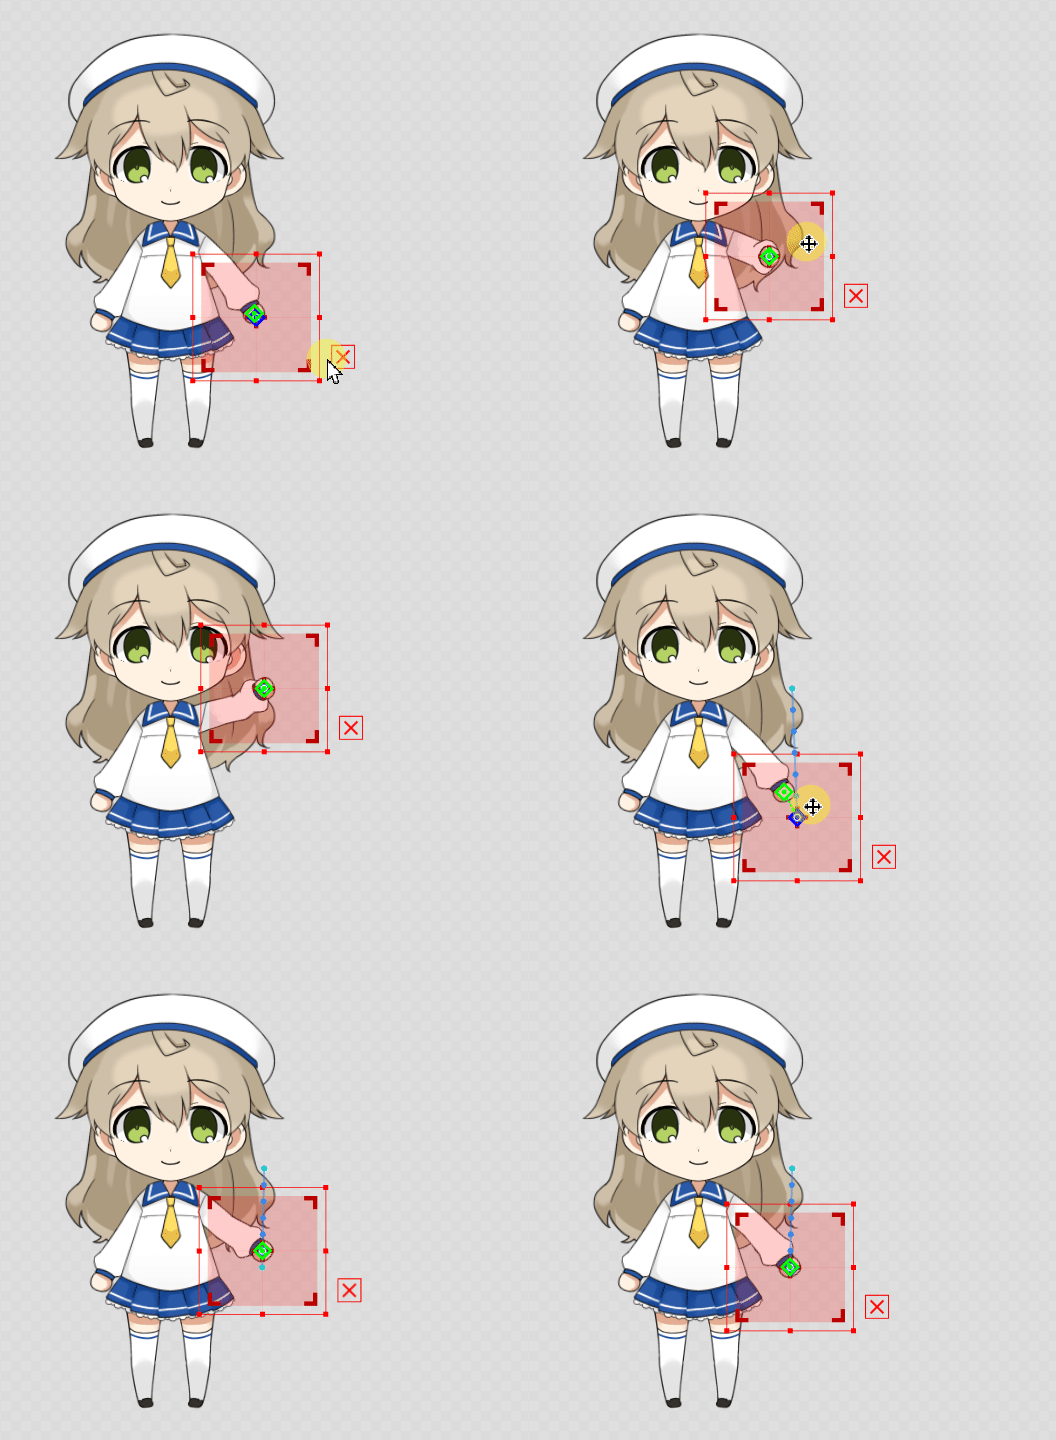
Motion is explained using an example of a red square target controller being followed by a controller set on the left hand of the model.
Setting a “Single-point controller” as the target for a “Single-point controller”
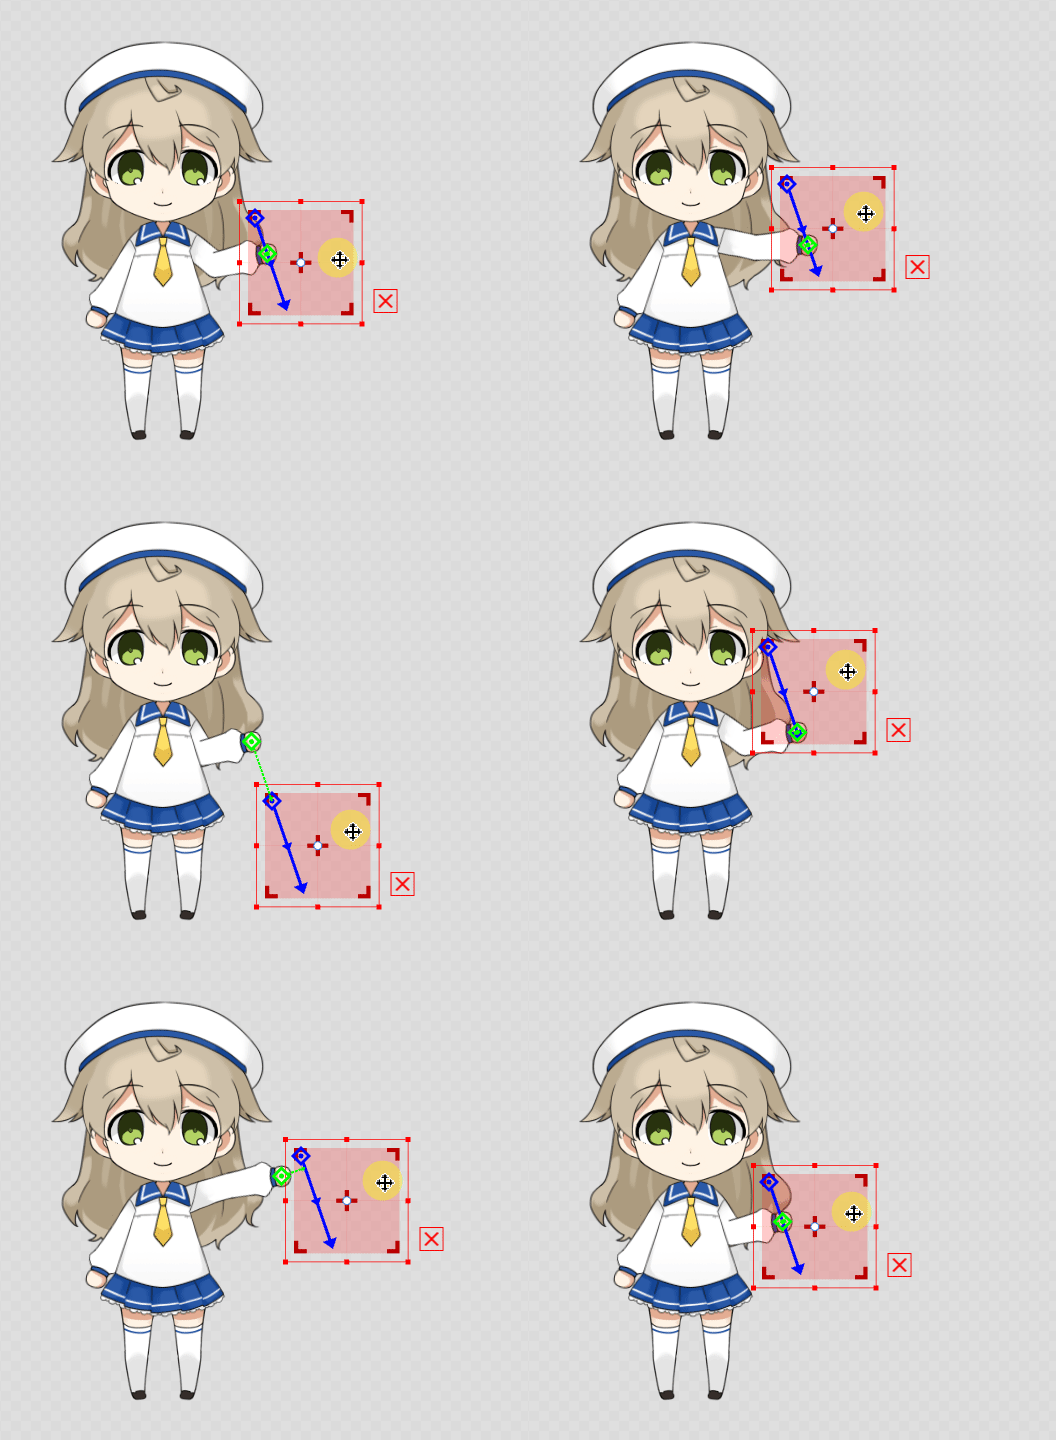
The green single-point controller moves closer to the position of the blue single-point controller.
Setting a “Direction Controller” as the target for a “Single-point controller”
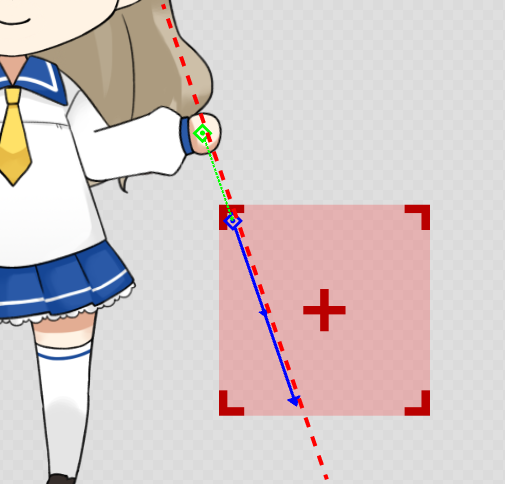
The green single-point controller moves closer to the position of the blue direction controller.
The green single-point controller moves to the nearest approaching position on a straight line passing through the start and end points of the blue direction controller.
Clearing the [Extend Direction Controller] checkbox in the inspector palette causes the green single-point controller to adhere to the start and end points of the blue direction controller, depending on its position.
Setting a “Single-point controller” as the target for a “Direction controller”
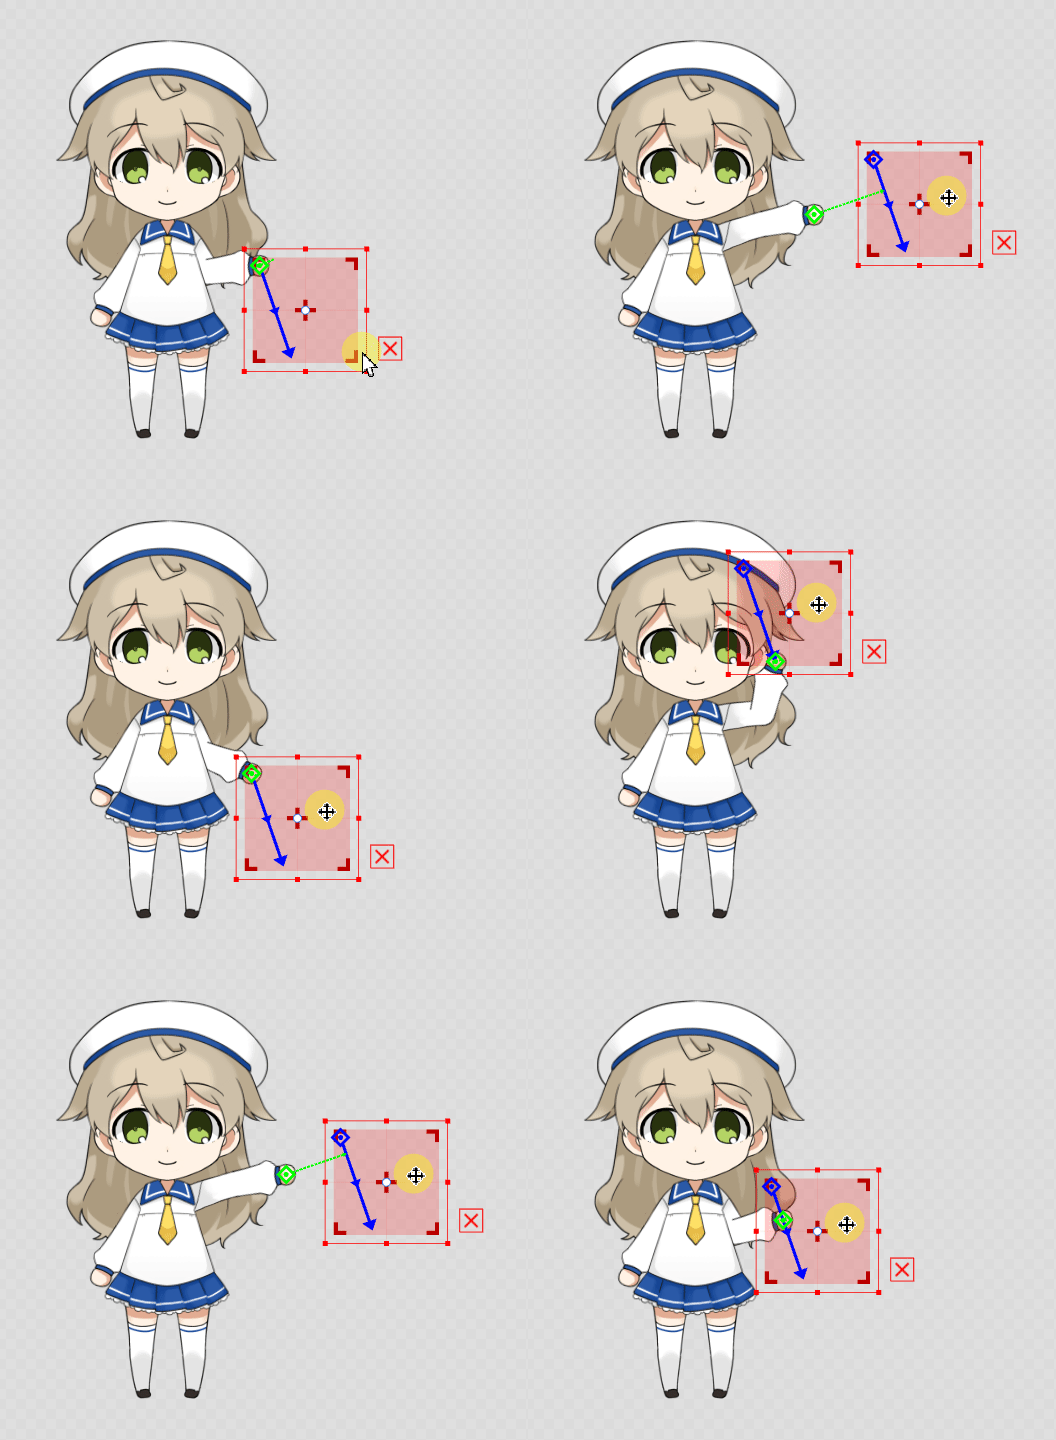
The green direction controller moves closer to the position of the blue single-point controller.
The blue single-point controller moves to the nearest approaching position on a straight line passing through the start and end points of the green direction controller.
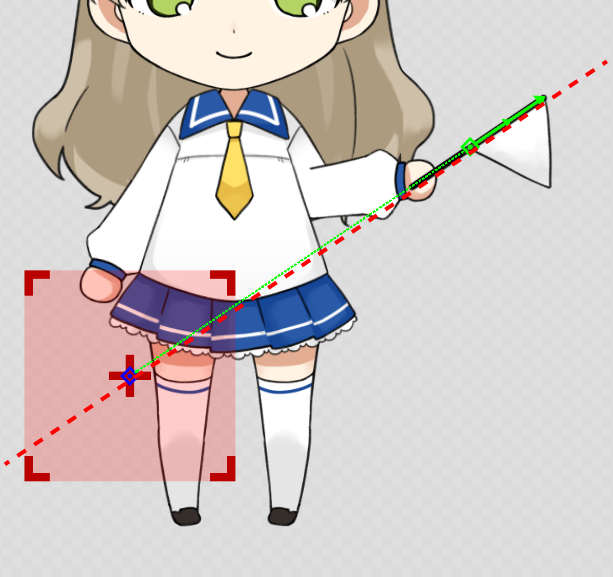
Clearing the [Extend Direction Controller] checkbox in the inspector palette causes the start and end points of the green direction controller to adhere to the blue single -point controller, depending on its position.
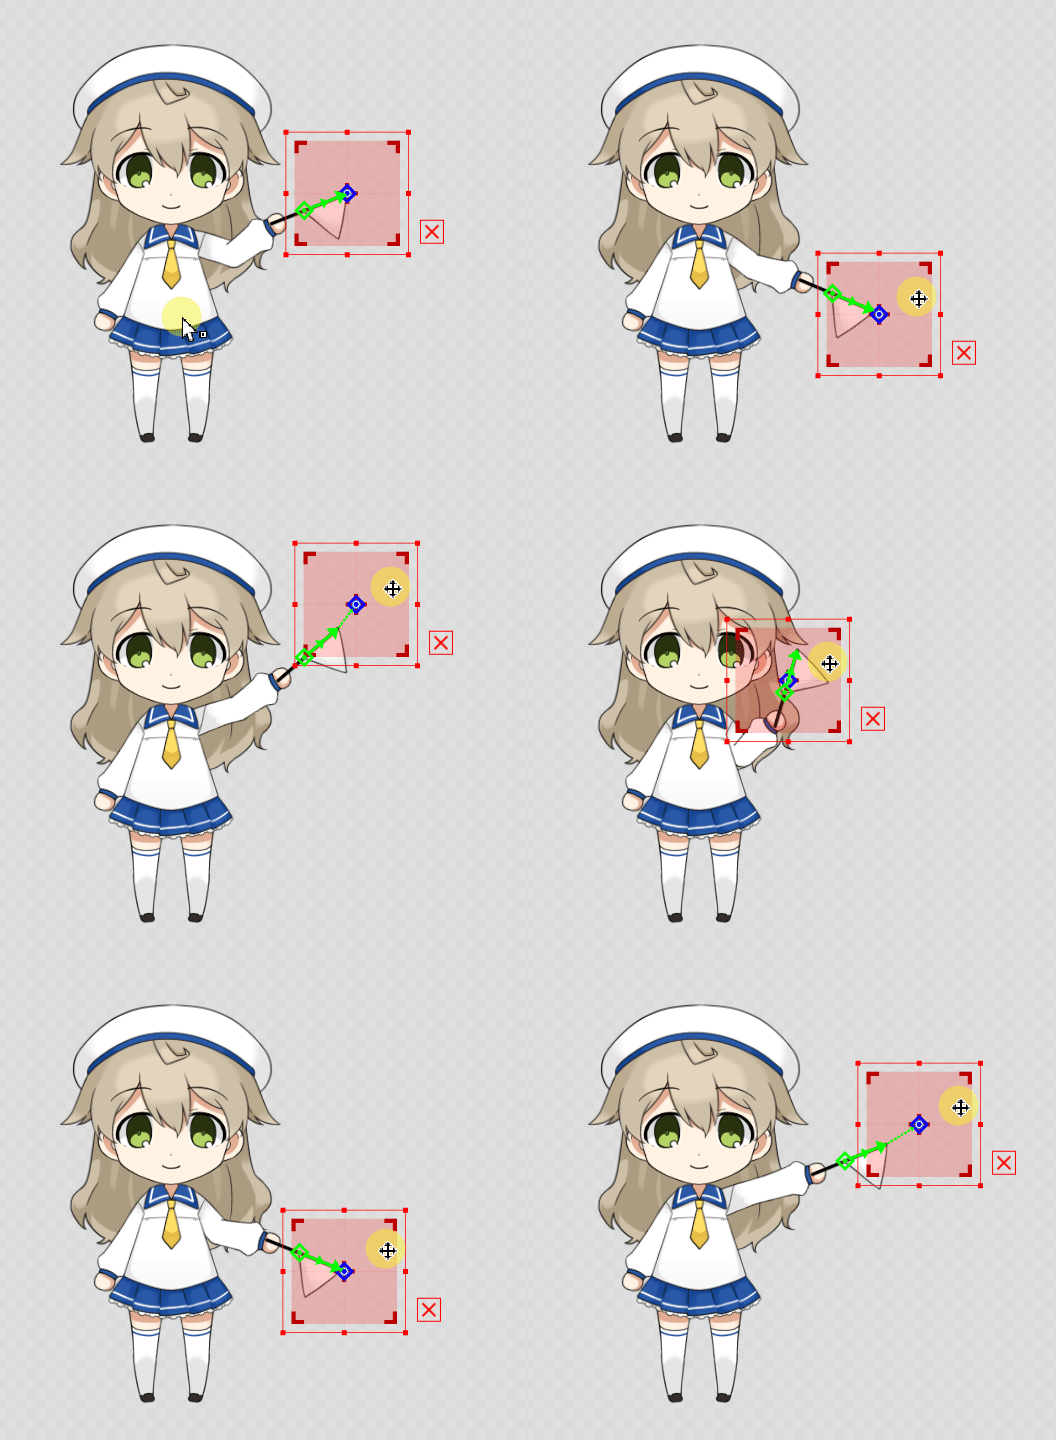
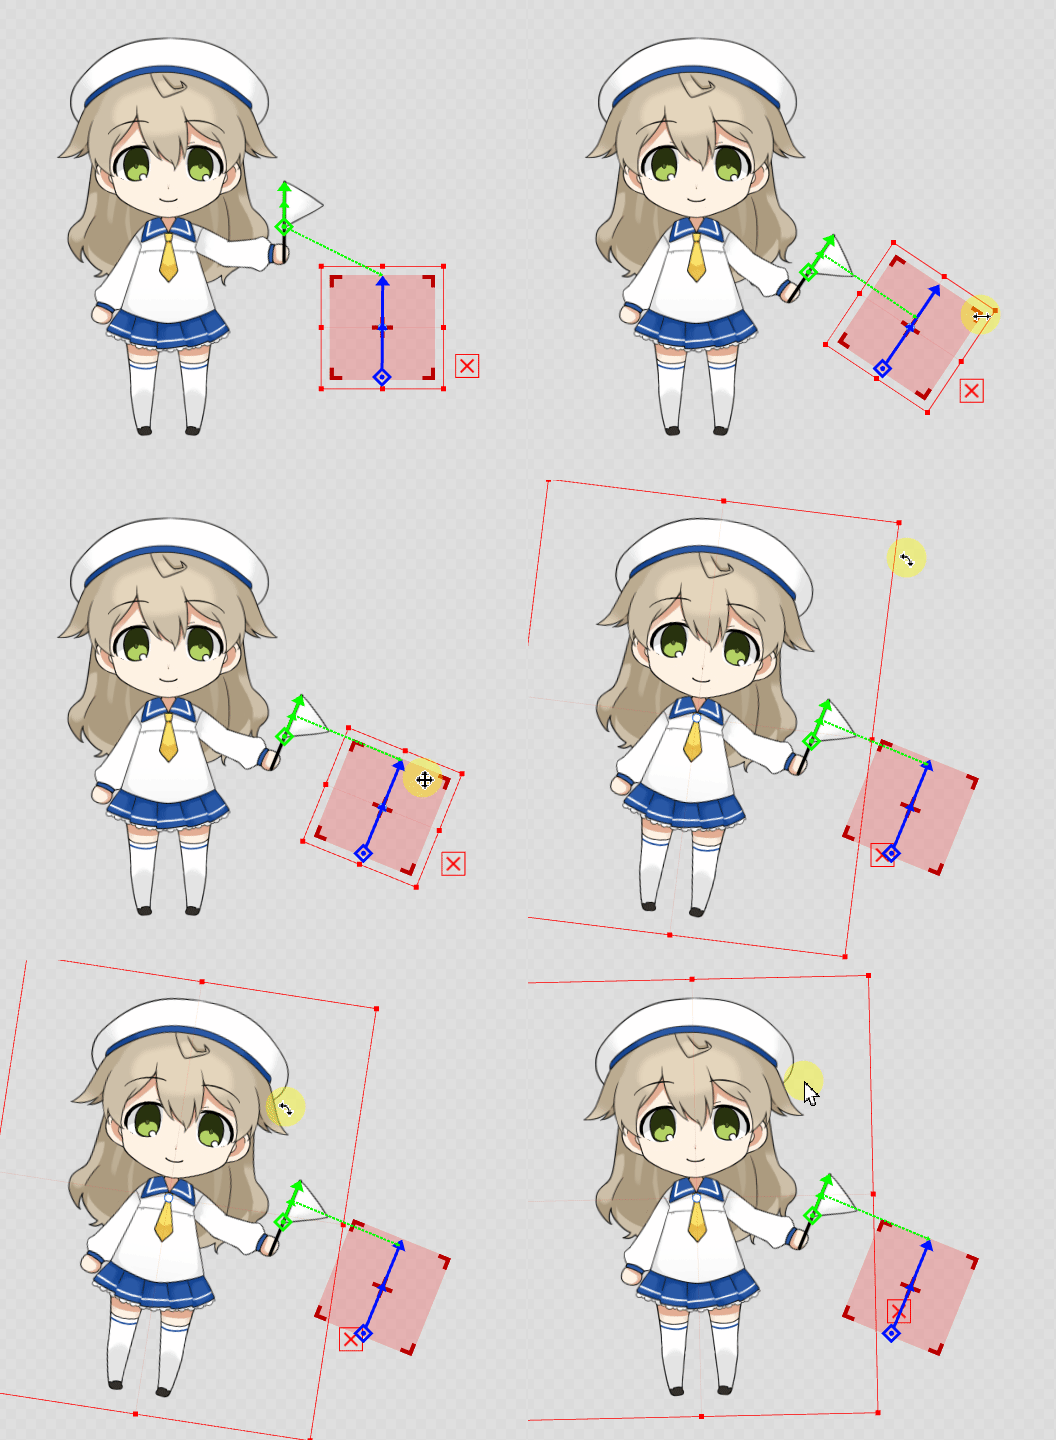
Setting a “Direction Controller” as the target for a “Direction Controller”
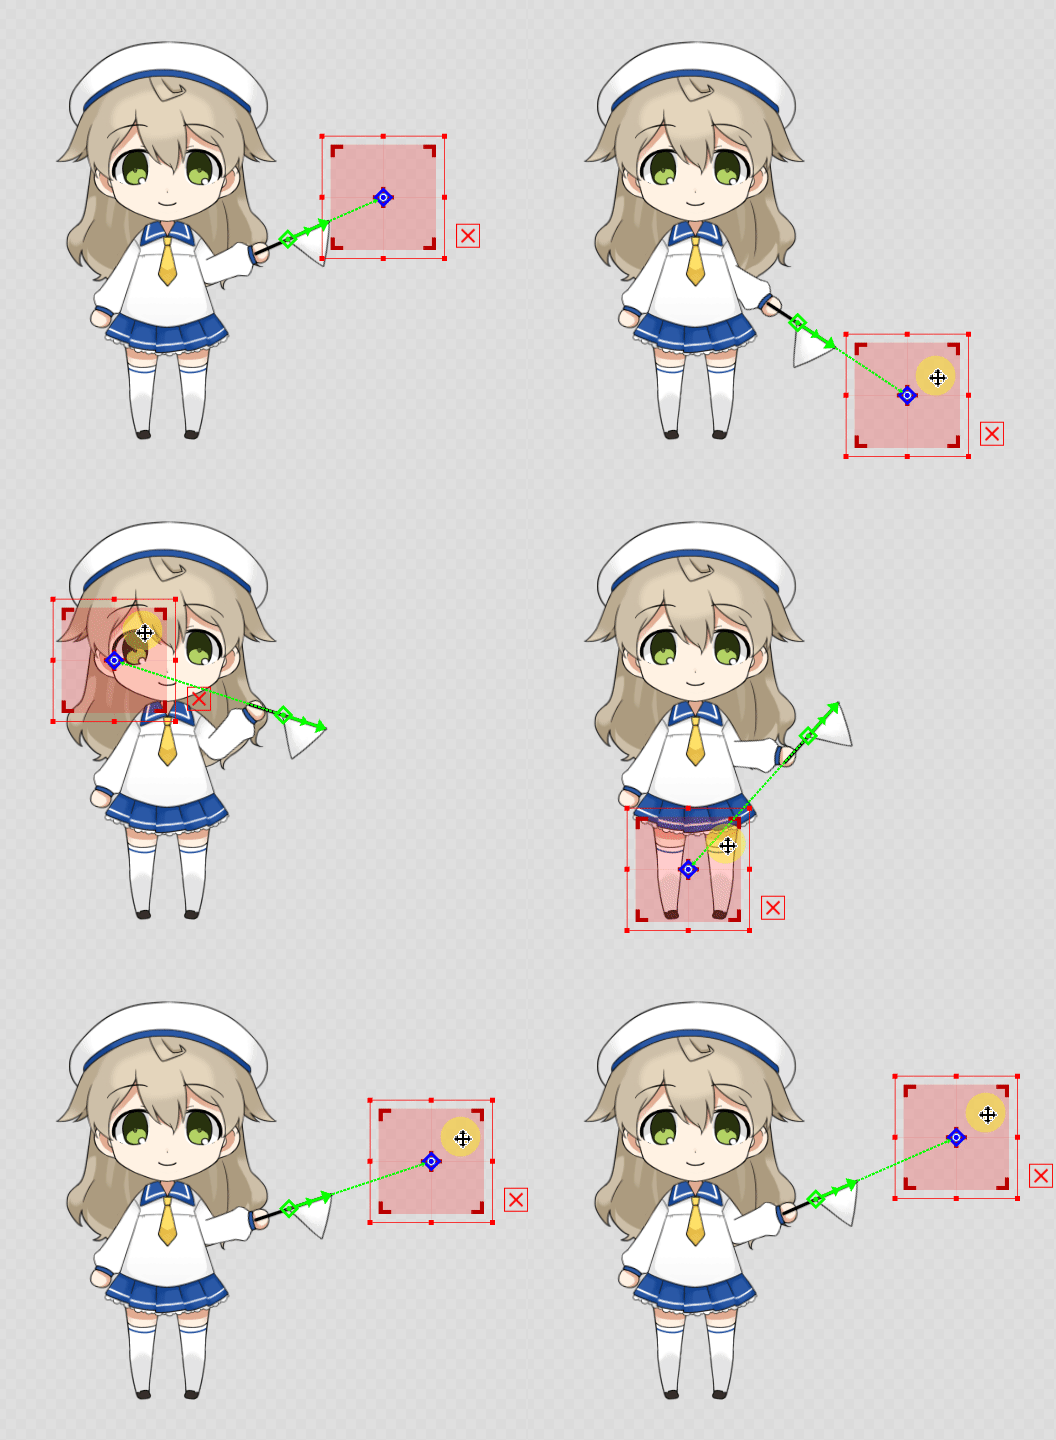
The green direction controller moves so that the angles of the green and blue direction controllers are aligned.
Precautions for controller control
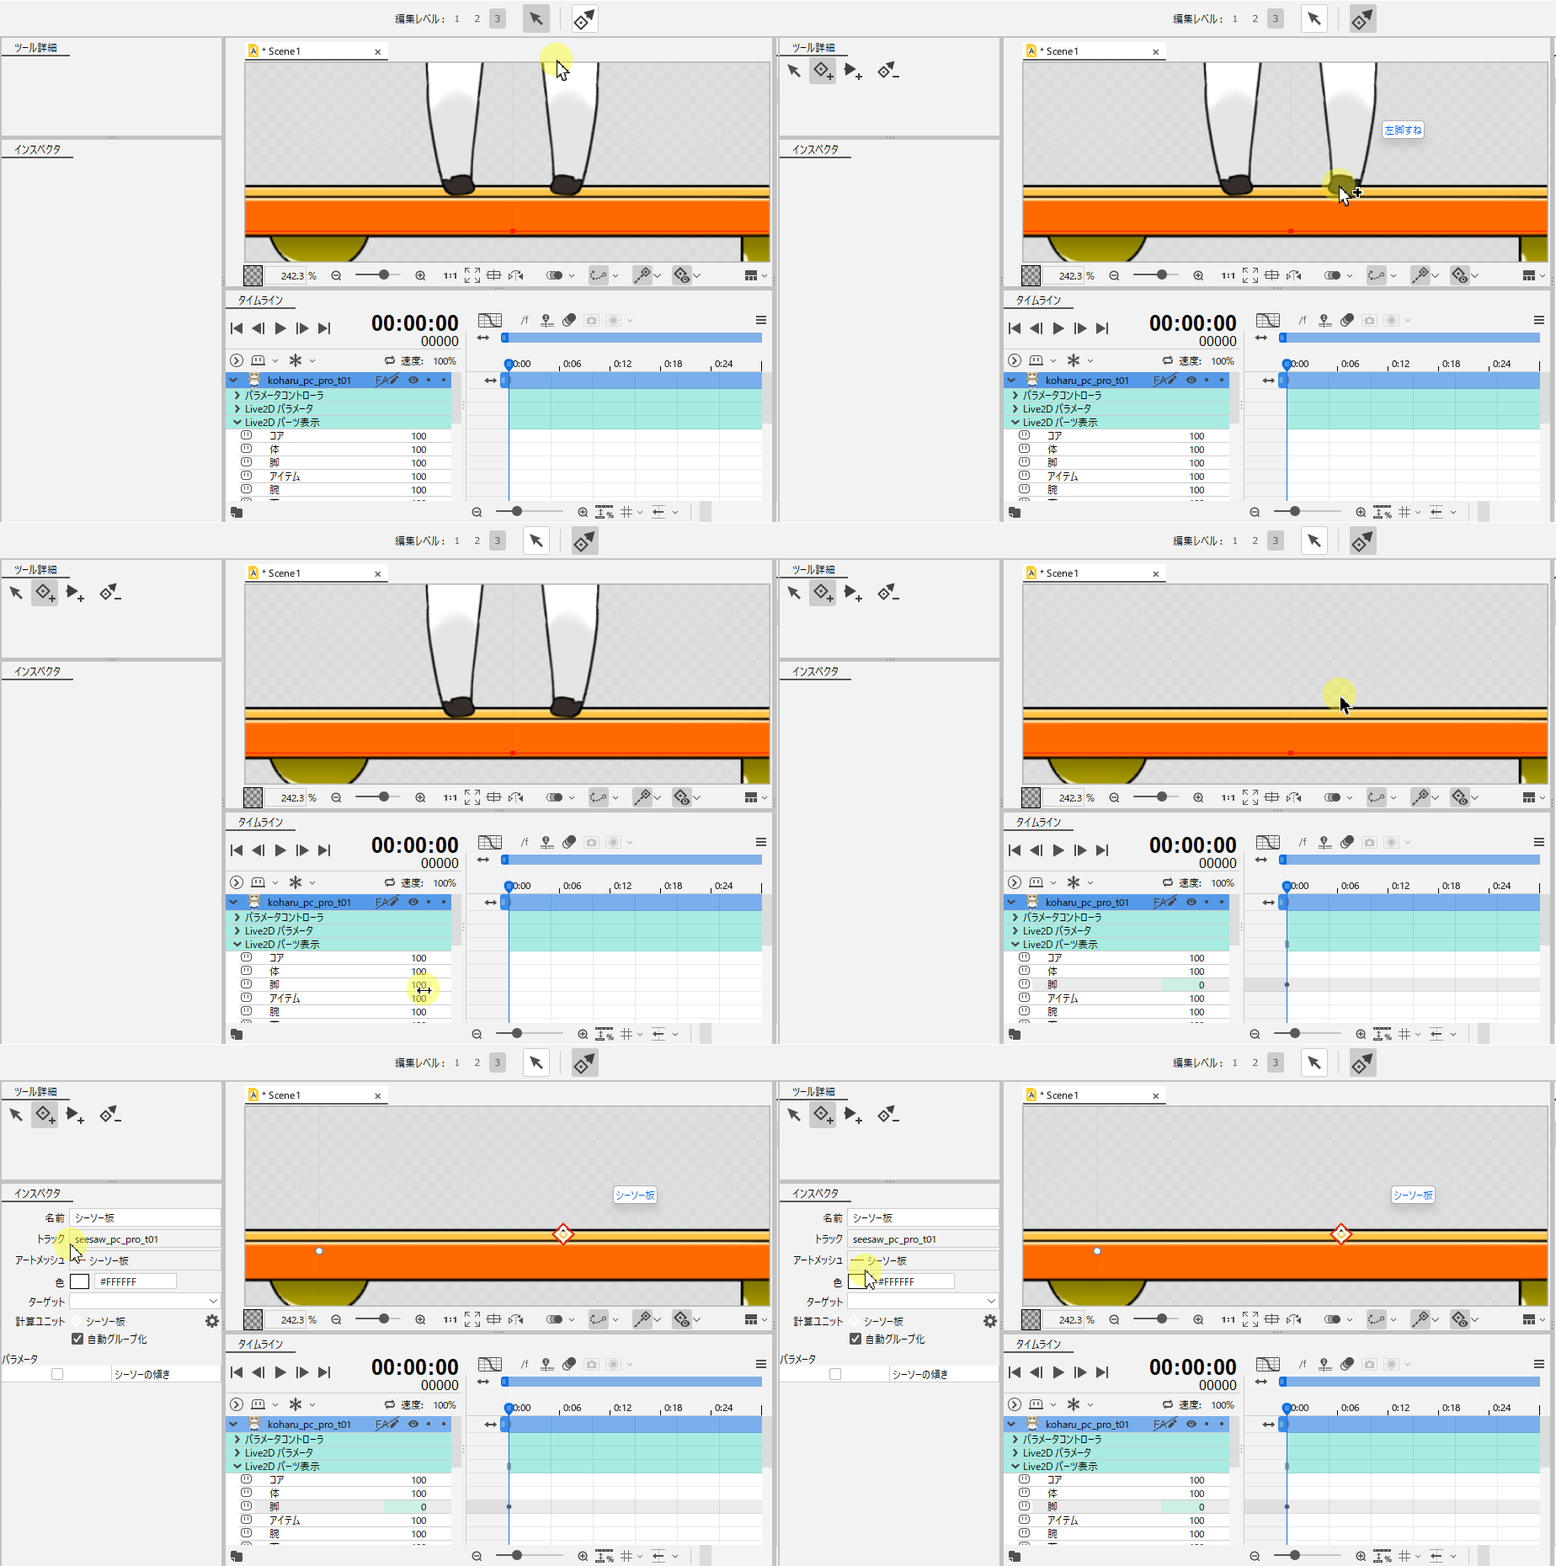
Setting the controller on an ArtMesh that is not drawn in the front
If you want to place the controller at the same position on the ground as the feet, for example, you can only set the controller on the foremost ArtMesh.
If you want to set the controller on an ArtMesh behind, hide the foreground parts in [Live2D parts visibility] and then set the controller.
Settings for moving two joints of a body part such as an arm or leg
When moving two joints of a body part, such as an arm or leg, with a target set, the intended motion can be made by setting a keyframe to the parameter.
In the example below, the foot is automatically tracking toward the seesaw, but the direction of knee bend is controlled by a parameter.
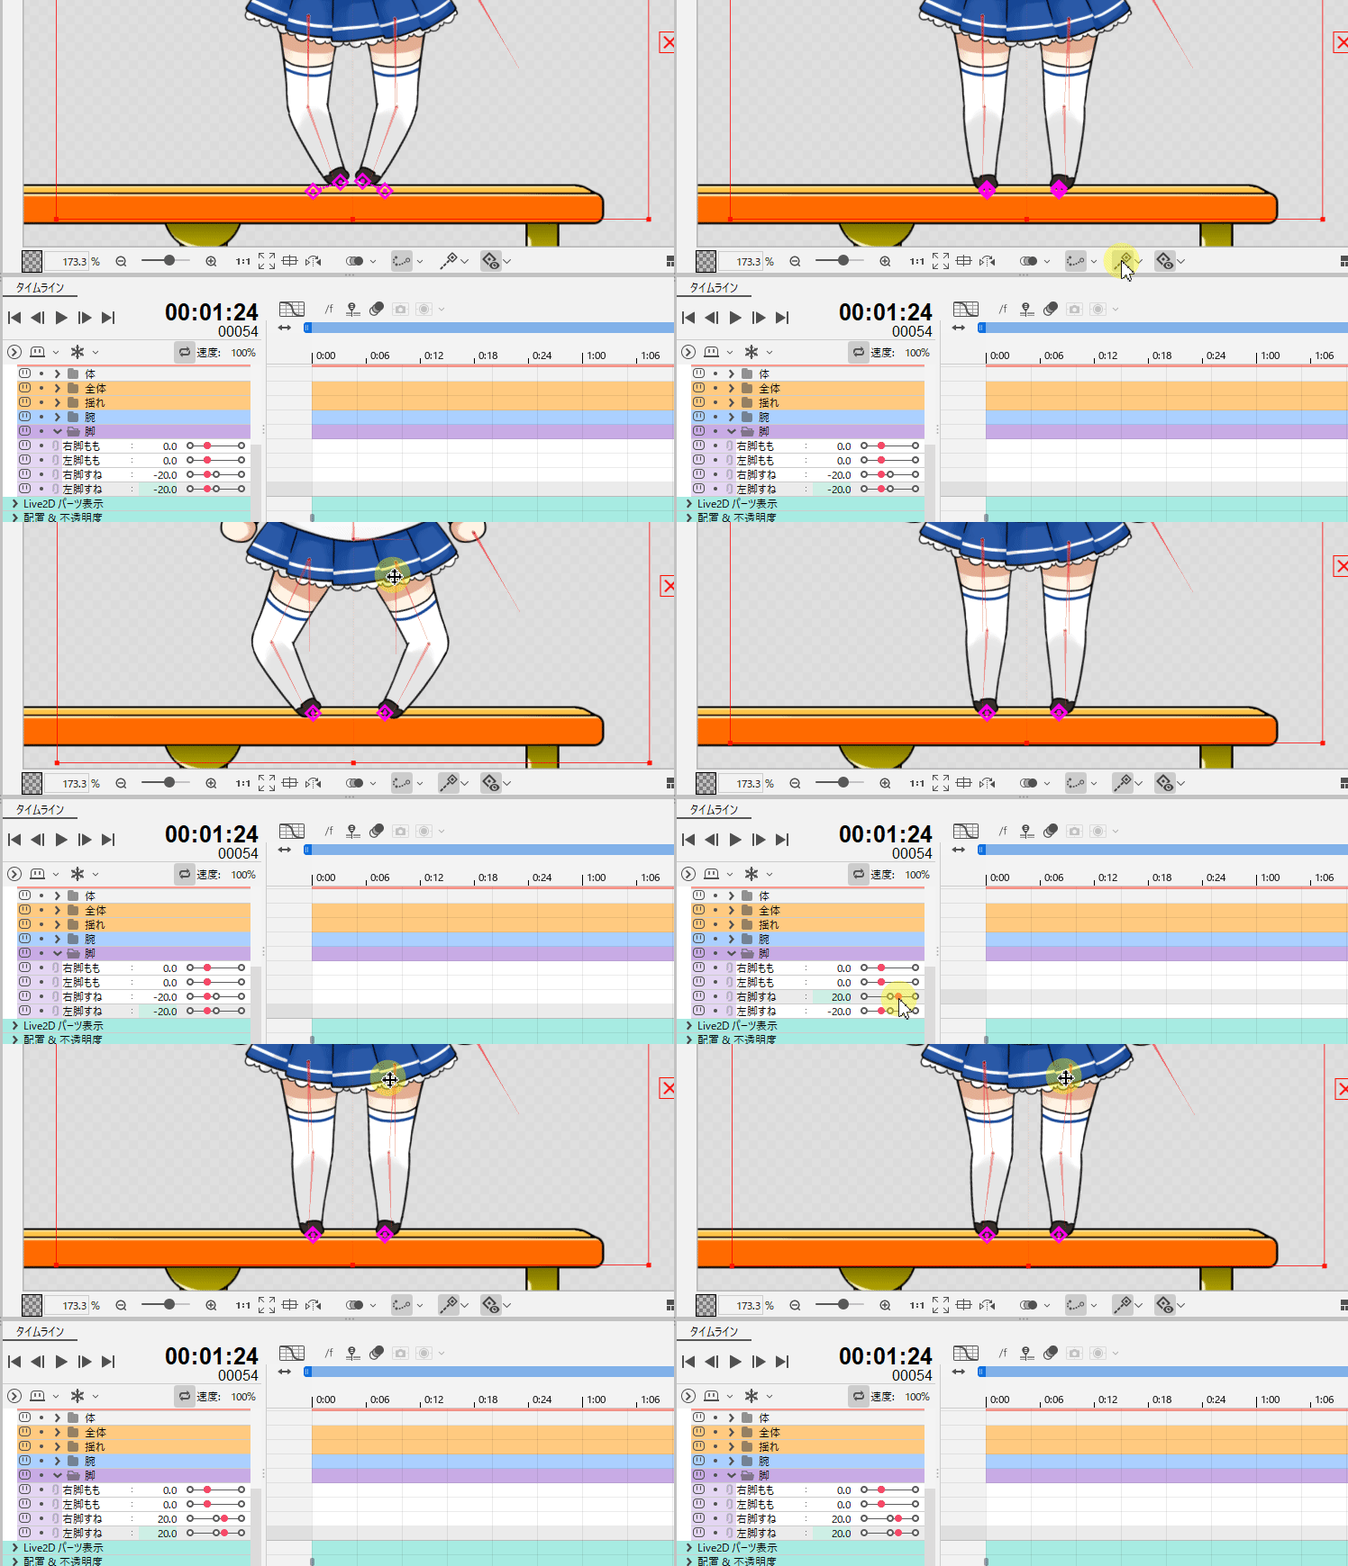
If you want a body part with two joints, such as an arm or a leg, to track a target, it is recommended to set the target tracking from a pre-bent position.
About the parameter controller calculation unit
When setting targets, two parameter controllers may overwrite each other with parameters that are affected by each other’s calculations.
To prevent this, the units of calculation ([Calculation Unit]) are automatically grouped together to calculate multiple parameter controllers at once.
However, if the calculation results are unintended, or if you want to control the motion even more closely, you can separate the calculation for a single controller by clearing the [Automatic grouping] checkbox.
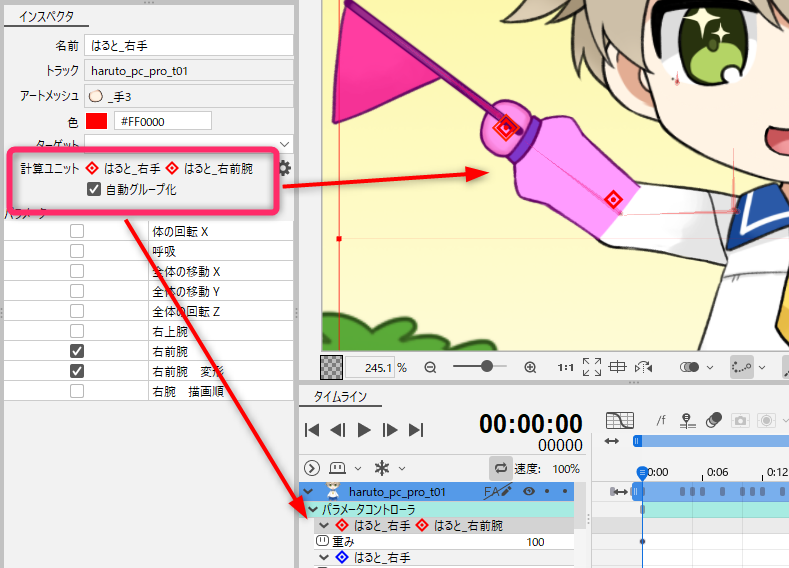
This may allow the intended motion to be adjusted in the calculation unit settings described below.
Parameter controller calculation unit settings
When a target is set, the order in which parameter controllers are calculated can be checked in [Parameter controller calculation unit settings].
Select the [Animation] menu -> [Parameter Controller] -> [Parameter controller calculation unit settings] to display the [Parameter controller calculation unit settings] dialog box.
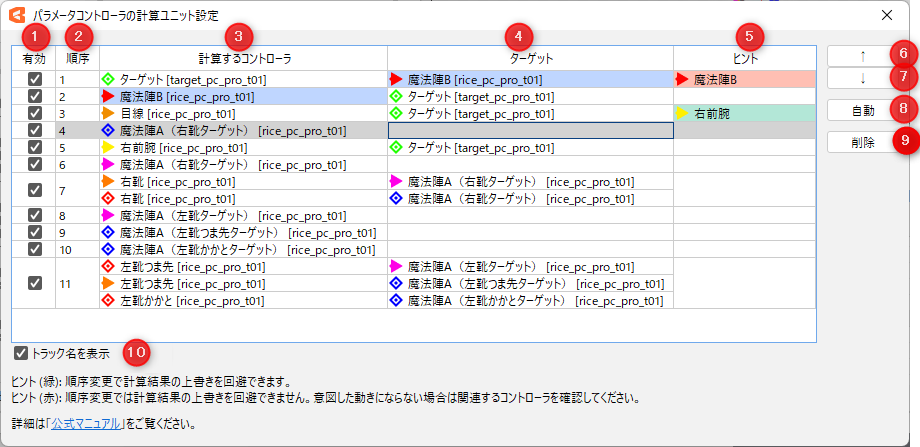
| Number | Name | Description |
|---|---|---|
| 1 | Valid | You can set whether calculations are performed for target tracking or baking. |
| 2 | Order | The order of calculation of the calculation units for the entire scene. |
| 3 | Calculating controller | Displays the parameter controllers to be calculated. Selecting a parameter controller in the dialog box will cause the target parameter controller to become selected. |
| 4 | Target | Displays the target of the controller to be calculated. |
| 5 | Hint | Information is displayed when a parameter is overwritten by a later calculated unit in the calculation sequence or when a controller that has not yet been calculated is set as a target. The following states are indicated by the color of the background. Green: Changing the order of calculations will produce the recommended calculation results. Red: Changing the order of calculations does not produce the recommended calculation results. The intended motion may be achieved by switching the timing of tracking by setting weights, etc., as described below. However, these are just not the recommended calculation results, so there is no problem with the hints displayed as long as the actual motion is as intended. |
| 6 | ↑ | Raises the priority of the currently selected calculation unit by one. |
| 7 | ↓ | Lowers the priority of the currently selected calculation unit by one. |
| 8 | Automatic | Automatically rearranges calculation units to show fewer hints. Red hint information cannot be deleted. |
| 9 | Delete | Delete the currently selected calculation unit. |
| 10 | Display track name | Displays the name of the track to which each controller belongs in the calculation unit, after the controller and target names. |
Tips for making the intended motion
In the [Parameter controller calculation unit settings] dialog box, the order can be rearranged by pressing the [Automatic] button to make the motion as expected.
However, the expected motion may not always be the intended motion, so refer to the [Hint] section to make adjustments to achieve your intended motion.
Weight settings
When tracking a target, you can set how much of the calculation results are reflected in the motion by adjusting [Weight] in the [Parameter Controller] property group of the timeline.
A value of 100 applies 100% of the results of the [Parameter Controller] calculation during target tracking.
When it reaches 0, tracking will be in the state set by other target tracking performed until just before the value reached 0 or the state set by “Live2D parameters.”
Weight can also be blended to apply 50%, etc.
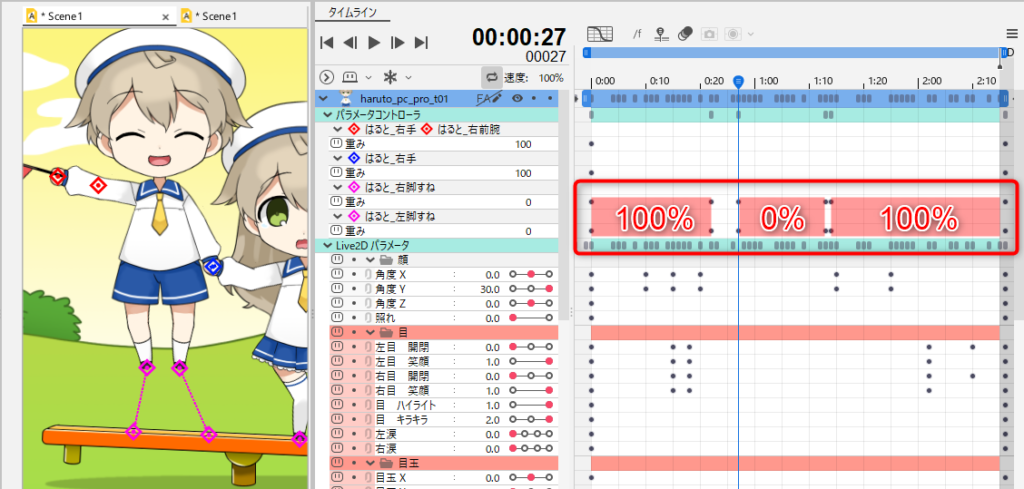
If the model above is in a jumping motion, you can set the target tracking weight to “0” while jumping and fine-tune the leg motion with parameters.
Target tracking calculation results are reflected in the drawing
This function allows you to visually confirm the calculation results of target tracking on the view.
Select the [Animation] menu -> [Parameter Controller] -> [Follow target].
Basically, this selection should be kept and used to check the final look during editing.
It can also be operated from the button at the bottom of the view area.
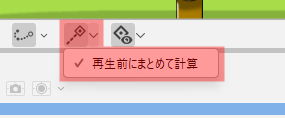
Calculate collectively before playback
When the [Follow target] button is pressed and the [Calculate collectively before playback] checkbox is selected, you will see a smooth animation with no delay.
When animation playback starts, a cache of frames in the work area is generated, so it takes a little time before playback starts.

Clearing the [Calculate collectively before playback] checkbox will create a cache of frames as they are played back.
Target tracking ON/OFF
Image and video export
Selecting the [File] menu -> [Image and video export] while the [Follow target] button is ON will output an animation with target tracking applied.
Freeze
Target tracking and freeze cannot be enabled simultaneously.
Target tracking is disabled when freeze is enabled.
Animation baking of parameter controllers
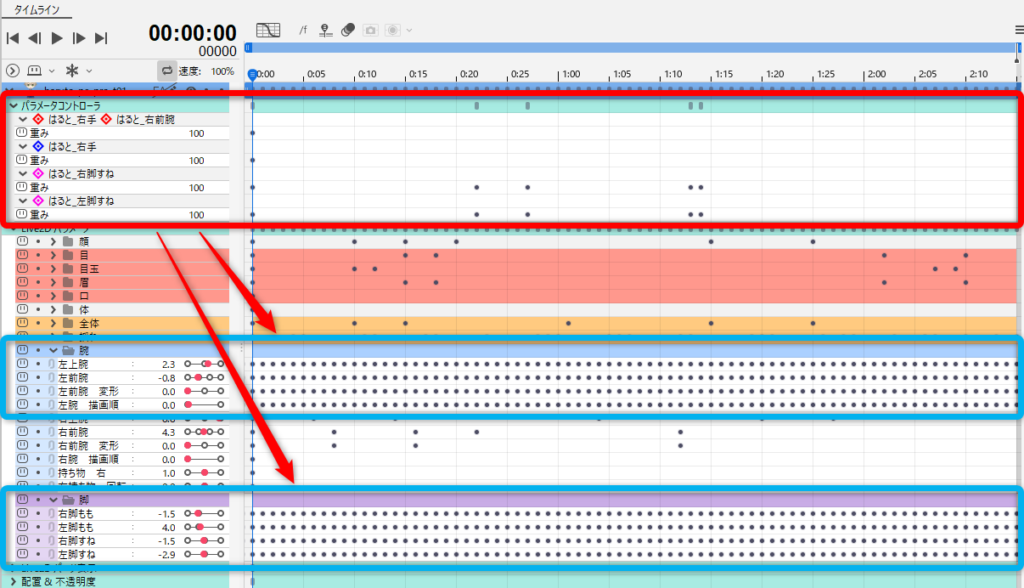
Bake the motion calculated by target tracking as keyframes in [Live2D parameters].
Select the [Animation] menu -> [Track] -> [Animation baking of parameter controllers].
The following confirmation dialog box will then appear.

Selecting [Bake after duplicating the scene] will bake the keyframes into the duplicated scene and remove all parameter controllers from the scene.
Note: The duplicate source will be saved as “scene name_COPY.”
Selecting [Bake without duplicating the scene] will bake the keyframes into the currently selected scene without duplicating the scene and remove all parameter controllers from the scene.
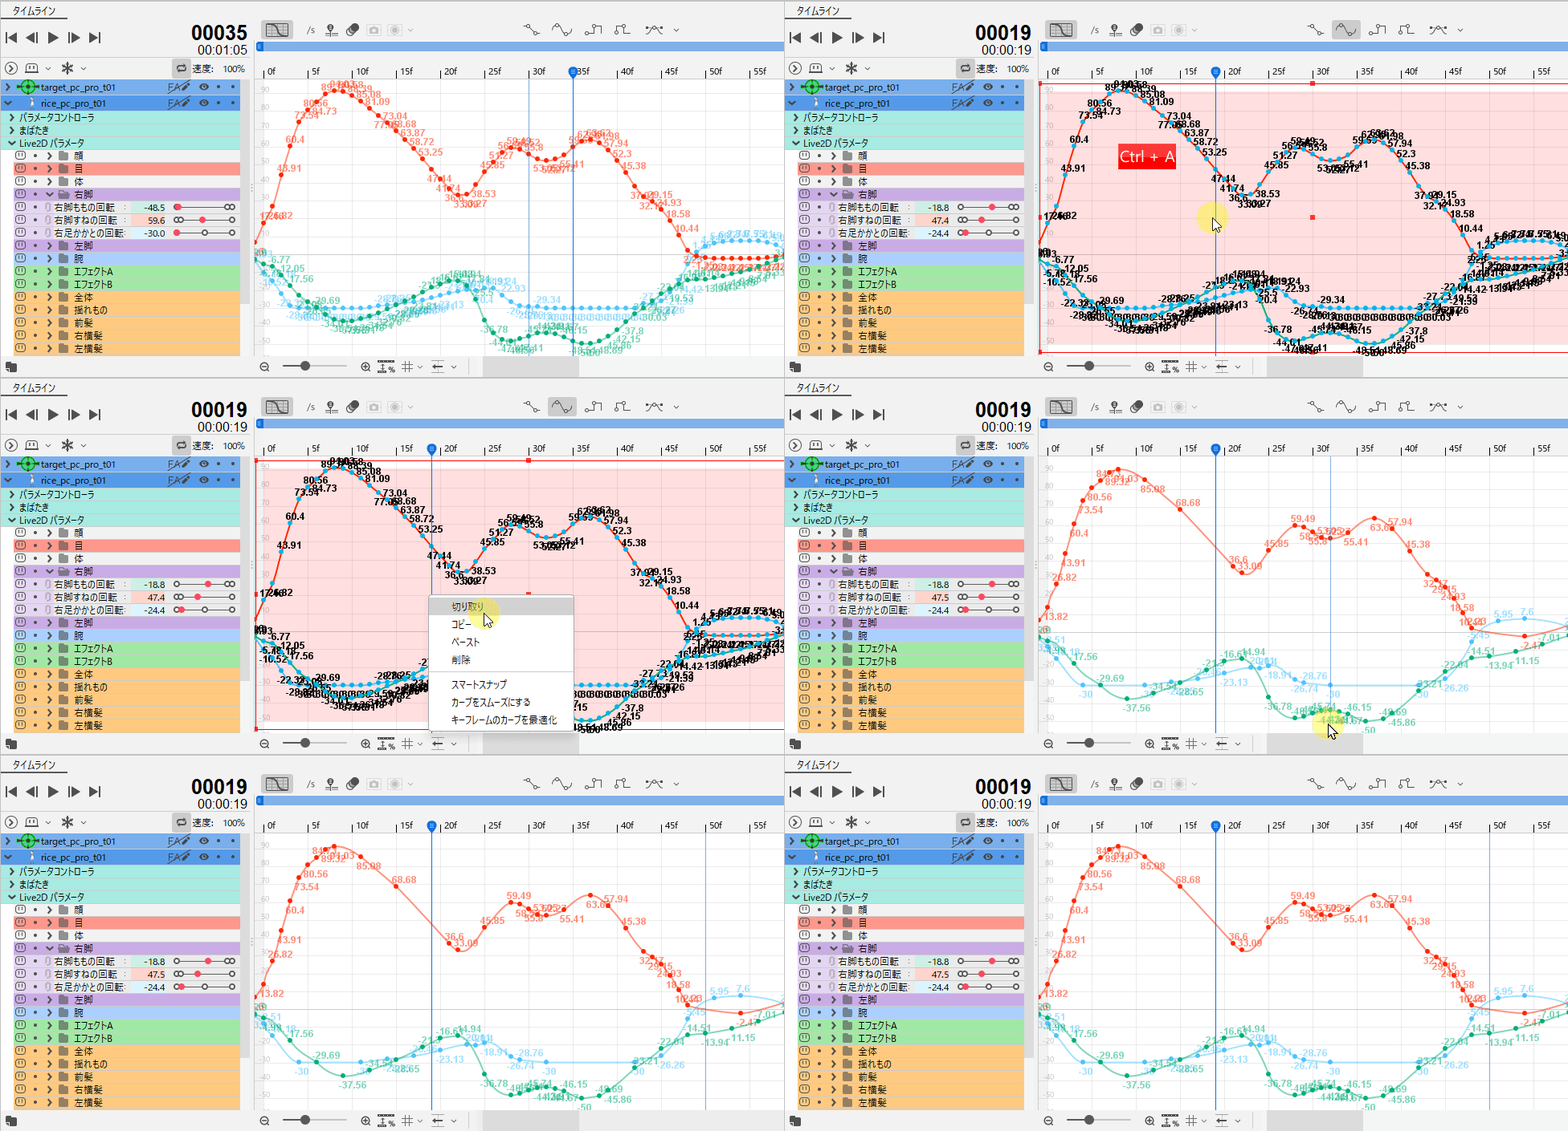
Baked keyframes can be optimized.
Click “Optimize keyframe curves” from the Graph Editor context menu.
The number of keyframes can then be reduced while maintaining the shape of the curve.
Notes on setting targets
Response
When a target is set on a controller, it can affect the response time for playing and editing animations.
Reducing the number of controllers that have targets set or temporarily disabling them will improve response.
Tips
Dragging a controller that is not directly targeted on the view and setting keyframes to the timeline has virtually no effect on the response.
Frame Step
If frame steps are set for target tracking, it is recommended that the same frame steps be set for the track designated as the target.
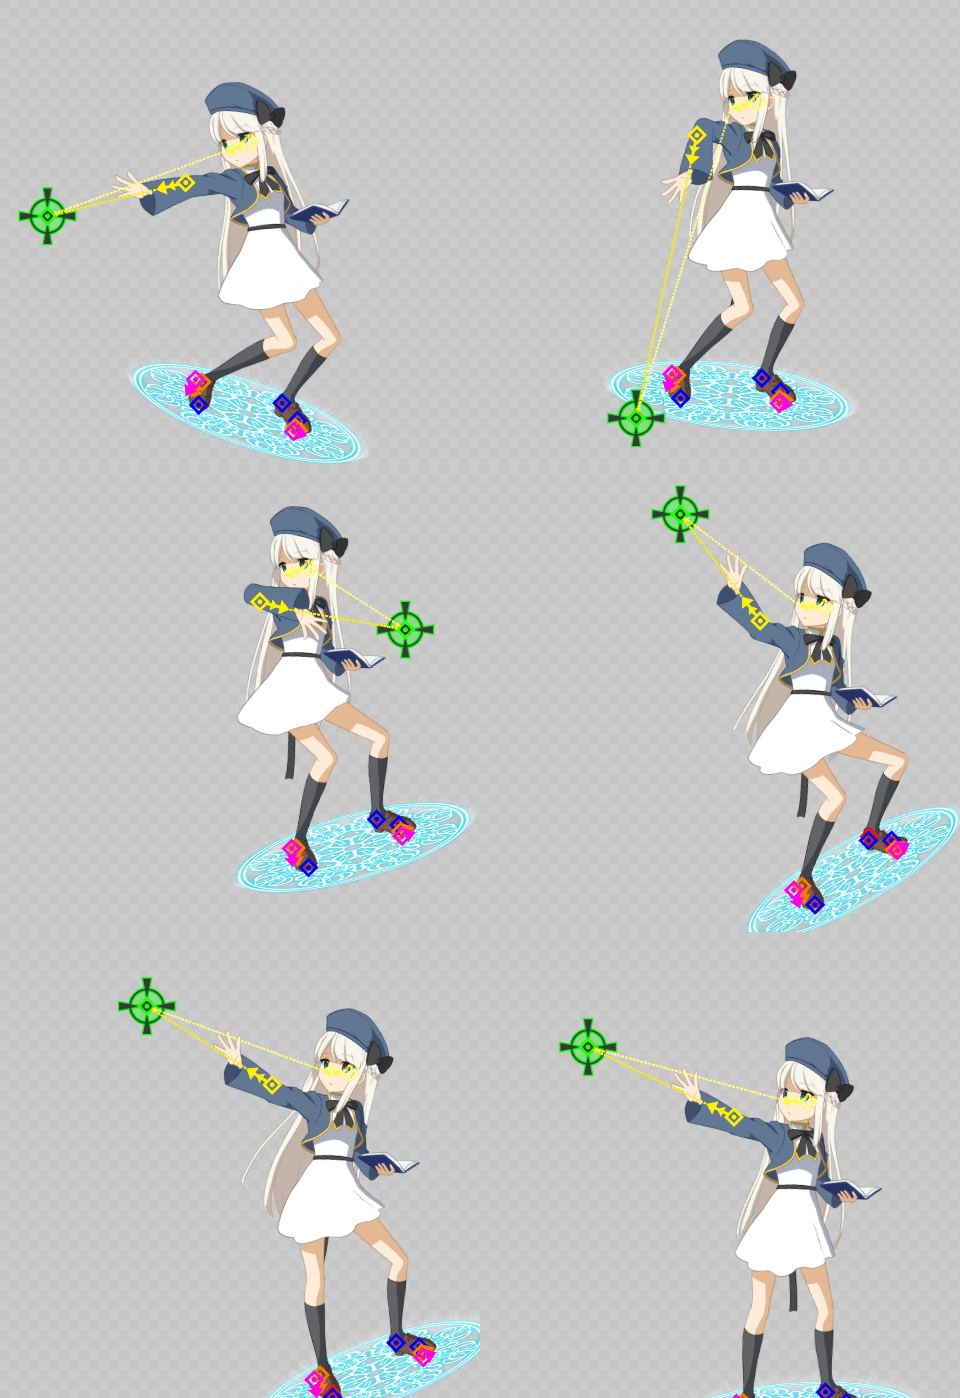
Improved target tracking
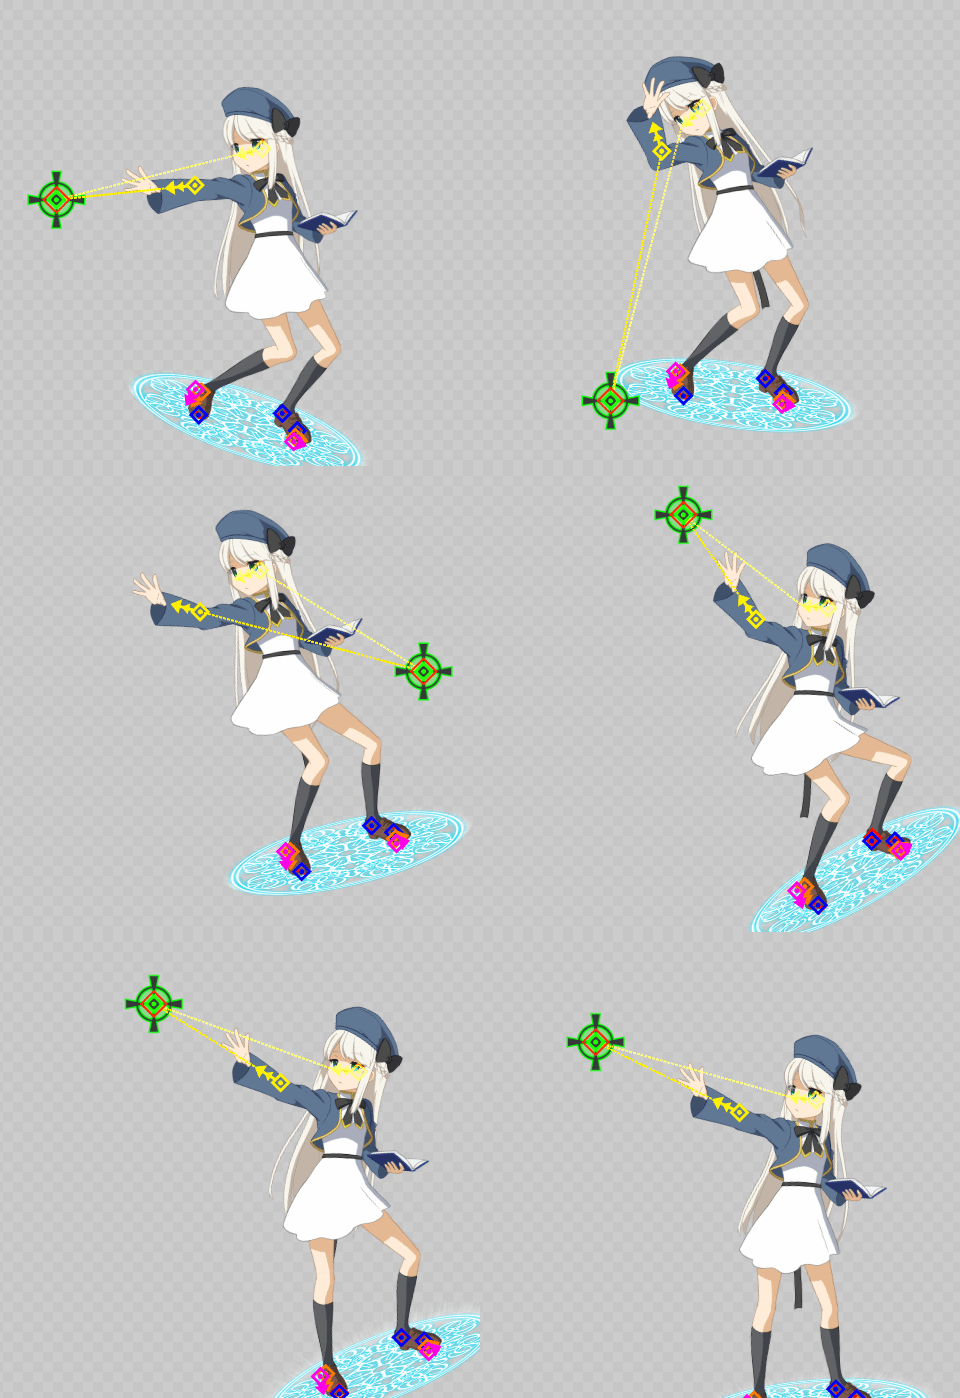
Until Cubism 5.2.03, when performing “direction controller tracking with single-point controller as target,” the controller was sometimes guided in the opposite direction of the target.
The following GIF images compare the movement of the direction controller set on the right hand tracking the target single-point controller in each version.
In Cubism 5.3, calculations have been optimized and operation has been improved.
| Up to Cubism 5.2.03 | Cubism 5.3 or later |
|---|---|
 |  |
When an animation file created with the editor of Cubism 5.2.03 or earlier is loaded into the editor of Cubism 5.3 or later, a confirmation dialog box will appear when the affected settings are detected.
Since optimization of the calculation may cause changes in the target tracking movement, please refer to the GIF movement, comparing each version to check the affected controller.
