About Cubism Viewer (for OW)
Updated: 03/03/2026
Cubism Viewer (for OW) is a Viewer intended only for validation of data created with Cubism.
Note: OW stands for “Original Workflow.”
With Cubism Viewer (for OW), you can check the following model display playback, etc.
• Physics
• Eye tracking
• Playback of multiple motions
• Facial expression settings
• Pose settings
Models and motions that can be loaded in Cubism Viewer are data exported for embedded use.
Please note that .cmo3 and .can3 for editing cannot be loaded.
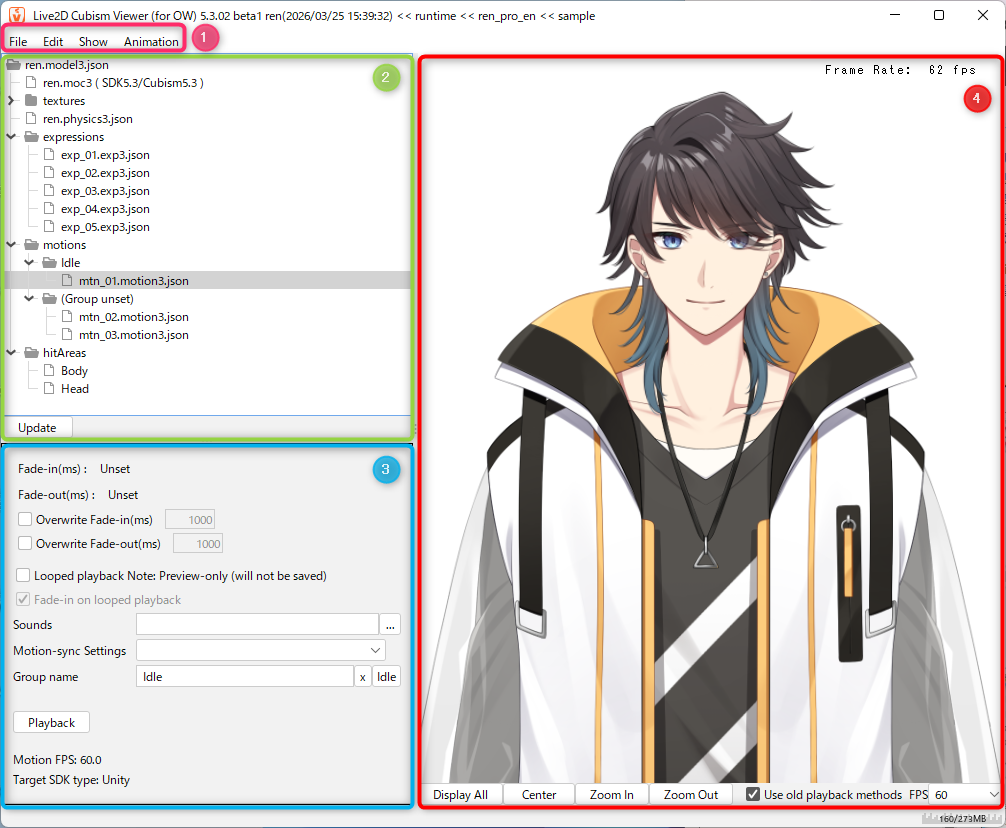
About the Screen of Cubism Viewer (for OW)
| Number | Item | Details |
|---|---|---|
| (1) | Menu area | A menu appears that allows you to load models, manipulate parameters, and play back motion. The menu to be displayed is selected from the drop-down at the top. |
| (2) | Resource area | Display the loaded data and data created in Cubism Viewer. |
| (3) | Setting item area | Change and check settings related to expression setting files and motion files. The settings can be saved in a model settings file. [File] menu -> [Export] -> [Model Settings (model3.json)] |
| (4) | Model display area | The loaded model is displayed here. The model can be moved or scaled. The [Show] menu allows you to change the background color, display the model with a transparent background, and display the collision detection. Note: The alpha value (transparency) of the background color cannot be set in the macOS version. |
How to Start Cubism Viewer (for OW)
Cubism Viewer (for OW) is included in the Cubism Editor installer.
After extracting the file, start the CubismViewer.exe file, which is located in the same folder hierarchy as the executable file.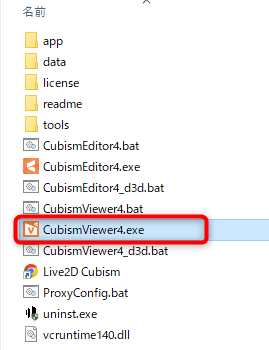
Loading files
Upon activation, a dialog box for loading opens.
Drag and drop the “.moc3” or “.model3.json” file to start the Viewer.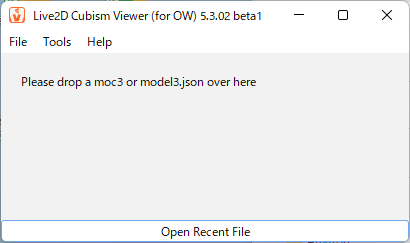
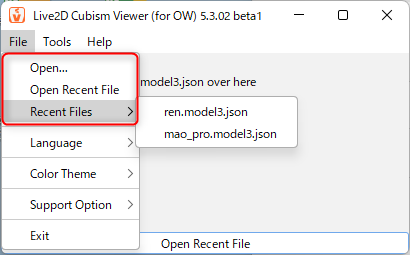
You can also load files from [Open], [Open Recent File], and [Recent files] on the [File] menu.
Language
You can switch the display language from the [File] menu -> [Language]. 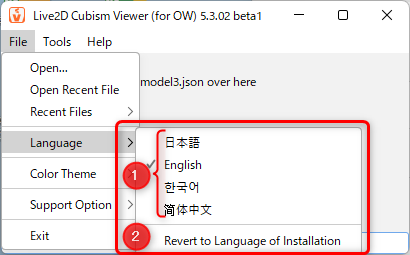
| Number | Item | Details |
| (1) | Language switching | You can select from [Japanese], [English], [Korean], or [Chinese]. |
| (2) | Revert to the language of the installation (Windows version) | Switches to the language selected during installation. |
| Revert to OS system language (macOS version) | Switch to the language of the OS. |
The following are the specifications for language settings.
• The language will be switched when the Editor is restarted after changing the setting.
• Language settings are shared within Editors of the same minor version (e.g., 5 series).
• Language switching, which is done through the Editor’s [Settings] menu, takes precedence over the installation settings and OS settings.
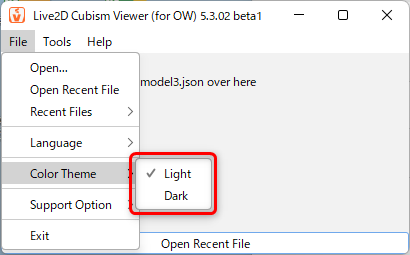
Color theme
You can switch between the [Light] and [Dark] color themes from the [File] menu -> [Color theme].
How to Create Basic Embedded Data
(1) Execute MOC3 file export from modeling
[File to be exported]
• Texture file (.png)
• MOC3 file (.moc3)
• Model file (.model3.json)
Note: Includes links to physics settings (.physics3.json) and motion-sync settings (.motionsync3.json).
(2) “Export motion file” from Animation
[File to be exported]
• Motion file (.motion3.json)
(3)Load the following files into the Viewer
• MOC3 file (.moc3) Note: .model3.json is also acceptable
=> File is loaded and the Viewer starts up
• Exported motion (.motion3.json) file
(4)Configure settings in the Viewer
• Pose settings (.pose3.json)
• Expression settings (.exp3.json)
[Notes]
Files set in Viewer are marked with an asterisk to the upper right of their names.
(5)Exporting Model Setting Files
• Model settings file (.model3.json)
[Notes]
When you overwrite the (.model3.json) output from Cubism Editor at output, the file created by Viewer (marked with an asterisk) will be saved together.
Menu of Cubism Viewer (for OW)
File
| Item | Details |
|---|---|
| Add | Expression: Add motion for facial expressions. In the setting item area, place a check mark next to the parameter for which you want to set the expression and adjust the parameter. Pose: Create a settings file in JSON format to reflect the arm switching mechanism created in the model and motion. See the “Pose Settings” page for detailed instructions. |
| Import | Motion for facial expressions (motion3.json/exp3.json): Load [.motion3.json] for facial expressions exported in the animation process into Cubism Viewer. |
| Export | Model settings (model3.json): Export the settings made in Cubism Viewer in a JSON format file. Shortcut key [Ctrl] + [S] All facial expression motions: Export all facial expression motions as JSON format files. See the “Expression Settings and Export” page for a detailed explanation. Pose: Export the pose switching settings in a JSON format settings file. See the “Pose Settings” page for a detailed explanation. |
| Setting | Include the extension in the default expression name: Include the extension in the default expression name when adding an expression. Open destination location after saving and exporting: If unchecked, the destination folder will not open after saving or exporting. |
Edit
| Item | Details |
|---|---|
| Restore parameters to default values | Reset parameters to default values. |
| Stopping motion | Stops the motion being played. |
| Difference Comparison | Information from two MOC3 data files can be compared and checked in the Viewer. See the “Comparison of two MOC3 data information files” page for details. |
Display
| Item | Details |
|---|---|
| Display of collision detection | Displays the set collision detection. |
| Enable mipmap | Enable mipmap. Note: Typically, we recommend that you check the box. |
| Background transparency (beta) | Displays the model with a transparent background. Note: This feature is not available in the macOS version. |
| Background color setting | Sets the background color. Note: The alpha value (transparency) cannot be set in the macOS version. |
| Frame rate display | The frame rate is displayed in the upper right corner of the model display area. |
| Show events | The event is displayed in the lower right corner of the model display area. |
Animation
| Item | Details |
|---|---|
| Enable facial expressions | Enables playback of motion for facial expressions. |
| Automatic Eye-blinking | Make the eyes blink automatically. |
| Enable Physics | Enable physics settings. |
| Enable Pose Switching | Enable Pose Switching. |
| Motion-sync | Enable motion-sync. See “Motion-sync Settings (OW)” for details. |
| Idle Motion | Enables idle motion. |
| Cursor tracking | Enables cursor tracking in the model display area. |
| Breath | Enable breathing. Breath applies values to parameters whose parameter IDs are “PARAM_BREATH” or “ParamBreath.” |
| Repeat parameters | Enable parameter repetition. |
| Use Old Motion Playback Method | Enable the old motion playback method. The [Use Old Motion Playback Method] checkbox in the lower right corner of the model display area is checked. See the “When the reproducibility of motion3.json deteriorates” page for a detailed explanation. |
| Use the old fading method | Enable the old fading playback method for expressions. The [Use the old fading method] checkbox in the lower right corner of the model display area is checked. For a detailed explanation, please see the “Fixing Bugs with Expression Transition Processing in Cubism 5 or Later” page. |
| Cursor tracking settings | Opens a dialog box for cursor tracking settings. |
About Cubism Viewer (for OW) Features
Cursor tracking settings
Check [Animation] menu -> [Follow Cursor] and drag on the View to move the model following the mouse cursor.
You can also set the parameters you want to follow in the [Animation] menu -> [Cursor Tracking Settings], which allows you to simulate the actual device.
Impact (%):
The degree of influence can be set to affect the movement of the parameter.
A stronger setting will result in a larger movement, while a weaker setting will result in a smaller movement.
Flip:
The cursor tracking is flipped.
Type:
Set the type of parameter you want the cursor to follow.
• In the case of left mouse dragging
(Left mouse X: horizontal movement, Left mouse Y: vertical movement)
• In the case of right mouse dragging
(Right mouse X: horizontal movement, Left mouse Y: vertical movement)
Cursor tracking settings are saved in the model data (.cmo3) but are not exported to the embedded data.
If you want the cursor to follow when embedding, configure the settings on the SDK side.
Note: Cursor tracking settings can also be checked in “Physics Settings.”
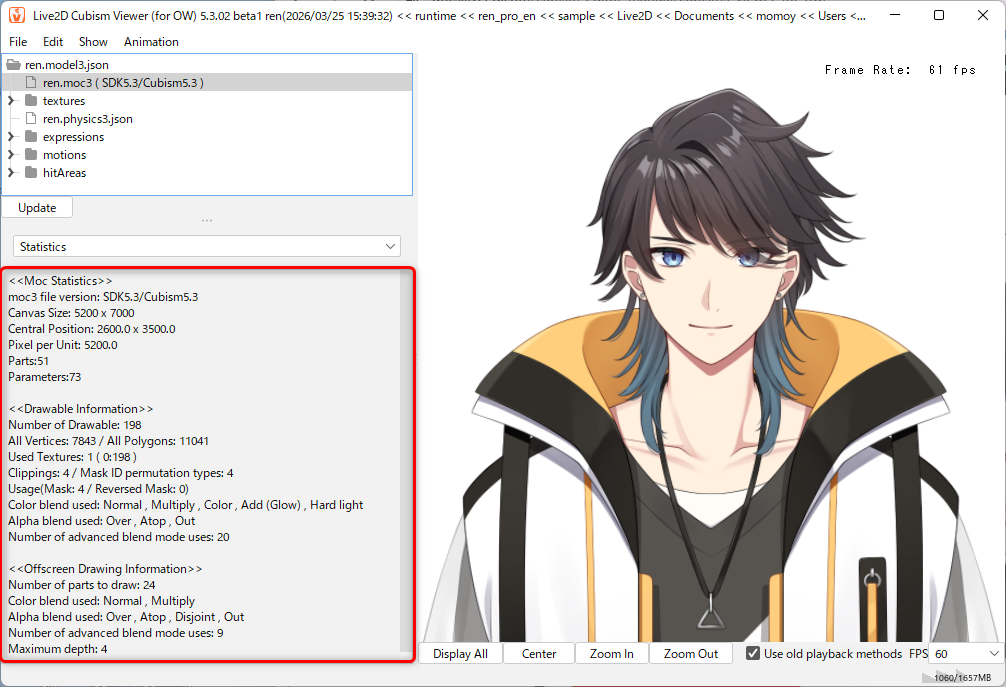
List of MOC3 file information
Click on the MOC3 file name and use the pull-down menu below to see the following information.
- Parameters
- Part(s)
- ArtMesh
- Offscreen drawing
- Draw order
- Statistics
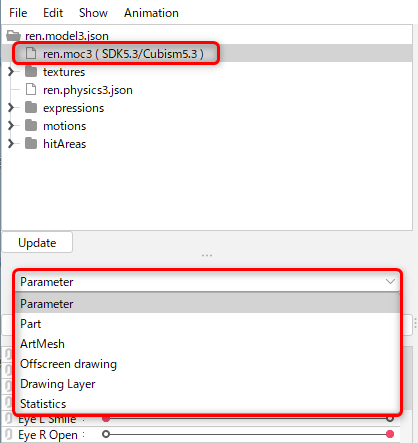
In the ArtMesh, offscreen drawing, and draw order sections, you can check information such as the number of polygons and vertices in a list format.
ArtMesh
When individually selected from the list, the target ArtMesh blinks blue in the view.
Statistics
You can check the target version and other information from the MOC3 file statistics.
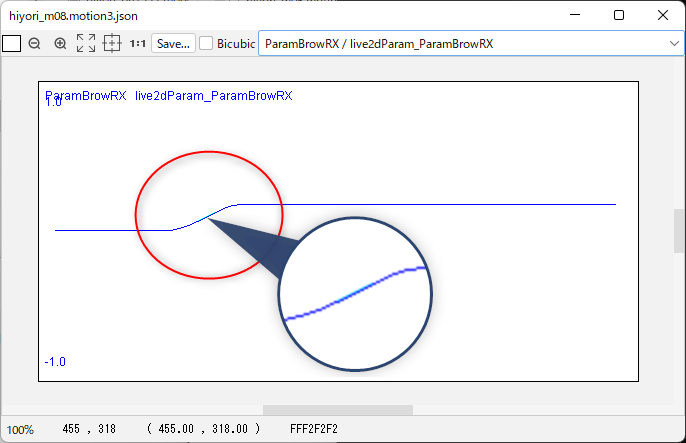
About curves
Image confirmation of curves
Select .motion3.json and right-click [View motion changes as image] to view the curve as an image.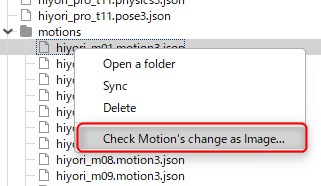

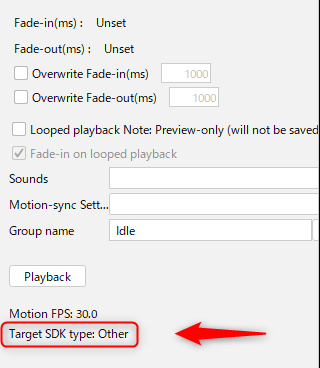
Displaying motion curve type
The motion inspector in the [OW Viewer] now displays the target version inferred from the information contained in the motion.
If you are using “SDK (Others)” in the target version, please consult with the developer and consider whether to check the box.
See the “When the reproducibility of motion3.json deteriorates” page in the SDK Manual for details.
Waveform comparison
For motions exported with the [SDK (Others)] function for checking curves, curves that are played back with unsupported SDKs are now displayed in light blue.
Use Old Motion Playback Method
Prior to version 4.1, Cubism Viewer (for OW) reproduced any motion file with the same curves as the animation in the Cubism Editor.
In Cubism Viewer (for OW) from version 4.1, motion will be reproduced with the curves reproduced by the SDK.
To use curves from versions earlier than 4.1, select the “Use Old Motion Playback Method” checkbox.
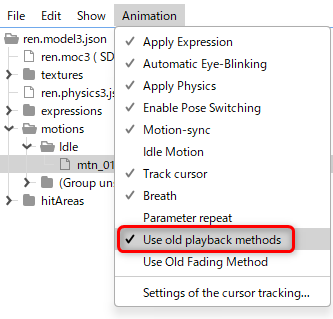
With the “Use Old Motion Playback Method” checked, the motion is played back with the Bezier curve motion with the Bezier handle fixed at 1/3 or 2/3.
If you are using the SDK (Others) in the target version, please consult with the developer and consider whether to check the box.
See the “When the reproducibility of motion3.json deteriorates” page in the [Cubism SDK Manual] for more details.
Comparison of two MOC3 data information files
Information from two MOC3 data files can be compared and checked in the Viewer.
The confirmation procedure is as follows:
- Drag and drop the two data files you want to compare into the Viewer
- Click [Edit] menu -> Select [Compare Difference]
- Check the confirmation dialog box that appears
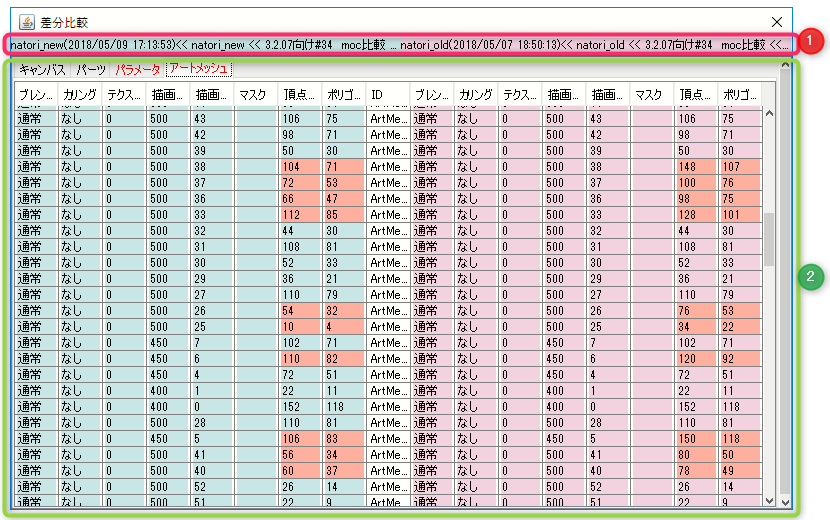
(1) File information
Display the information of the file you want to compare, such as the file name, the date/time the file was created, and the location of the file.
(2) Categories and detailed items
Canvas:
Display the comparative information on the canvas.
Parts:
Display the comparative information on parts.
Parameter:
Min, Default, and Max values are compared and displayed for each ID.
ArtMesh:
Information on the following items for each ID is displayed for comparison.
1. Blend mode
2. Culling
3. Texture number
4. Draw order
5. Draw order of Artmesh
6. Mask
7. Number of vertices
8. Number of polygons
Burning eye blinking and lip-sync motion
Motion set in “Eye blinking” and “Lip-sync” can be burned (baked) into Live2D parameters when exporting motion.
Since “Scale” and “Effect” data are not exported to motion3.json, this feature can be used to completely reproduce the motion of an animation in the Viewer.
Note, however, that the motion3.json file must be written out again if adjustments are necessary.
Note: When using Viewer (for OW), burning the motion function for eye blinking and lip-sync is recommended.
When setting motion data, check the “Burn Lip-sync and Blink into Motion” checkbox.
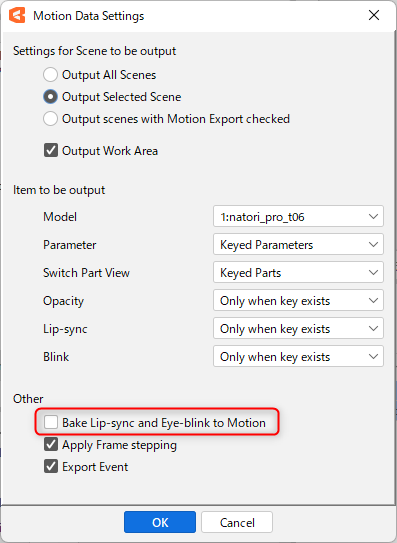
If this item is enabled, “Lip-sync” and “Eye blinking” will not be exported to .motion3.json separately, so the items will be grayed out.
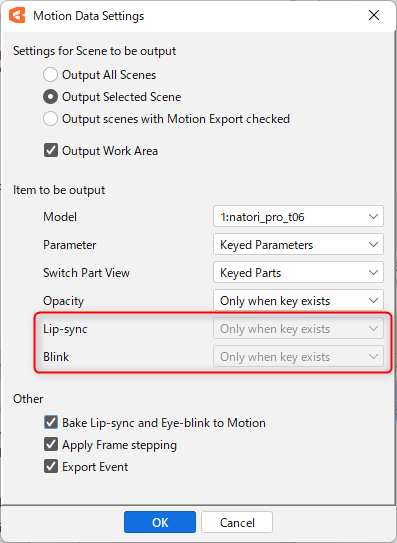
If you click “OK” in this state, you will be able to see the blink and lip-sync settings on the checked parameters.
It will be burned as a keyframe and output as .motion3.json.
If a keyframe is set for the parameter to which “Eye blinking” or “Lip-sync” is applied, the curve of the above effect is calculated (multiplied in the case of Eye blinking, added in the case of Lip-sync) for that parameter.