Application of 3D Rotation Expression
Updated: 09/19/2024
The function of “Application of 3D rotation expression” assists in the generation of 3D-like motion shapes.
For drawable objects (ArtMesh, ArtPath) and deformers (warp deformer, rotational deformer), it generates three-dimensional shapes with estimated deformation in 3D space.
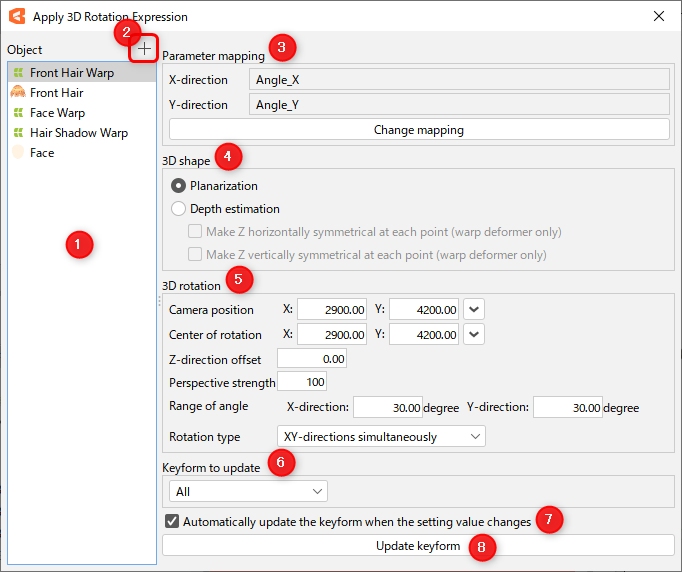
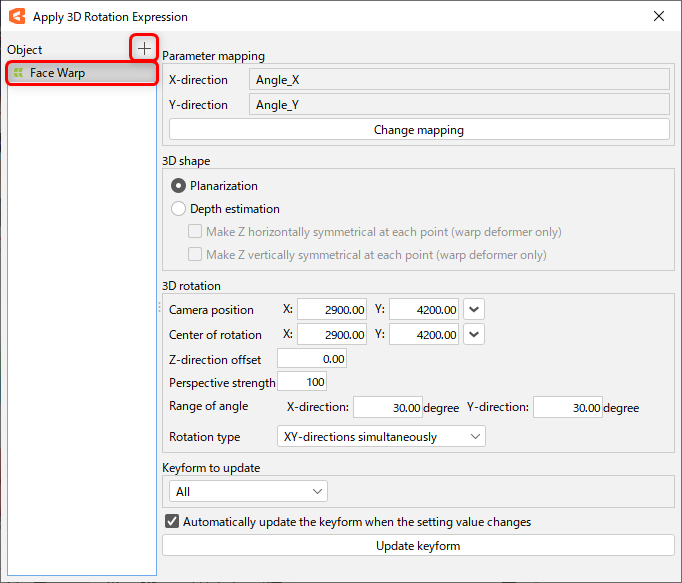
Structure of the dialog box for Application of 3D rotation expression
The function of “Application of 3D rotation expression” is available in the modeling view.
Select the [Modeling] menu -> [Parameter] -> [Application of 3D rotation expression] to open the dialog box.
Since this dialog box is modeless, it is possible to perform other operations in the modeling view while it is open.
| Number | Item | Description |
|---|---|---|
| 1 | List | Objects registered under [Register objects] will appear in this list. Right-clicking in the list will bring up the menu. |
| 2 | Register objects | Create a setting for application of 3D rotation expression to the object selected in the modeling view. |
| 3 | Mapping to parameters | Set parameters for rotation in the X and Y directions. |
| 4 | 3D Shape | Configure settings related to shape in 3D space. |
| 5 | 3D Rotation | Configure settings related to rotation in 3D space. |
| 6 | Keyforms to Update | Set the conditions under which keyforms are to be updated. There are four values that can be set: [All], [Parameters in X direction], [Parameters in Y direction], and [Four corners]. |
| 7 | Automatically update keyforms when setting values are changed | When checked, the keyform is automatically updated whenever any of the following settings are changed: [Mapping to parameters], [3D shape], [3D rotation], and [Keyforms to update]. |
| 8 | Update keyforms | The keyform is updated based on the settings. After performing keyform editing, this button must be clicked to estimate the 3D shape. |
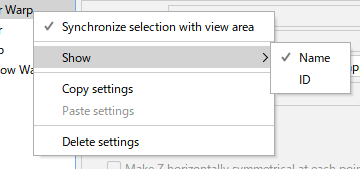
Right-click menu on the list
| Item | Description |
|---|---|
| Synchronize selections with the view | When checked, it synchronizes the selection state between the settings dialog box and the modeling view. |
| Display | Change the display type of the list. You can choose whether to display the object by “Name” or “ID.” |
| Copy settings | Copies the settings of [Ties to parameters], [3D shape], [3D rotation], and [Keyforms to Update] of the selected object. |
| Paste settings | Copied settings with [Copy settings] will be pasted to the selected object. If the [Automatically update keyforms when setting values are changed] checkbox is checked, the keyforms will be updated after pasting. |
| Delete settings | Deletes the settings of application of 3D rotation expression for the selected object. Objects whose settings have been deleted will disappear from the list. The object itself and the contents of the applied keyform are not deleted. |
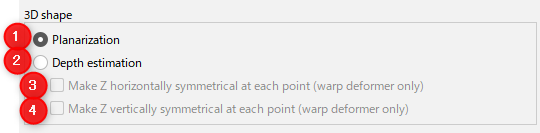
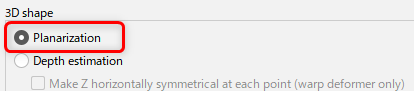
3D Shape
| Number | Item | Description |
|---|---|---|
| 1 | Flattening | Flattens the shape of the object in 3D space. It is used to generate the orientation in the underlying 3D space as a preliminary step to estimating the 3D shape. |
| 2 | Depth Estimation | Estimates the 3D shape from the displayed keyform. Estimation of 3D shapes can only be done for orientations other than frontal (default value keyform). |
| 3 | Make Z symmetrical at each point (warp deformer only) | Makes the Z position of each point in the warp deformer by depth estimation symmetrical on the left and right. |
| 4 | Make the Z of each point vertically symmetrical (warp deformer only) | Makes the Z position of each point in the warp deformer by depth estimation symmetrical vertically. |
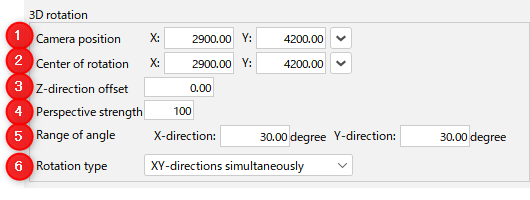
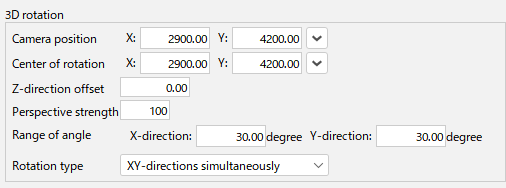
3D Rotation
| Number | Item | Description |
|---|---|---|
| 1 | Camera position | Specify the position of the camera that captures the object in 3D space. Specify XY coordinates in canvas coordinates. Z is automatically changed according to the perspective strength. The V button menu on the right allows you to change the display settings. |
| 2 | Center of rotation | Specify the center position for rotating the object in 3D space. Specify XY coordinates in canvas coordinates (markers will appear in the Modeling View depending on the setting). Z is the position of the canvas. The V button menu on the right allows you to change the display settings. |
| 3 | Offset in Z direction | Specify how much the depth is shifted in the Z direction. The front of the screen is positive, and the scale is the same as the canvas coordinates. The procedure for shifting in the Z direction is performed before rotation. If depth estimation is used, it is performed for the estimated position. |
| 4 | Perspective strength | Specify the perspective after the image is taken. If set to 0, parallel projection is used. If greater than 0, it will be a perspective projection. |
| 5 | Angle range | Specify the limit angle of rotation. The default value of the parameter is the front, and the minimum and maximum values, whichever is farther from the default value, are the limits of rotation possible. |
| 6 | Rotation method | Specify the rotation calculation method. This setting mainly affects the appearance of the four corners. |
For details on each setting item of 3D rotation expression, see “Setting items for applying 3D rotation expressions.”
Operating procedure
Create an expression of 3D rotation using the following three steps.
Each step is intended to be done in sequence, but you may skip or go back to one previous step and start over as needed.
- Register the target object in the list
- Set up 3D rotation in a plane
- Set up 3D rotation with depth estimation
Register the target object in the list
Registering an object to the list creates a setting and enables the use of applying a 3D rotation expression.
Step 1
Open the settings dialog box for applying 3D rotation expressions.
Step 2
With the settings dialog box open, select an object (ArtMesh, ArtPath, warp deformer, or rotation deformer) in the modeling view.
TIPS
When using the application of 3D rotation expression, any existing keyform edits will eventually be replaced by the auto-generated content. Therefore, it is recommended that objects selected here are those that have not yet undergone keyform editing.
Step 3
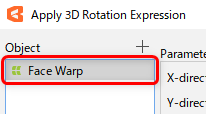
Clicking the [Register objects] button in the settings dialog box adds the selected object to the list.
Set up 3D rotation in a plane
Create keyforms that serve as the foundation for creating expressions with depth.
Assign a 3D rotation expression to the parameter and set it up so that you can specify the orientation for adding depth.
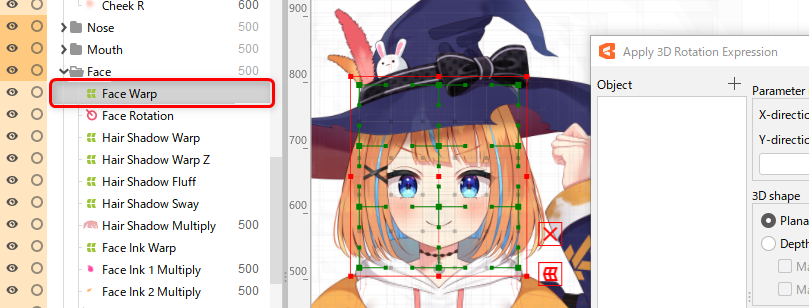
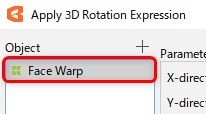
Step 1
Select in the list the object for which you want to create a keyform.
Step 2
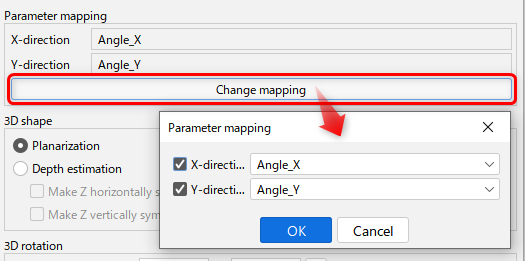
Specify the parameters for rotation in the X and Y directions in [Mapping to parameters].
Clicking [Change mapping] displays a dialog box for selecting parameters.
Checking the checkbox for the direction in which you want to rotate (both or one of [X direction] and [Y direction]) will activate the combo box.
Select the parameters to be mapped from the combo box and click the OK button to update the mappings.
Step 3
Select [Flattening] under [3D shape].
Step 4
Set each item in [3D rotation]. See the aforementioned screen descriptions for details on each item.
Step 5
Clicking [Update keyforms] creates a keyform for the 3D rotation expression.
The keyform created here is a 3D rotation of the front keyform as a plane.
If the [Automatically update keyforms when setting values are changed] checkbox is checked, the keyforms will be updated automatically, so there is no need to click [Update keyforms] each time you perform each of the steps 1 through 4.

The keyform created will have the default value as the front, with the minimum value facing left (down) and the maximum value facing right (up).
The keyform is created with the one that is farther away from the default value as the maximum angle.
If the parameter has not yet been keyed:
A dialog box appears asking if you want to add the three key points.
Clicking the OK button will set the keys in the default, minimum, and maximum values for the parameter.
If the parameter has already been keyed:
The keyform of that key’s position is overwritten by the keyform of the 3D rotation expression.
If there is no key in the default value, the creation of the keyform will result in an error and the process will be aborted, since it is not possible to determine the shape that will be the front.
Step 6
In the Parameter palette, move the values of the parameters to see the keyforms created.
If you want to modify it, return to step 4.
Set up 3D rotation with depth estimation
From here, you will add depth to the keyform created in “3D rotation in a plane” to create a three-dimensional rotation.
Step 1
In the list, select the object for which you created the keyform in “3D rotation in a plane.”
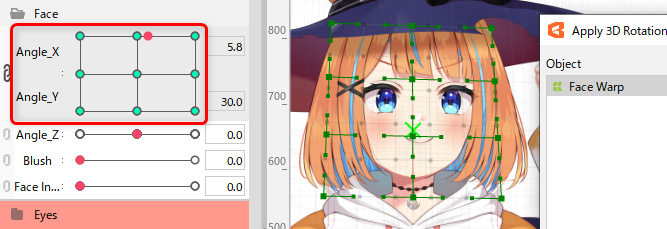
Step 2
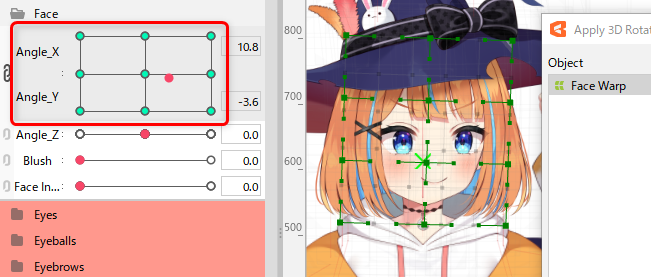
Select the parameter specified in [Mapping to parameters] in the parameter palette and select a key that is not the default value.
Since the default value is considered frontal, depth estimation is not possible with the default value keyform.
To add depth in the next step, you should select a keyform for which it is easy to grasp the three-dimensionality.
| OK A non-default value is selected | NG A default value is selected (angle X 0.0, angle Y 0.0) |
|---|---|
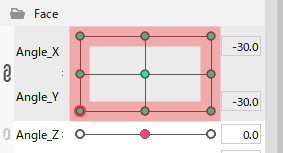 | 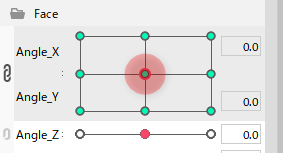 |
Step 3
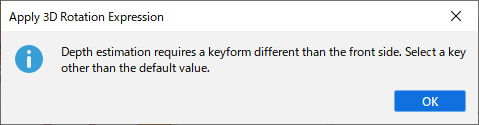
Select [Depth Estimation] under [3D shape].
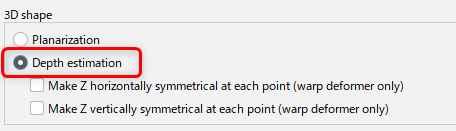
At this time, if the keyform with default values is selected, the following message is displayed.
As mentioned earlier, select a keyform other than the default value.
Step 4
Pressing [Update keyforms] creates a keyform for the 3D rotation expression.
Even if the [Automatically update keyforms when setting values are changed] checkbox is checked, this function will not automatically update the keyforms after editing them.
After editing the keyform, be sure to update the keyform manually.
Depth estimation is performed by pressing the button based on the keyform currently displayed in the modeling view.
A keyform of the 3D rotation expression is then created, similar to “3D rotation in a plane.”
Step 5
In the Parameter palette, move the values of the parameters to see the keyforms created.
It is also possible to manually adjust the object’s shape in the modeling view.
If you want to modify it, return to step 3.
For a better look, it is effective to arrange the keyforms in multiple orientations.
Precautions
As with normal keyform editing, deleting all keyforms created by applying a 3D rotation expression does not reset the shape.
If you delete all of the keyforms, they remain fixed in the shape they are displaying at the time of deletion.
If the parameters are rekeyed and the keyform is created again with depth estimation from this state, the results will not be consistent with the previous depth estimation results, and correct estimation will not be possible.
Please return to the original shape and start over from the 3D rotation in the plane.