Cubism 3 AE Plug-in (beta) (Old Version)
Updated: 06/03/2020
This page contains statements regarding the beta version.
The contents described here are a description of “Live2D Cubism 3 AE Plugin beta4_1.”
Note: This version is no longer available.
Please download the latest version from the following page.
This plug-in enables Adobe After Effects to handle Cubism 3 models (.moc3).
Cubism 3 models can be loaded into AE and keyed directly on the timeline for animation.
There is no need to use videos or sequentially numbered still images output by Animator because motion editing of the model can be performed directly in AE.
Notes on the beta version
- We recommend that you make a backup of your data, just in case.
- Since this is a beta version, we may not be able to guarantee compatibility with future releases.
- We will do our best to accommodate you, but we ask for your understanding in advance.
- Please feel free to contact the community regarding any problems or requests with the beta version.
Supported AE versions
- After Effects CC 2019
- After Effects CC 2018
- After Effects CC 2017
- After Effects CC 2015
- After Effects CC 2014
For older versions up to Cubism 2.1, please download from the following page.
“After Effects Plug-in for Cubism 2.1”
Proposed features to be supported in the future before the official version
- Import and export motion
- Simplified procedure for loading model3.json
- Support CC2018 (CC2018 is now supported.)
- Display parameter names in AE
- Support file collection functions
Terms of Use
The application is subject to the Editor’s Terms of Use.
Please be sure to read the Editor’s “Free Material License Agreement” before downloading and launching the software.
By downloading or launching the software, you must agree to the Terms of Use.
Download
| Version | Windows | Mac |
|---|---|---|
| Live2D Cubism 3 AE Plugin beta4_1 | Download | – |
| Live2D Cubism 3 AE Plugin beta4 | Download | – |
| Live2D Cubism 3 AE Plugin beta3 | Download | – |
| Live2D Cubism 3 AE Plugin beta2 | Download | – |
| Live2D Cubism 3 AE Plugin beta1 | Download | – |
Update Information
New!
[2/1/2019] Live2D Cubism 3 AE Plugin beta4_1
- Adobe After Effects CC2019 is now supported by the installer.
[12/25/2018] Live2D Cubism 3 AE Plugin beta4
- AE plug-in for Cubism 3.3 is now available.
[10/30/2018] Live2D Cubism 3 AE Plugin beta3
- Fixed a bug that prevented certain ArtMesh with masks set from being displayed.
[09/21/2018] Live2D Cubism 3 AE Plugin beta2
- Fixed a bug that prevented the creation of links to plug-ins in the CC2014 version. (Modified for installer only)
[07/25/2018] Live2D Cubism 3 AE Plugin beta2
- Adobe After Effects CC2018 is now supported.
[06/28/2018] Live2D Cubism 3 AE Plugin beta1
- AE plug-in for Cubism 3 is now available.
Model Display
To load, model settings file (.model3.json), MOC3 file, and texture files exported from Editor are required.
[STEP 1] Install

First, install “Cubism 3 AE Plug-in.”
- Download the installer.
- Install the Cubism 3 AE plug-in.
[STEP 2] Export model data using Editor
Export the target model data (.moc3).
See “Data for Embedding” for details.
[STEP 3] Import the Live2D model in After Effects
Next, move to After Effects.
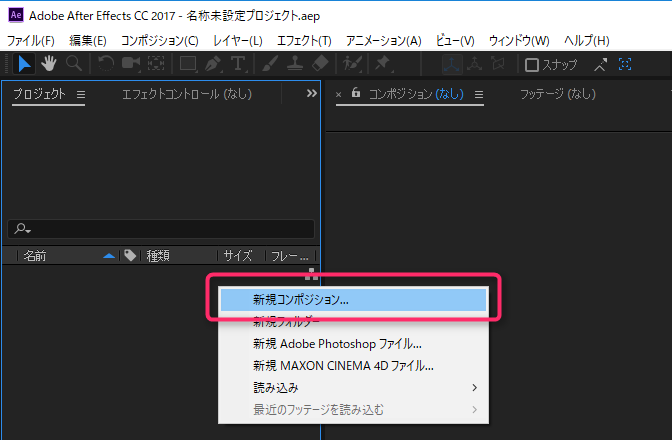
Create a new composition.
(Project panel -> Right-click -> Create New Composition)
TIPS
If you perform the “Cubism 3 model loading” described below without creating a new composition, compositions will be created with the model’s canvas size.
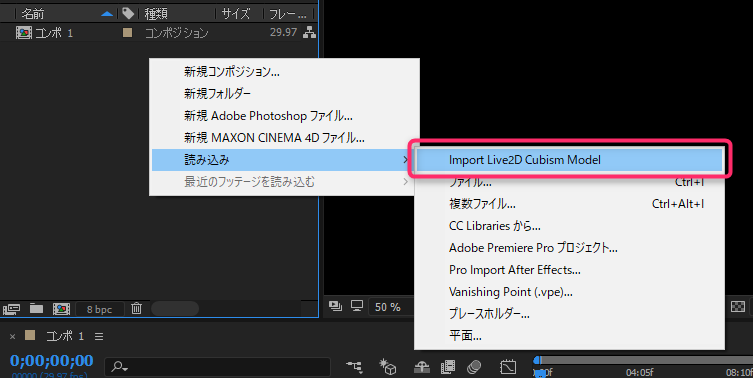
Load Cubism 3 models.
(Project panel -> Right click -> Import -> Import Live2D Cubism Model)
[Attention]
If the file path (save location) contains Japanese characters, the file may not load.
Pay attention to the storage location of the model data.
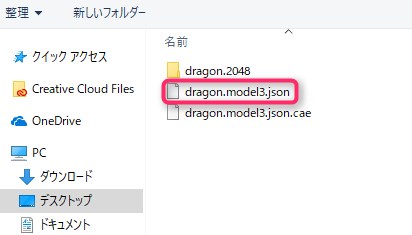
Select the [model3.json] file you just exported and load it into the project palette.
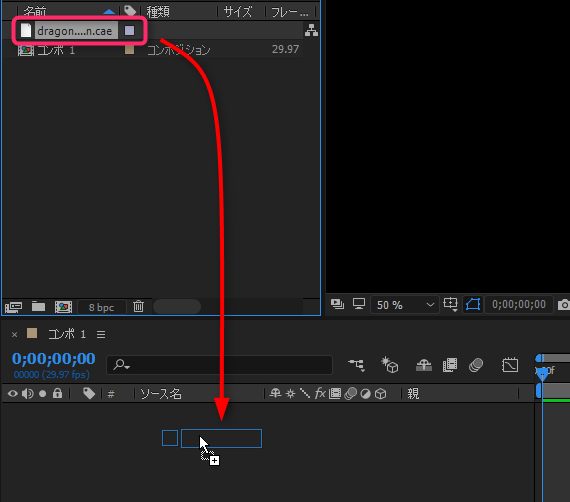
Loading the [model3.json] file will generate a [cae] file in the project palette.
Drag and drop the [cae] file into the timeline panel.
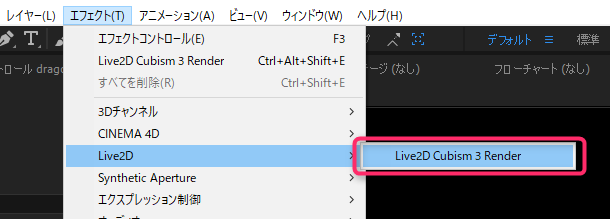
Select the source loaded in the timeline and click on [Live2D Cubism 3 Render] from the Effects.
(Effects menu -> Live2D -> Live2D Cubism 3 Render)
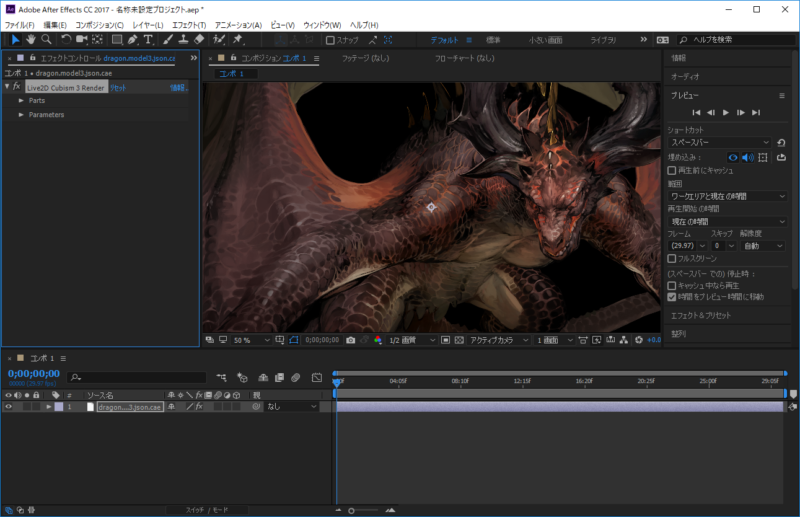
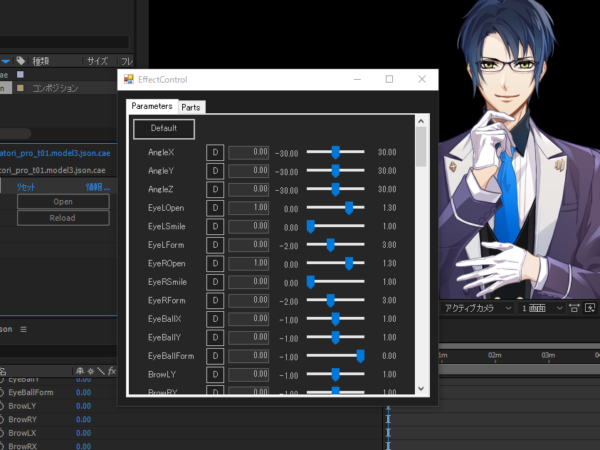
The Cubism 3 model appears on the After Effects screen as shown below.
Form Display
Each part can be set in [Parts], and each parameter can be set in [Parameters].
On the effect control panel, the upper and lower limits of the parameters are all displayed as -1000 to 1000.
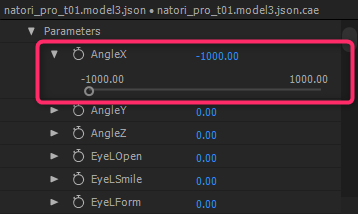
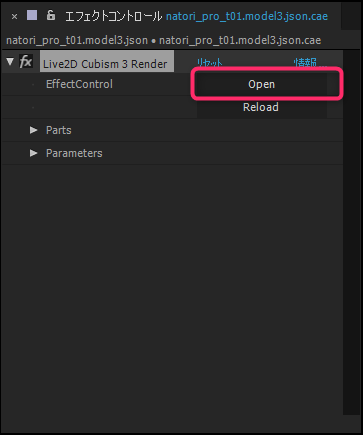
If you want to adjust a parameter within its range, click “Open” in the red frame to display the form.
Information entered on the form can only be adjusted within the ranges of the parameters.
About the Form
This section describes the function of each area of the form.
Parameters
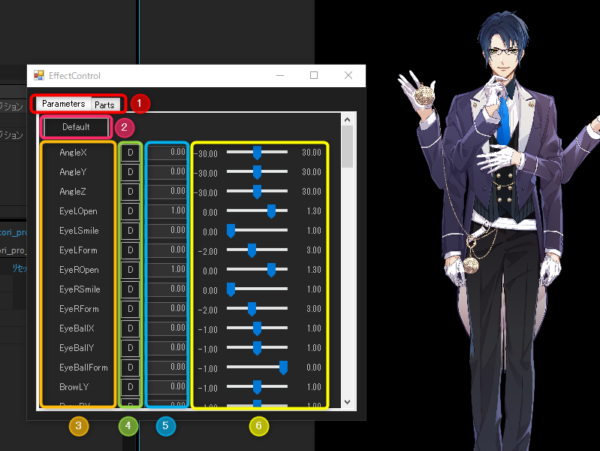
| No. | Item | Details |
|---|---|---|
| (1) | Switching tab | Use tabs to switch between parameters and parts. |
| (2) | Default button | Resets all parameters to default values. |
| (3) | Parameter name | The parameter ID is displayed. Note: “Param” at the beginning is omitted. |
| (4) | Individual default button | Resets parameters individually to their default values. |
| (5) | Numerical parameter input | Enter numerical values directly to manipulate parameters. |
| (6) | Slider | Drag the slider to manipulate the parameters. |
Part(s)
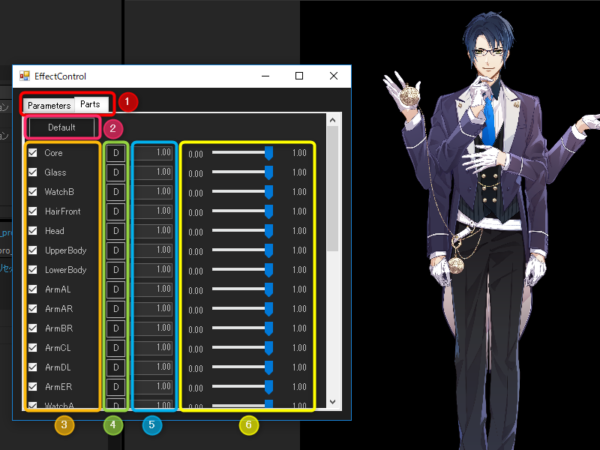
| No. | Item | Details |
|---|---|---|
| (1) | Switching tab | Use tabs to switch between parameters and parts. |
| (2) | Default button | Restore all parts to default values. |
| (3) | Part name Show/Hide checkbox | The part ID is displayed. Note: “Part” at the beginning is omitted. Click the checkbox to toggle show/hide. |
| (4) | Individual default button | Restore parts individually to their default values. |
| (5) | Input numerical opacity value for the part | Enter numerical values directly to manipulate the opacity of the part. Note: The display of the range is changed from 0-100 to 0-1. |
| (6) | Slider | Drag the slider to manipulate the opacity of the part. Note: The display of the range is changed from 0-100 to 0-1. |
Precautions for Use
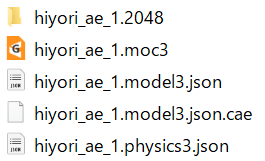
About file collection
Normally, when you “collect files,” the files are collected in the “Footage” folder in the created folder.
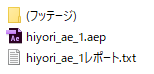
However, the following files used by Cubism are currently not collected due to extension issues.
Note: To be supported in the future
Only “.cae” files will be collected in the Footage folder, so copy and paste any other necessary files.
| Immediately after collection | Copy and paste files that are not collected | |
 |
 |
 |
If the necessary files do not appear correctly after copying and pasting, click “Reload” in the figure below.

Minor defects
- In CC2014 version, there is a bug that causes an error when duplicating a layer to which a Live2D effect is applied.
- There is a bug that even if the “Export Hidden Parts” checkbox is checked during .moc3 export, the parts are not hidden.