Guide line function
Updated: 12/09/2025
This section explains how to draw guide lines in the view area of the modeling workspace.
How to add guide lines
Context menu
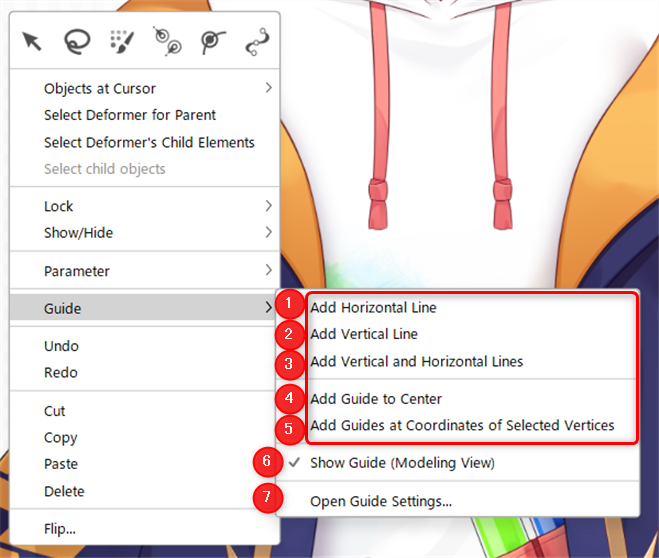
Right-clicking the view displays a context menu.
Select [Guide Line] to select how guide lines are added.
| No. | Item | Details |
|---|---|---|
| 1 | Add Horizontal Line | Adds a horizontal guide line on the basis of the clicked position. |
| 2 | Add Vertical Line | Adds a vertical guide line on the basis of the clicked position. |
| 3 | Add Vertical and Horizontal Lines | Adds horizontal and vertical guide lines on the basis of the clicked position. |
| 4 | Add guide lines in the center | Adds horizontal and vertical guide lines to the center of the canvas. |
| 5 | Add a guide line to the coordinates of the selected vertex | Adds a guide line on the basis of the selected vertex. |
| 6 | Show Guide Lines (Modeling View) | Selecting this item shows the guide lines set in the modeling view. |
| 7 | Open guide line settings | Opens a dialog box for Guide Line settings. |
Example of guide line addition: adding guide lines in the center
Guide line menu
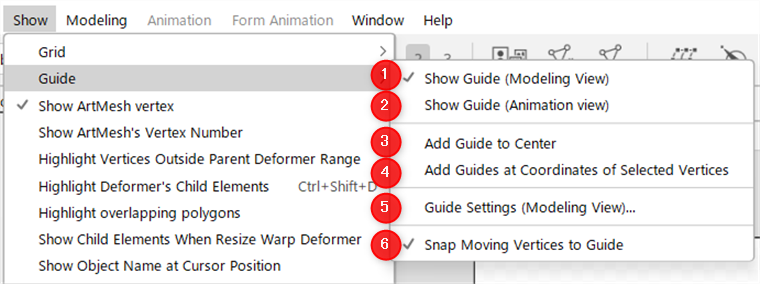
Various guide line settings can be made from the [Show] menu -> [Guide Line].
| No. | Item | Details |
|---|---|---|
| 1 | Show Guide Lines (Modeling View) | Selecting this item shows the guide lines set in the modeling view. |
| 2 | Show Guide Line (Animation View) | Guide lines can be displayed in the animation view. Note: These are unique guide lines, not guide lines set in the modeling view. |
| 3 | Add guide lines in the center | Adds horizontal and vertical guide lines to the center of the canvas. |
| 4 | Add a guide line to the coordinates of the selected vertex | Adds a guide line on the basis of the selected vertex. |
| 5 | Guide Line (Modeling View) settings | Opens a dialog box for Guide Line settings. |
| 6 | Adhesion of moving vertices to guide lines | Select this item to snap moving vertices to guide lines. |
Tips
With the [Adhesion of moving vertices to guide lines] function, when a vertex is dragged over a guide line, the line turns green to indicate that the vertex is attached to the guide line. This allows for precise alignment with the [Position] of the guide line setting.
Tips
Each item in the guide line menu can be assigned a shortcut.
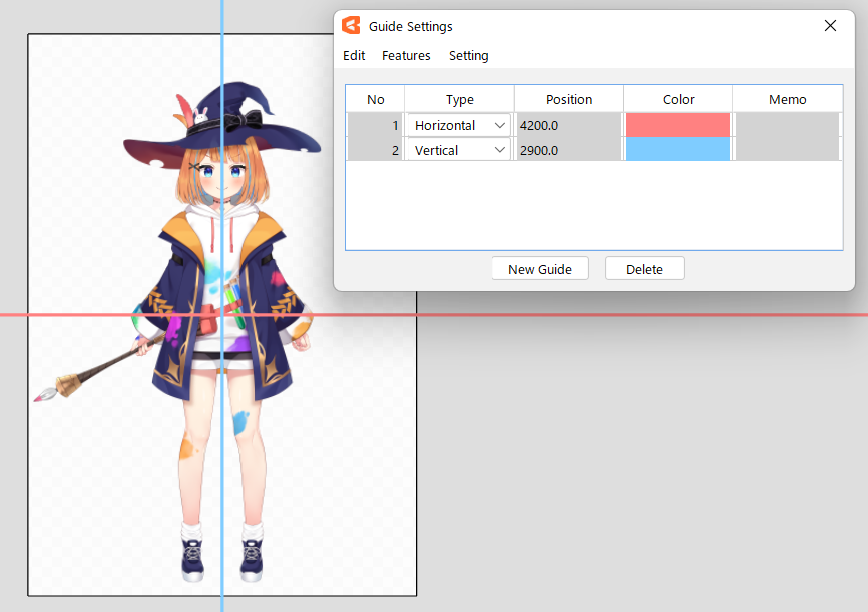
Guide Line Settings
The [Guide Line Settings] dialog box allows you to customize the color and position of guide lines.
Open the [Guide Line Settings] dialog box from the [Show] menu -> [Guide Line] -> [Guide Line (Modeling View) settings].
Alternatively, you can also open the dialog box by right-clicking and selecting [Guide Line] -> [Open guide line settings].

A. Menu
| Item | Details |
|---|---|
| Edit | Undo: Restores the state immediately before the last operation. Redo: Executes the operation performed before going back one step. |
| Function | Change color of all guide lines: Change the color of all guide lines to any color. |
| Setting | Default color of guide line: Sets the default color when creating guide lines. |
B. Setting items
| Item | Details |
|---|---|
| No. | Displays the number of guides that have been set. |
| Type | Select [Horizontal] or [Vertical] to set the guide line direction. |
| Position | Drag the values to adjust the guide line position. |
| Color | Click the color field to open the color settings window. |
| Memo | A note can be set for the guide line. |
| New Guide Lines | Add a new guide line. |
| Delete | Delete the selected guide line. (Multiple selections allowed) |