マスクの前処理方式(Java)
最終更新: 2024年1月18日
Cubism 5 SDK 以降では、一部のクラス名などが変更されています
詳細についてはCHANGELOGを参照してください。
Live2D Cubism SDK for Javaでは、スマートフォンなどで描画速度を維持するために、
モデル描画処理の最初に一枚のマスクバッファに対してすべてのマスク形状を描画する『前処理方式』を採用しています。
原則的な描画方法では、マスクを必要とするDrawableを描画するタイミングで、その都度マスク形状を描画します(図参照)。
この方法では、Drawableがマスクを必要とするたびにレンダーターゲットの切り替え・バッファのクリアなど比較的高コストな処理が発生することになります。
そのため、スマートフォンなどで描画速度が低下する原因になる場合があります。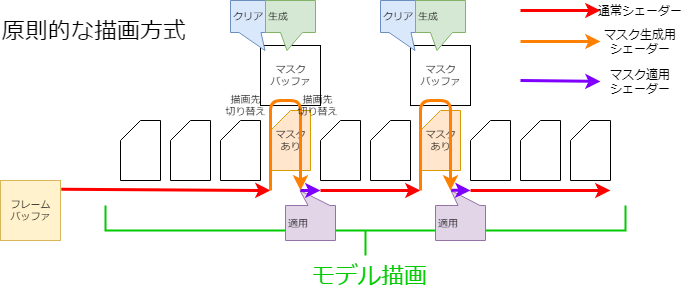
しかし、前もってマスクを用意するだけではマスクバッファが複数枚必要になり、メモリを圧迫することになります。
この点を解決するため、一枚のマスクバッファに対して以下の処理を行うことで、まるで複数枚のマスクバッファを利用しているかのように扱いつつ、メモリの圧迫を抑えることができます。
マスクの統合
前もってすべてのマスクを生成するため、同じマスク指定を受けているDrawableは同一のマスク画像を使うことで生成する枚数を抑えられます。
この処理はCubismRendererAndroid.initialize関数の呼び出しの中でACubismClippingManager.initialize関数によって行われます。
    @Override
    public void initialize(
        CubismRenderer.RendererType type,
        CubismModel model,
        int maskBufferCount
    ) {
        renderTextureCount = maskBufferCount;

        // レンダーテクスチャのクリアフラグの配列の初期化
        clearedMaskBufferFlags = new boolean[renderTextureCount];

        final int drawableCount = model.getDrawableCount();     // 描画オブジェクトの数
        final int[][] drawableMasks = model.getDrawableMasks();     // 描画オブジェクトをマスクする描画オブジェクトのインデックスのリスト
        final int[] drawableMaskCounts = model.getDrawableMaskCounts();     // 描画オブジェクトをマスクする描画オブジェクトの数

        // クリッピングマスクを使う描画オブジェクトを全て登録する。
        // クリッピングマスクは、通常数個程度に限定して使うものとする。
        for (int i = 0; i < drawableCount; i++) {
            if (drawableMaskCounts[i] <= 0) {
                // クリッピングマスクが使用されていないアートメッシュ(多くの場合使用しない)
                clippingContextListForDraw.add(null);
                continue;
            }

            // 既にあるClipContextと同じかチェックする。
            T_ClippingContext cc = findSameClip(drawableMasks[i], drawableMaskCounts[i]);
            if (cc == null) {
                // 同一のマスクが存在していない場合は生成する。
                cc = (T_ClippingContext) ACubismClippingContext.createClippingContext(
                    type,
                    this,
                    drawableMasks[i],
                    drawableMaskCounts[i]
                );

                clippingContextListForMask.add(cc);
            }

            cc.addClippedDrawable(i);
            clippingContextListForDraw.add(cc);
        }
    }
複数枚のマスク用テクスチャの利用
Cubism SDK for Java R1 beta1以降では、マスク用テクスチャを任意で複数枚使用することができます。
そのため、alpha1までに存在したマスクの使用上限数である36枚を超過したマスクをモデルに設定しても、SDK上で正常に表示させることができるようになります。
ただし、マスク用テクスチャを2枚以上使用した場合、マスク用テクスチャ1枚に対して生成されるマスクの上限数は32枚までとなります。
(1枚のみ使用する場合のマスクの上限数は36枚です。こちらの詳細は後述します)
仮にマスク用テクスチャを2枚使用した場合、使用できるマスクの上限数は32 * 2の64枚になります。
マスク用テクスチャを複数枚使用するための設定は以下のようになります。
int maskBufferCount = 2;

CubismRenderer renderer = CubismRendererAndroid.create();
renderer.initialize(cubismModel, maskBufferCount);
CubismRendererAndroid.initialize() の第2引数に何も渡さない場合、マスク用テクスチャは1枚のみ生成、使用されます。
renderer.initialize(cubismModel);
色情報での分離
マスクバッファは実態として通常のテクスチャバッファなどと同じようにRGBAの映像用配列です。
通常のマスク処理ではこのAチャンネルのみを使用してマスクを適用しますがRGBのチャンネルは使用しません。
そこでRGBAで別々のマスクデータを持つことによって一枚のマスクバッファを4枚のマスクバッファとして取り扱えるようになります。
分割分離
マスク画像が4枚では足りなくなった時、マスクバッファを2分割、4分割、9分割で取り扱うことによってマスクの枚数を増やします。
色情報での分割もあるので4 x 9 の36枚まで違うマスクを保持できるようになっています。
またマスク画像がつぶれるのを防ぐため、マスクの適用を受けるすべてのDrawableの矩形でマスクを描画します。
このため範囲の生成とマスク生成、マスク使用でのマトリックスの生成が必要になります。
マスク用テクスチャを複数枚利用する場合も分割方式はマスク用テクスチャ1枚のみを利用した場合と同様となります。
ただし、マスク用テクスチャを複数枚利用する場合にはマスク用テクスチャ1枚あたりへのマスクの割り当てを可能な限り等分するようになるため、同じモデルでも描画の品質が上がります。(マスク用テクスチャを増やすと、その分コストはかかります)
例えば、マスクが32枚のモデルの場合には通常はマスク用テクスチャ1枚で32枚のマスクを描画しようとしますが、マスク用テクスチャを2枚使った場合のマスクの割り当ては「1枚あたり16枚」となります。
矩形の確認
マスク生成の初めのステップで、マスクごとにマスク適用先すべてが収まる矩形を確認します。
    public void calcClippedDrawTotalBounds(CubismModel model, T_ClippingContext clippingContext) {
        // 被クリッピングマスク(マスクされる描画オブジェクト)の全体の矩形
        float clippedDrawTotalMinX = Float.MAX_VALUE;
        float clippedDrawTotalMinY = Float.MAX_VALUE;
        float clippedDrawTotalMaxX = -Float.MAX_VALUE;
        float clippedDrawTotalMaxY = -Float.MAX_VALUE;

        // このマスクが実際に必要か判定する。
        // このクリッピングを利用する「描画オブジェクト」がひとつでも使用可能であればマスクを生成する必要がある。
        final int clippedDrawCount = clippingContext.clippedDrawableIndexList.size();
        for (int clippedDrawableIndex = 0; clippedDrawableIndex < clippedDrawCount; clippedDrawableIndex++) {
            // マスクを使用する描画オブジェクトの描画される矩形を求める。
            final int drawableIndex = clippingContext.clippedDrawableIndexList.get(clippedDrawableIndex);

            final int drawableVertexCount = model.getDrawableVertexCount(drawableIndex);
            float[] drawableVertices = model.getDrawableVertices(drawableIndex);

            float minX = Float.MAX_VALUE;
            float minY = Float.MAX_VALUE;
            float maxX = -Float.MAX_VALUE;
            float maxY = -Float.MAX_VALUE;

            int loop = drawableVertexCount * VERTEX_STEP;
            for (int pi = VERTEX_OFFSET; pi < loop; pi += VERTEX_STEP) {
                float x = drawableVertices[pi];
                float y = drawableVertices[pi + 1];
                if (x < minX) minX = x;
                if (x > maxX) maxX = x;
                if (y < minY) minY = y;
                if (y > maxY) maxY = y;
            }

            if (minX == Float.MAX_VALUE) {
                continue;   // 有効な点が1つも取れなかったのでスキップする
            }

            // 全体の矩形に反映
            if (minX < clippedDrawTotalMinX) clippedDrawTotalMinX = minX;
            if (maxX > clippedDrawTotalMaxX) clippedDrawTotalMaxX = maxX;
            if (minY < clippedDrawTotalMinY) clippedDrawTotalMinY = minY;
            if (maxY > clippedDrawTotalMaxY) clippedDrawTotalMaxY = maxY;
        }

        if (clippedDrawTotalMinX == Float.MAX_VALUE) {
            clippingContext.isUsing = false;

            csmRectF clippedDrawRect = clippingContext.allClippedDrawRect;
            clippedDrawRect.setX(0.0f);
            clippedDrawRect.setY(0.0f);
            clippedDrawRect.setWidth(0.0f);
            clippedDrawRect.setHeight(0.0f);
        } else {
            clippingContext.isUsing = true;
            float w = clippedDrawTotalMaxX - clippedDrawTotalMinX;
            float h = clippedDrawTotalMaxY - clippedDrawTotalMinY;

            csmRectF clippedDrawRect = clippingContext.allClippedDrawRect;
            clippedDrawRect.setX(clippedDrawTotalMinX);
            clippedDrawRect.setY(clippedDrawTotalMinY);
            clippedDrawRect.setWidth(w);
            clippedDrawRect.setHeight(h);
        }
    }
色分離、分割分離を受けたレイアウト決定
マスクごとに所属するマスクバッファの色チャンネル、分割位置を定めます。
    @Override
    public void setupLayoutBounds(int usingClipCount) {
        final int useClippingMaskMaxCount = renderTextureCount <= 1
            ? CLIPPING_MASK_MAX_COUNT_ON_DEFAULT
            : CLIPPING_MASK_MAX_COUNT_ON_MULTI_RENDER_TEXTURE * renderTextureCount;

        if (usingClipCount <= 0 || usingClipCount > useClippingMaskMaxCount) {
            if (usingClipCount > useClippingMaskMaxCount) {
                // マスクの制限数の警告を出す
                int count = usingClipCount - useClippingMaskMaxCount;
                cubismLogError(
                    "not supported mask count : %d\n[Details] render texture count: %d\n, mask count : %d",
                    count,
                    renderTextureCount,
                    usingClipCount
                );
            }
            // この場合は一つのマスクターゲットを毎回クリアして使用する
            for (int index = 0; index < clippingContextListForMask.size(); index++) {
                T_ClippingContext cc = clippingContextListForMask.get(index);

                cc.layoutChannelIndex = 0;   // どうせ毎回消すので固定で良い
                cc.layoutBounds.setX(0.0f);
                cc.layoutBounds.setY(0.0f);
                cc.layoutBounds.setWidth(1.0f);
                cc.layoutBounds.setHeight(1.0f);
                cc.bufferIndex = 0;
            }
            return;
        }

        // レンダーテクスチャが1枚なら9分割する(最大36枚)
        final int layoutCountMaxValue = renderTextureCount <= 1 ? 9 : 8;

        // ひとつのRenderTextureを極力いっぱいに使ってマスクをレイアウトする。
        // マスクグループの数が4以下ならRGBA各チャンネルに1つずつマスクを配置し、5以上6以下ならRGBAを2,2,1,1と配置する。
        // NOTE: 1枚に割り当てるマスクの分割数を取りたいため、小数点は切り上げる。
        final int countPerSheetDiv = (usingClipCount + renderTextureCount - 1) / renderTextureCount;     // レンダーテクスチャ1枚あたり何枚割り当てるか
        final int reduceLayoutTextureCount = usingClipCount % renderTextureCount;     // レイアウトの数を1枚減らすレンダーテクスチャの数(この数だけのレンダーテクスチャが対象)。

        // RGBAを順番に使っていく。
        final int divCount = countPerSheetDiv / COLOR_CHANNEL_COUNT;     // 1チャンネルに配置する基本のマスク個数
        final int modCount = countPerSheetDiv % COLOR_CHANNEL_COUNT;     // 余り、この番号のチャンネルまでに1つずつ配分する(インデックスではない)

        // RGBAそれぞれのチャンネルを用意していく(0:R , 1:G , 2:B, 3:A, )
        int curClipIndex = 0;   // 順番に設定していく

        for (int renderTextureIndex = 0; renderTextureIndex < renderTextureCount; renderTextureIndex++) {
            for (int channelIndex = 0; channelIndex < COLOR_CHANNEL_COUNT; channelIndex++) {
                // このチャンネルにレイアウトする数
                // NOTE: レイアウト数 = 1チャンネルに配置する基本のマスク + 余りのマスクを置くチャンネルなら1つ追加
                int layoutCount = divCount + (channelIndex < modCount ? 1 : 0);

                // レイアウトの数を1枚減らす場合にそれを行うチャンネルを決定
                // divが0の時は正常なインデックスの範囲になるように調整
                final int checkChannelIndex = modCount + (divCount < 1 ? -1 : 0);

                // 今回が対象のチャンネルかつ、レイアウトの数を1枚減らすレンダーテクスチャが存在する場合
                if (channelIndex == checkChannelIndex && reduceLayoutTextureCount > 0) {
                    // 現在のレンダーテクスチャが、対象のレンダーテクスチャであればレイアウトの数を1枚減らす。
                    layoutCount -= !(renderTextureIndex < reduceLayoutTextureCount) ? 1 : 0;
                }

                // 分割方法を決定する。
                if (layoutCount == 0) {
                    // 何もしない。
                } else if (layoutCount == 1) {
                    // 全てをそのまま使う。
                    T_ClippingContext cc = clippingContextListForMask.get(curClipIndex++);
                    cc.layoutChannelIndex = channelIndex;
                    csmRectF bounds = cc.layoutBounds;

                    bounds.setX(0.0f);
                    bounds.setY(0.0f);
                    bounds.setWidth(1.0f);
                    bounds.setHeight(1.0f);

                    cc.bufferIndex = renderTextureIndex;
                } else if (layoutCount == 2) {
                    for (int i = 0; i < layoutCount; i++) {
                        final int xpos = i % 2;

                        T_ClippingContext cc = clippingContextListForMask.get(curClipIndex++);
                        cc.layoutChannelIndex = channelIndex;
                        csmRectF bounds = cc.layoutBounds;

                        // UVを2つに分解して使う
                        bounds.setX(xpos * 0.5f);
                        bounds.setY(0.0f);
                        bounds.setWidth(0.5f);
                        bounds.setHeight(1.0f);

                        cc.bufferIndex = renderTextureIndex;
                    }
                } else if (layoutCount <= 4) {
                    // 4分割して使う
                    for (int i = 0; i < layoutCount; i++) {
                        final int xpos = i % 2;
                        final int ypos = i / 2;

                        T_ClippingContext cc = clippingContextListForMask.get(curClipIndex++);
                        cc.layoutChannelIndex = channelIndex;
                        csmRectF bounds = cc.layoutBounds;

                        bounds.setX(xpos * 0.5f);
                        bounds.setY(ypos * 0.5f);
                        bounds.setWidth(0.5f);
                        bounds.setHeight(0.5f);

                        cc.bufferIndex = renderTextureIndex;
                    }
                } else if (layoutCount <= layoutCountMaxValue) {
                    // 9分割して使う
                    for (int i = 0; i < layoutCount; i++) {
                        final int xpos = i % 3;
                        final int ypos = i / 3;

                        T_ClippingContext cc = clippingContextListForMask.get(curClipIndex++);
                        cc.layoutChannelIndex = channelIndex;
                        csmRectF bounds = cc.layoutBounds;

                        bounds.setX(xpos / 3.0f);
                        bounds.setY(ypos / 3.0f);
                        bounds.setWidth(1.0f / 3.0f);
                        bounds.setHeight(1.0f / 3.0f);

                        cc.bufferIndex = renderTextureIndex;
                    }
                }
                // マスクの制限枚数を超えた場合の処理
                else {
                    int count = usingClipCount - useClippingMaskMaxCount;
                    cubismLogError(
                        "not supported mask count : %d\n[Details] render texture count: %d\n, mask count : %d",
                        count,
                        renderTextureCount,
                        usingClipCount
                    );

                    // 開発モードの場合は停止させる。
                    assert false;

                    // 引き続き実行する場合、 SetupShaderProgramでオーバーアクセスが発生するので仕方なく適当に入れておく。
                    // もちろん描画結果はろくなことにならない。
                    for (int i = 0; i < layoutCount; i++) {
                        T_ClippingContext cc = clippingContextListForMask.get(curClipIndex++);
                        cc.layoutChannelIndex = 0;

                        csmRectF bounds = cc.layoutBounds;
                        bounds.setX(0.0f);
                        bounds.setY(0.0f);
                        bounds.setWidth(1.0f);
                        bounds.setHeight(1.0f);

                        cc.bufferIndex = 0;
                    }
                }
            }
        }
    }
マスク描画、マスク使用のマトリックス生成
描画前に調べた矩形範囲と所属場所に基づいてマスク生成用、マスク使用用の変換マトリックスを用意します。
/*省略*/
            // ---- 実際に1つのマスクを描く ----
            T_ClippingContext clipContext = clippingContextListForMask.get(clipIndex);
            csmRectF allClippedDrawRect = clipContext.allClippedDrawRect;   // このマスクを使う、全ての描画オブジェクトの論理座標上の囲み矩形
            csmRectF layoutBoundsOnTex01 = clipContext.layoutBounds;    // このマスクを収める

            final float margin = 0.05f;
            float scaleX, scaleY;
            final float ppu = model.getPixelPerUnit();
            final float maskPixelWidth = clipContext.getClippingManager().getClippingMaskBufferSize().x;
            final float maskPixelHeight = clipContext.getClippingManager().getClippingMaskBufferSize().y;
            final float physicalMaskWidth = layoutBoundsOnTex01.getWidth() * maskPixelWidth;
            final float physicalMaskHeight = layoutBoundsOnTex01.getHeight() * maskPixelHeight;

            tmpBoundsOnModel.setRect(allClippedDrawRect);

            if (tmpBoundsOnModel.getWidth() * ppu > physicalMaskWidth) {
                tmpBoundsOnModel.expand(allClippedDrawRect.getWidth() * margin, 0.0f);
                scaleX = layoutBoundsOnTex01.getWidth() / tmpBoundsOnModel.getWidth();
            } else {
                scaleX = ppu / physicalMaskWidth;
            }

            if (tmpBoundsOnModel.getHeight() * ppu > physicalMaskHeight) {
                tmpBoundsOnModel.expand(0.0f, allClippedDrawRect.getHeight() * margin);
                scaleY = layoutBoundsOnTex01.getHeight() / tmpBoundsOnModel.getHeight();
            } else {
                scaleY = ppu / physicalMaskHeight;
            }

            // マスク生成時に使う行列を求める。
            createMatrixForMask(isRightHanded, layoutBoundsOnTex01, scaleX, scaleY);

            clipContext.matrixForMask.setMatrix(tmpMatrixForMask.getArray());
            clipContext.matrixForDraw.setMatrix(tmpMatrixForDraw.getArray());
/*省略*/
マスクバッファの動的なサイズ変更
OpenGL ES 2.0レンダラーには、実行時にマスクバッファのサイズを変更するAPIを用意してあります。
現状、マスクバッファのサイズは初期値として256*256(ピクセル)を設定していますが、マスク生成領域を9枚に切るような場合、85*85(ピクセル)の矩形領域に描画したマスク形状を、更に拡大してクリッピング領域として使用します。
その結果、クリッピング結果のエッジがぼやけたり、滲みのような現象が見られます。
それを解決する方法として、マスクバッファのサイズをプログラム実行時に変更するAPIを用意しています。
例えば、マスクバッファのサイズを256*256 ⇒ 1024*1024とすることで、マスク生成領域を9枚に切るような場合、341*341の矩形領域にマスク形状を描画することができるので、拡大してクリッピング領域として使用しても、クリッピング結果のエッジのぼやけやにじみを解消することができます。
※マスクバッファのサイズを大きくする ⇒ 処理するピクセルが増えると速度は遅くなるが、描画結果は綺麗になる。
※マスクバッファのサイズを小さくする ⇒ 処理するピクセルが減るので速度は速くなるが、描画結果は汚くなる。
    public void setClippingMaskBufferSize(final float width, final float height) {
        if (clippingManager == null) {
            return;
        }

        // インスタンス破棄前にレンダーテクスチャの数を保存
        final int renderTextureCount = this.clippingManager.getRenderTextureCount();

        // Destroy and recreate instances to change the size of MaskBuffer
        clippingManager = new CubismClippingManagerAndroid();
        clippingManager.setClippingMaskBufferSize(width, height);

        CubismModel model = getModel();
        clippingManager.initialize(
            RendererType.ANDROID,
            model,
            renderTextureCount
        );
    }
前処理方式によってパフォーマンスの向上が見込める理由
携帯端末特有の事情として、GPUに対するClear命令やレンダリングターゲット切り替え命令の処理コストが、他の命令よりも高い場合があります。
原則的方式で描画するときには、これら処理コストが高い命令を、マスクが必要になるDrawableの数だけ実行することになります。
しかし、前処理方式の場合では、これらの命令を実行する回数を削減することができるので、スマートフォンなどでのパフォーマンスの向上が見込めます。
実際にその効果を把握するための実験を行っております。
この実験の測定方法および結果については、「(Native)マスクの前処理方式」の「前処理方式によってパフォーマンスの向上が見込める理由」をご覧ください。
マスクの処理を高精細な方式に切り替える
描画の度にマスクを生成する方法だと、低スペック端末ではパフォーマンスに影響があります。
しかし、最終的に動画として出力する場合のように、ランタイムでのパフォーマンスよりも画面の品質の方を重視する場合にはこちらの方式が適しています。
Cubism SDK for Javaでは、マスクの処理を高精細な方式に切り替える事ができます。
高精細な方式に切り替えるには、以下のAPIにtrueを渡します。
CubismRenderer.isUsingHighPrecisionMask()