마스크 전처리 방식(Java)
업데이트: 2024/01/18
Cubism 5 SDK 이상에서는 일부 클래스 이름 등이 변경되었습니다.
자세한 내용은 CHANGELOG를 참조하십시오.
Live2D Cubism SDK for Java에서는 스마트폰 등에서 그리기 속도를 유지하기 위해,
모델 묘화 처리의 최초로 1매의 마스크 버퍼에 대해서 모든 마스크 형상을 묘화하는 「전처리 방식」을 채용하고 있습니다.
원칙적인 드로잉 방법은 마스크가 필요한 Drawable을 그릴 때마다 마스크 모양을 그립니다(그림 참조).
이 방법에서는 Drawable이 마스크를 필요로 할 때마다 렌더 타깃의 전환·버퍼의 클리어 등 비교적 고비용의 처리가 발생하게 됩니다.
따라서 스마트폰 등에서 그리기 속도가 저하되는 원인이 될 수 있습니다.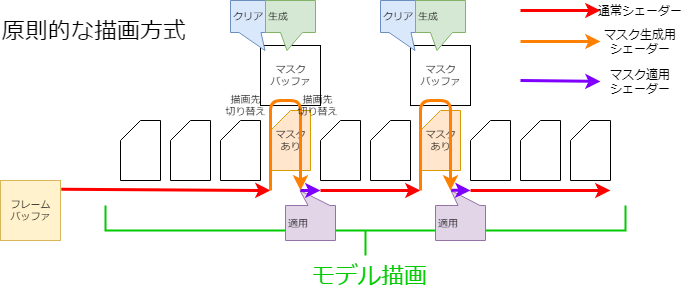
그러나 미리 마스크를 준비하는 것만으로는 마스크 버퍼가 여러 장 필요하게 되어, 메모리를 압박하게 됩니다.
이 점을 해결하기 위해 1장의 마스크 버퍼에 대해서 이하의 처리를 실시함으로써, 마치 여러 장의 마스크 버퍼를 이용하고 있는 것처럼 취급하면서 메모리의 압박을 억제할 수 있습니다.
마스크 통합
미리 모든 마스크를 생성하기 때문에 동일한 마스크 지정을 받은 Drawable은 동일한 마스크 이미지를 사용하여 생성하는 매수를 줄일 수 있습니다.
이 처리는 CubismRendererAndroid.initialize 함수 호출 중에서 ACubismClippingManager.initialize 함수에 의해 수행됩니다.
    @Override
    public void initialize(
        CubismRenderer.RendererType type,
        CubismModel model,
        int maskBufferCount
    ) {
        renderTextureCount = maskBufferCount;

        // 렌더 텍스쳐의 클리어 플래그 배열 초기화
        clearedMaskBufferFlags = new boolean[renderTextureCount];

        final int drawableCount = model.getDrawableCount();     // 그리기 오브젝트의 수
        final int[][] drawableMasks = model.getDrawableMasks();     // 그리기 오브젝트를 마스크하는 그리기 오브젝트의 인덱스 목록
        final int[] drawableMaskCounts = model.getDrawableMaskCounts();     // 그리기 오브젝트를 마스크하는 그리기 오브젝트의 수

        // 클리핑 마스크를 사용하는 모든 그리기 오브젝트를 등록.
        // 클리핑 마스크는 일반적으로 몇 개 정도로 한정하여 사용한다.
        for (int i = 0; i < drawableCount; i++) {
            if (drawableMaskCounts[i] <= 0) {
                // 클리핑 마스크를 사용하지 않은 아트메쉬(대부분의 경우 사용하지 않음)
                clippingContextListForDraw.add(null);
                continue;
            }

            // 이미 있는 ClipContext와 같은지 확인.
            T_ClippingContext cc = findSameClip(drawableMasks[i], drawableMaskCounts[i]);
            if (cc == null) {
                // 동일한 마스크가 존재하지 않으면 생성.
                cc = (T_ClippingContext) ACubismClippingContext.createClippingContext(
                    type,
                    this,
                    drawableMasks[i],
                    drawableMaskCounts[i]
                );

                clippingContextListForMask.add(cc);
            }

            cc.addClippedDrawable(i);
            clippingContextListForDraw.add(cc);
        }
    }
여러 장의 마스크용 텍스쳐 사용
Cubism SDK for Java R1 beta1 이상에서는 마스크용 텍스쳐를 임의로 여러 장 사용할 수 있습니다.
이로 인해 alpha1까지 존재한 마스크의 사용 상한수인 36장을 초과하는 마스크를 모델로 설정해도 SDK상에서 정상적으로 표시할 수 있게 됩니다.
단, 마스크용 텍스쳐를 2장 이상 사용했을 경우 마스크용 텍스쳐 1장에 대해 생성되는 마스크의 상한수는 32장까지입니다.
(1장만 사용하는 경우의 마스크 상한수는 36장입니다. 이에 대한 자세한 내용은 후술합니다)
만약 마스크용 텍스쳐를 2장 사용했을 경우 사용할 수 있는 마스크의 상한수는 32*2인 64장이 됩니다.
마스크용 텍스쳐를 여러 장 사용하기 위한 설정은 다음과 같습니다.
int maskBufferCount = 2;

CubismRenderer renderer = CubismRendererAndroid.create();
renderer.initialize(cubismModel, maskBufferCount);
CubismRendererAndroid.initialize()의 제2인수에 아무것도 전달하지 않을 경우 마스크용 텍스쳐는 1장만 생성, 사용됩니다.
renderer.initialize(cubismModel);
색상 정보로 분리
마스크 버퍼는 실태로서 통상의 텍스쳐 버퍼 등과 마찬가지로 RGBA의 영상용 배열입니다.
일반 마스크 처리에서는 이 A 채널만을 사용하여 마스크를 적용하지만 RGB 채널은 사용하지 않습니다.
따라서 RGBA에서 별개의 마스크 데이터를 가짐으로써 1매의 마스크 버퍼를 4장의 마스크 버퍼로서 취급할 수 있게 됩니다.
분할 분리
마스크 이미지가 4장으로는 부족해졌을 때 마스크 버퍼를 2분할, 4분할, 9분할로 취급함으로써 마스크의 매수를 늘립니다.
색 정보에 의한 분할도 있으므로 4×9의 36장까지 다른 마스크를 유지할 수 있게 되어 있습니다.
또한 마스크 이미지가 깨지는 것을 방지하기 위해 마스크 적용을 받는 모든 Drawable 직사각형으로 마스크를 그립니다.
이 때문에 범위의 생성과 마스크 생성, 마스크 사용으로 매트릭스의 생성이 필요하게 됩니다.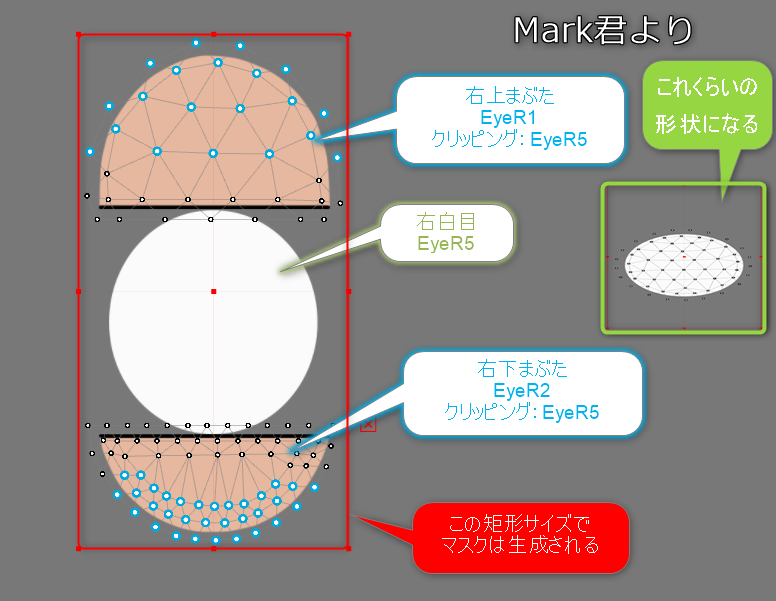
마스크용 텍스쳐를 여러 장 이용하는 경우도 분할 방식은 마스크용 텍스쳐 1장만을 이용한 경우와 동일합니다.
단, 마스크용 텍스쳐를 여러 장 이용하는 경우에는 마스크용 텍스쳐 1장에 대한 마스크의 할당을 가능한 한 등분하게 되기 때문에, 같은 모델에서도 그리기 품질이 향상됩니다. (마스크용 텍스쳐를 늘리면 그만큼 비용이 듭니다)
예를 들면, 마스크가 32장의 모델인 경우 일반적으로는 마스크용 텍스쳐 1장으로 32장의 마스크를 그리려고 하지만, 마스크용 텍스쳐를 2장 사용했을 경우의 마스크 할당은 「1장당 16장」이 됩니다.
직사각형 확인
마스크 생성의 첫 번째 단계에서 마스크별로 마스크 적용 대상이 모두 들어가는 직사각형을 확인합니다.
    public void calcClippedDrawTotalBounds(CubismModel model, T_ClippingContext clippingContext) {
        // 피 클리핑 마스크(마스킹되는 그리기 오브젝트)의 전체 직사각형
        float clippedDrawTotalMinX = Float.MAX_VALUE;
        float clippedDrawTotalMinY = Float.MAX_VALUE;
        float clippedDrawTotalMaxX = -Float.MAX_VALUE;
        float clippedDrawTotalMaxY = -Float.MAX_VALUE;

        // 이 마스크가 실제로 필요한지 판정한다.
        // 이 클리핑을 이용하는 「그리기 오브젝트」가 하나라도 사용 가능하면 마스크를 생성할 필요가 있다.
        final int clippedDrawCount = clippingContext.clippedDrawableIndexList.size();
        for (int clippedDrawableIndex = 0; clippedDrawableIndex < clippedDrawCount; clippedDrawableIndex++) {
            // 마스크를 사용하는 그리기 오브젝트가 그려지는 직사각형을 구한다.
            final int drawableIndex = clippingContext.clippedDrawableIndexList.get(clippedDrawableIndex);

            final int drawableVertexCount = model.getDrawableVertexCount(drawableIndex);
            float[] drawableVertices = model.getDrawableVertices(drawableIndex);

            float minX = Float.MAX_VALUE;
            float minY = Float.MAX_VALUE;
            float maxX = -Float.MAX_VALUE;
            float maxY = -Float.MAX_VALUE;

            int loop = drawableVertexCount * VERTEX_STEP;
            for (int pi = VERTEX_OFFSET; pi < loop; pi += VERTEX_STEP) {
                float x = drawableVertices[pi];
                float y = drawableVertices[pi + 1];
                if (x < minX) minX = x;
                if (x > maxX) maxX = x;
                if (y < minY) minY = y;
                if (y > maxY) maxY = y;
            }

            if (minX == Float.MAX_VALUE) {
                continue; //유효한 점이 하나도 잡히지 않았기 때문에 건너뛴다
            }

            // 전체 직사각형에 반영
            if (minX < clippedDrawTotalMinX) clippedDrawTotalMinX = minX;
            if (maxX > clippedDrawTotalMaxX) clippedDrawTotalMaxX = maxX;
            if (minY < clippedDrawTotalMinY) clippedDrawTotalMinY = minY;
            if (maxY > clippedDrawTotalMaxY) clippedDrawTotalMaxY = maxY;
        }

        if (clippedDrawTotalMinX == Float.MAX_VALUE) {
            clippingContext.isUsing = false;

            csmRectF clippedDrawRect = clippingContext.allClippedDrawRect;
            clippedDrawRect.setX(0.0f);
            clippedDrawRect.setY(0.0f);
            clippedDrawRect.setWidth(0.0f);
            clippedDrawRect.setHeight(0.0f);
        } else {
            clippingContext.isUsing = true;
            float w = clippedDrawTotalMaxX - clippedDrawTotalMinX;
            float h = clippedDrawTotalMaxY - clippedDrawTotalMinY;

            csmRectF clippedDrawRect = clippingContext.allClippedDrawRect;
            clippedDrawRect.setX(clippedDrawTotalMinX);
            clippedDrawRect.setY(clippedDrawTotalMinY);
            clippedDrawRect.setWidth(w);
            clippedDrawRect.setHeight(h);
        }
    }
색 분리, 분할 분리를 받은 레이아웃 결정
마스크마다 소속되는 마스크 버퍼의 색 채널, 분할 위치를 정합니다.
    @Override
    public void setupLayoutBounds(int usingClipCount) {
        final int useClippingMaskMaxCount = renderTextureCount <= 1
            ? CLIPPING_MASK_MAX_COUNT_ON_DEFAULT
            : CLIPPING_MASK_MAX_COUNT_ON_MULTI_RENDER_TEXTURE * renderTextureCount;

        if (usingClipCount <= 0 || usingClipCount > useClippingMaskMaxCount) {
            if (usingClipCount > useClippingMaskMaxCount) {
                // 마스크 제한 수 경고를 발생시킨다
                int count = usingClipCount - useClippingMaskMaxCount;
                cubismLogError(
                    "not supported mask count : %d\n[Details] render texture count: %d\n, mask count : %d",
                    count,
                    renderTextureCount,
                    usingClipCount
                );
            }
            // 이 경우 하나의 마스크 타겟을 매번 클리어하여 사용한다
            for (int index = 0; index < clippingContextListForMask.size(); index++) {
                T_ClippingContext cc = clippingContextListForMask.get(index);

                cc.layoutChannelIndex = 0;   // 어차피 매번 지우므로 고정해도 된다
                cc.layoutBounds.setX(0.0f);
                cc.layoutBounds.setY(0.0f);
                cc.layoutBounds.setWidth(1.0f);
                cc.layoutBounds.setHeight(1.0f);
                cc.bufferIndex = 0;
            }
            return;
        }

        // 렌더 텍스쳐가 1장이라면 9분할(최대 36장)
        final int layoutCountMaxValue = renderTextureCount <= 1 ? 9 : 8;

        // 하나의 RenderTexture를 최대한 많이 사용하여 마스크를 레이아웃.
        // 마스크 그룹의 수가 4 이하이면 RGBA 각 채널에 하나씩 마스크를 배치하고, 5 이상 6 이하이면 RGBA를 2,2,1,1로 배치한다.
        // NOTE: 1장에 할당할 마스크의 분할 수를 구하고 싶으므로 소수점은 올림한다.
        final int countPerSheetDiv = (usingClipCount + renderTextureCount - 1) / renderTextureCount;     // 렌더 텍스쳐 1장당 몇 장을 할당할 것인가?
        final int reduceLayoutTextureCount = usingClipCount % renderTextureCount;     // 레이아웃의 수를 1장 줄이는 렌더 텍스쳐의 수(이 수만큼의 렌더 텍스쳐가 대상).

        // RGBA를 차례로 사용한다.
        final int divCount = countPerSheetDiv / COLOR_CHANNEL_COUNT; // 1채널에 배치할 기본 마스크
        final int modCount = countPerSheetDiv % COLOR_CHANNEL_COUNT;     // 나머지, 이 번호의 채널까지 하나씩 배분(인덱스 아님)

        // RGBA 각 채널을 준비한다(0:R, 1:G, 2:B, 3:A, )
        int curClipIndex = 0; //순서대로 설정

        for (int renderTextureIndex = 0; renderTextureIndex < renderTextureCount; renderTextureIndex++) {
            for (int channelIndex = 0; channelIndex < COLOR_CHANNEL_COUNT; channelIndex++) {
                // 이 채널에 배치할 수
                // NOTE: 레이아웃 수 = 1채널에 배치할 기본 마스크 + 남은 마스크를 두는 채널이라면 하나 추가
                int layoutCount = divCount + (channelIndex < modCount ? 1 : 0);

                // 레이아웃의 수를 1장 줄일 경우에 이를 수행할 채널을 결정
                // div가 0일 때는 정상적인 인덱스의 범위가 되도록 조정
                final int checkChannelIndex = modCount + (divCount < 1 ? -1 : 0);

                // 이번이 대상 채널이고 레이아웃 수를 1장 줄이는 렌더 텍스쳐가 존재하는 경우
                if (channelIndex == checkChannelIndex && reduceLayoutTextureCount > 0) {
                    // 현재의 렌더 텍스쳐가 대상 렌더 텍스쳐라면 레이아웃 수를 1장 줄인다.
                    layoutCount -= ! (renderTextureIndex < reduceLayoutTextureCount) ? 1 : 0;
                }

                // 분할 방법 결정.
                if (layoutCount == 0) {
                    // 아무것도 하지 않는다.
                } else if (layoutCount == 1) {
                    // 모두 그대로 사용.
                    T_ClippingContext cc = clippingContextListForMask.get(curClipIndex++);
                    cc.layoutChannelIndex = channelIndex;
                    csmRectF bounds = cc.layoutBounds;

                    bounds.setX(0.0f);
                    bounds.setY(0.0f);
                    bounds.setWidth(1.0f);
                    bounds.setHeight(1.0f);

                    cc.bufferIndex = renderTextureIndex;
                } else if (layoutCount == 2) {
                    for (int i = 0; i < layoutCount; i++) {
                        final int xpos = i % 2;

                        T_ClippingContext cc = clippingContextListForMask.get(curClipIndex++);
                        cc.layoutChannelIndex = channelIndex;
                        csmRectF bounds = cc.layoutBounds;

                        // UV를 2개로 분해하여 사용
                        bounds.setX(xpos * 0.5f);
                        bounds.setY(0.0f);
                        bounds.setWidth(0.5f);
                        bounds.setHeight(1.0f);

                        cc.bufferIndex = renderTextureIndex;
                    }
                } else if (layoutCount <= 4) {
                    // 4분할하여 사용
                    for (int i = 0; i < layoutCount; i++) {
                        final int xpos = i % 2;
                        final int ypos = i / 2;

                        T_ClippingContext cc = clippingContextListForMask.get(curClipIndex++);
                        cc.layoutChannelIndex = channelIndex;
                        csmRectF bounds = cc.layoutBounds;

                        bounds.setX(xpos * 0.5f);
                        bounds.setY(ypos * 0.5f);
                        bounds.setWidth(0.5f);
                        bounds.setHeight(0.5f);

                        cc.bufferIndex = renderTextureIndex;
                    }
                } else if (layoutCount <= layoutCountMaxValue) {
                    // 9분할하여 사용
                    for (int i = 0; i < layoutCount; i++) {
                        final int xpos = i % 3;
                        final int ypos = i / 3;

                        T_ClippingContext cc = clippingContextListForMask.get(curClipIndex++);
                        cc.layoutChannelIndex = channelIndex;
                        csmRectF bounds = cc.layoutBounds;

                        bounds.setX(xpos / 3.0f);
                        bounds.setY(ypos / 3.0f);
                        bounds.setWidth(1.0f / 3.0f);
                        bounds.setHeight(1.0f / 3.0f);

                        cc.bufferIndex = renderTextureIndex;
                    }
                }
                // 마스크의 제한 매수를 초과한 경우의 처리
                else {
                    int count = usingClipCount - useClippingMaskMaxCount;
                    cubismLogError(
                        "not supported mask count : %d\n[Details] render texture count: %d\n, mask count : %d",
                        count,
                        renderTextureCount,
                        usingClipCount
                    );

                    // 개발 모드의 경우에는 정지시킨다.
                    assert false;

                    // 계속 실행할 경우 SetupShaderProgram에서 오버 액세스가 발생하므로 어쩔 수 없이 적당히 넣어 둔다.
                    // 당연히 그리기 결과는 어색해진다.
                    for (int i = 0; i < layoutCount; i++) {
                        T_ClippingContext cc = clippingContextListForMask.get(curClipIndex++);
                        cc.layoutChannelIndex = 0;

                        csmRectF bounds = cc.layoutBounds;
                        bounds.setX(0.0f);
                        bounds.setY(0.0f);
                        bounds.setWidth(1.0f);
                        bounds.setHeight(1.0f);

                        cc.bufferIndex = 0;
                    }
                }
            }
        }
    }
마스크 그리기, 마스크 사용의 매트릭스 생성
그리기 전에 조사한 직사각형 범위와 소속 장소에 근거해 마스크 생성용, 마스크 사용용 변환 매트릭스를 준비합니다.
/*생략*/
            // ---- 실제로 하나의 마스크를 그리기 ----
            T_ClippingContext clipContext = clippingContextListForMask.get(clipIndex);
            csmRectF allClippedDrawRect = clipContext.allClippedDrawRect; //이 마스크를 사용하는 모든 그리기 오브젝트의 논리 좌표상의 둘러싼 직사각형
            csmRectF layoutBoundsOnTex01 = clipContext.layoutBounds;    // 이 마스크를 넣는다

            final float margin = 0.05f;
            float scaleX, scaleY;
            final float ppu = model.getPixelPerUnit();
            final float maskPixelWidth = clipContext.getClippingManager().getClippingMaskBufferSize().x;
            final float maskPixelHeight = clipContext.getClippingManager().getClippingMaskBufferSize().y;
            final float physicalMaskWidth = layoutBoundsOnTex01.getWidth() * maskPixelWidth;
            final float physicalMaskHeight = layoutBoundsOnTex01.getHeight() * maskPixelHeight;

            tmpBoundsOnModel.setRect(allClippedDrawRect);

            if (tmpBoundsOnModel.getWidth() * ppu > physicalMaskWidth) {
                tmpBoundsOnModel.expand(allClippedDrawRect.getWidth() * margin, 0.0f);
                scaleX = layoutBoundsOnTex01.getWidth() / tmpBoundsOnModel.getWidth();
            } else {
                scaleX = ppu / physicalMaskWidth;
            }

            if (tmpBoundsOnModel.getHeight() * ppu > physicalMaskHeight) {
                tmpBoundsOnModel.expand(0.0f, allClippedDrawRect.getHeight() * margin);
                scaleY = layoutBoundsOnTex01.getHeight() / tmpBoundsOnModel.getHeight();
            } else {
                scaleY = ppu / physicalMaskHeight;
            }

            // 마스크를 생성할 때 사용할 행렬을 구한다.
            createMatrixForMask(isRightHanded, layoutBoundsOnTex01, scaleX, scaleY);

            clipContext.matrixForMask.setMatrix(tmpMatrixForMask.getArray());
            clipContext.matrixForDraw.setMatrix(tmpMatrixForDraw.getArray());
/*생략*/
마스크 버퍼의 동적 크기 변경
OpenGL ES 2.0 렌더러는 실행 시에 마스크 버퍼의 크기를 변경하는 API를 제공합니다.
현재 마스크 버퍼의 사이즈는 초기값으로 256*256(픽셀)을 설정하고 있는데 마스크 생성 영역을 9매로 자르는 경우 85*85(픽셀)의 직사각형 영역에 묘화한 마스크 형상을 한층 더 확대해 클리핑 영역으로서 사용합니다.
그 결과 클리핑 결과의 가장자리가 흐리거나 번지는 현상이 나타납니다.
이를 해결하는 방법으로 마스크 버퍼의 크기를 프로그램 실행 시에 변경하는 API를 제공합니다.
예를 들어, 마스크 버퍼의 크기를 256*256 ⇒ 1024*1024로 함으로써 마스크 생성 영역을 9매로 자르는 경우 341*341의 직사각형 영역에 마스크 형상을 그릴 수 있으므로, 클리핑 영역으로 확대하여 사용해도 클리핑 결과의 가장자리의 흐림이나 번짐을 없앨 수 있습니다.
※마스크 버퍼의 사이즈를 크게 한다 ⇒ 처리하는 픽셀이 증가하면 속도는 느려지지만, 묘화 결과는 깨끗해진다.
※마스크 버퍼의 사이즈를 작게 한다 ⇒ 처리하는 픽셀이 줄어들기 때문에 속도는 빨라지지만, 묘화 결과는 더러워진다.
    public void setClippingMaskBufferSize(final float width, final float height) {
        if (clippingManager == null) {
            return;
        }

        // 인스턴스 파기 전에 렌더 텍스쳐 수를 저장
        final int renderTextureCount = this.clippingManager.getRenderTextureCount();

        // Destroy and recreate instances to change the size of MaskBuffer
        clippingManager = new CubismClippingManagerAndroid();
        clippingManager.setClippingMaskBufferSize(width, height);

        CubismModel model = getModel();
        clippingManager.initialize(
            RendererType.ANDROID,
            model,
            renderTextureCount
        );
    }
전처리 방식으로 성능 향상을 기대할 수 있는 이유
휴대 단말기 특유의 사정으로 GPU에 대한 Clear 명령이나 렌더링 타깃 전환 명령의 처리 비용이 다른 명령보다 높을 수 있습니다.
원칙적인 방식으로 그릴 때는 이러한 처리 비용이 높은 명령을 마스크가 필요한 Drawable의 수만큼 실행하게 됩니다.
그러나 전처리 방식의 경우에는 이러한 명령을 실행하는 횟수를 줄일 수 있으므로 스마트폰 등에서의 성능 향상을 기대할 수 있습니다.
실제로 그 효과를 파악하기 위한 실험을 실시하고 있습니다.
이 실험의 측정 방법과 결과에 대해서는 「(Native)마스크 전처리 방식」의 「전처리 방식으로 성능 향상을 기대할 수 있는 이유」를 봐 주세요.
마스크 처리를 고선명 방식으로 전환
그릴 때마다 마스크를 생성하는 방법이라면 낮은 사양 단말기에서는 성능에 영향이 있습니다.
그러나 최종적으로 동영상으로서 출력하는 경우와 같이, 런타임에서의 퍼포먼스보다 화면의 품질을 중시하는 경우는 이쪽 방식이 더 적합합니다.
Cubism SDK for Java에서는 마스크 처리를 고선명 방식으로 전환할 수 있습니다.
고선명 방식으로 전환하려면 다음 API에 true를 전달합니다.
CubismRenderer.isUsingHighPrecisionMask()