Frame Step
Updated: 09/04/2019
This section describes the frame step function.
[Frame Step] means the interval, expressed in frames, at which the same picture is displayed within 24 frames* (1 sec).
(For general animation)
About Frame Step
The default setting is full frames, so the motion is smooth, but by using the frame step function, it is possible to reproduce the sharpness of motion as in limited animation.
In the video below, the left side does not use the frame step setting (full frame) and the right side uses the frame step setting.
Frame Step Setting
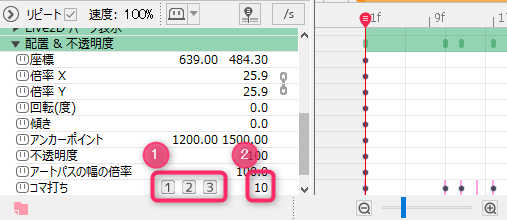
You can find the frame step properties in the [Placement & Opacity] property group of the timeline.
By clicking on the frame step setting button (1), you can select single, double, or triple frame steps.
You can also drag and drop the numeric input box in (2) or directly input the numeric value in frame step field.
When a frame step is set, a frame step keyframe is set at the position of the indicator (red bar on the timeline).

Multiple keyframes can also be set to change the frame step setting between keys.

UI for Frame Step
The frame step properties are located at the bottom of the property group.

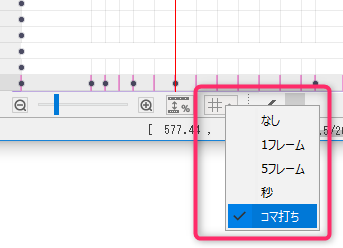
If it is difficult to confirm the settings, select [Frame Step] from the frame display in the timeline.
This switches the timeline frame display to a frame step setting.

Individual Parameter Group Settings
Frame step settings can be set individually if there is a [Parameter Group] in the [Live2D Parameters] property.
Right-click on [Property] -> Click on [Add Frame Step Properties].


A frame step property has been added at the bottom.
Export Frame Step
The following settings are required when exporting with frame step applied.
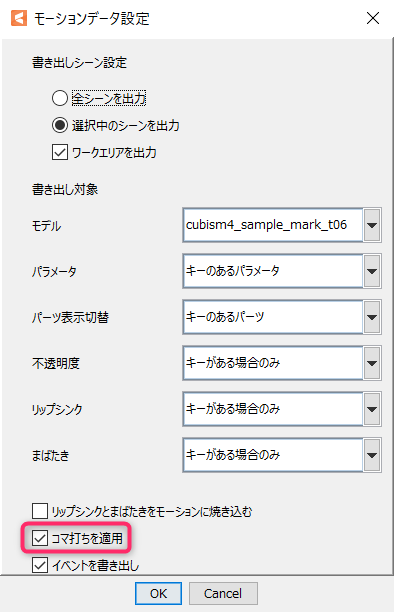
Open the Animation View, click File -> Export For Runtime -> Export motion file from the top menu, and open the Motion Data Settings dialog box.
Export with the [Apply Frame Step] checkbox checked.
(The information from the frame step is converted to steps.)

