About the Cubism Controller
Updated: 11/23/2020
You can add keys from the control panel or timeline in Adobe After Effects, but this section describes a convenient way to edit using the Cubism Controller.
Cubism Controller Display
By using the Cubism Controller, keyframes can be set in the same way as in the Cubism timeline.
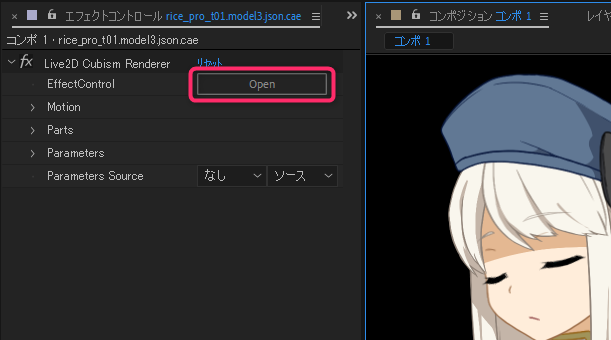
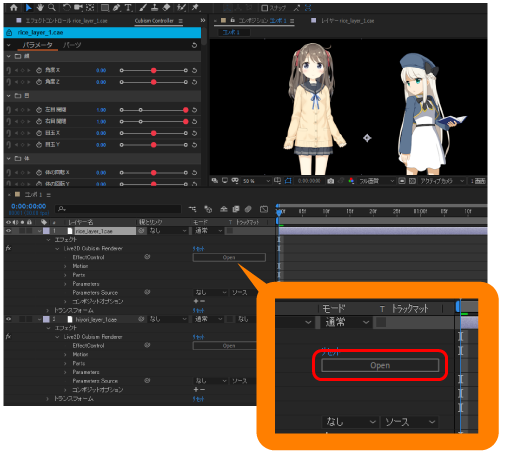
Click “Open” in the red frame to display the [Cubism Controller].
It can also be opened from the Effects Control Panel or the Timeline Panel.
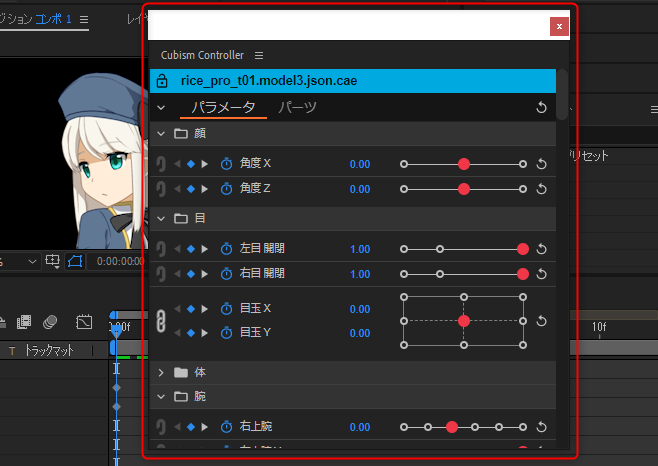
Parameters and parts are displayed in a tree and sliders can be manipulated.
Parameter concatenation, right-clicking to snap to keys, etc. are also reproduced, allowing for almost the same operations as in the Cubism timeline.
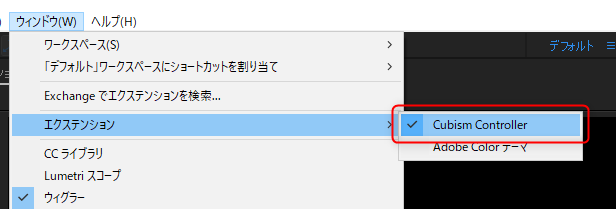
If the Cubism Controller does not appear, check to see if the [Cubism Controller] checkbox in the [Window] menu -> [Extensions] is checked.
About the Cubism Controller
This section describes the functions within the Cubism Controller.
Parameters
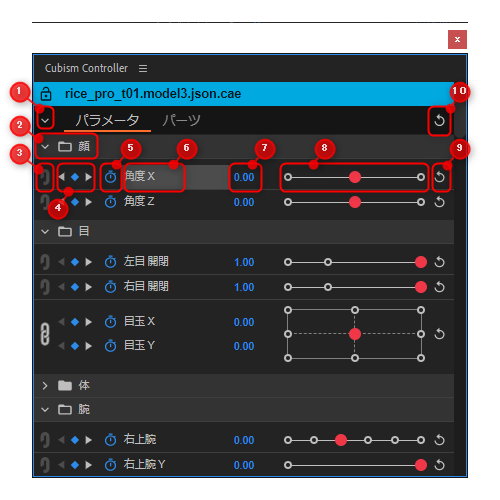
| No. | Item | Details |
|---|---|---|
| (1) | Switching | Switches between Parameter and Part(s). |
| (2) | Open All / Close All | Opens or closes all groups in the parameter folder. |
| (3) | Parameter group | Opens or closes groups in the parameter folder. |
| (4) | Connecting button | Connects to the parameter placed below. No cross-folder connection is allowed. |
| (5) | Add/Move Keyframe button | Adds a key to the playback position in the After Effects timeline with the diamond-shaped button in the center. Moves to the previous and next keys with the left and right triangle buttons. |
| (6) | Create Keyframe button | Adds keys to the After Effects timeline. |
| (7) | Parameter name | Displays the parameter name. |
| (8) | Numeric editor | Enter numerical values directly to change parameter values. You can also change the value by dragging. • [Shift] + drag to change values 10 times faster • [Ctrl] + drag to change values at 0.1x speed |
| (9) | Slider | Drag the slider to change the parameter value. |
| (10) | Reset button for parameter values | Resets individual parameter values to default values. |
| (11) | Batch reset button for parameter values | Resets the values of all parameters to their default values. |
| (12) | Lock for layer display | Once locked, the display will not switch when another layer is selected. |
Part(s)
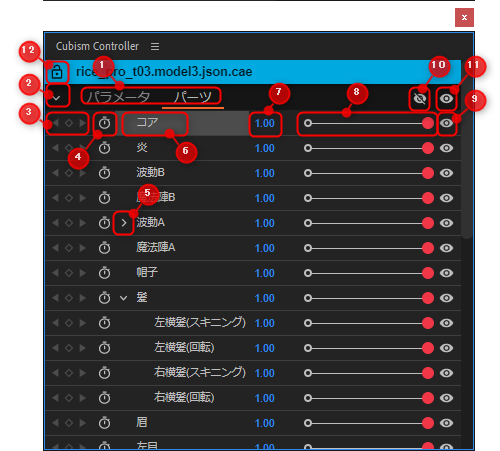
| No. | Item | Details |
|---|---|---|
| (1) | Switching | Switches between Parameter and Part(s). |
| (2) | Open All / Close All | Opens or closes all groups in the parameter folder. |
| (3) | Add/Move Keyframe button | Adds a key to the playback position in the After Effects timeline with the diamond-shaped button in the center. Moves to the previous and next keys with the left and right triangle buttons. |
| (4) | Create Keyframe button | Adds keys to the After Effects timeline. |
| (5) | Open/Close part | Opens and closes the part. |
| (6) | Part name | Displays the part name. |
| (7) | Numeric editor | Change opacity values of the part by entering numerical values directly. You can also change the value by dragging. • [Shift] + drag to change values 10 times faster • [Ctrl] + drag to change values at 0.1x speed |
| (8) | Slider | Drag the slider to change the opacity value of part. |
| (9) | Show/hide parts button | Shows or hides individual parts. You can show/hide the part by dragging the slider. |
| (10) | Batch hide button for parts | Hides all parts at once. |
| (11) | Batch display button for parts | Show all parts at once. |
| (12) | Lock for layer display | Once locked, the display will not switch when another layer is selected. |
TIPS
Non-parted objects will not be displayed in the Part(s) tab.
In Cubism Editor, create a folder of parts for each component (eyes, nose, etc.) of the character, and put the object you want to display in it.
Panel Docking
The Cubism Controller panel can be docked to the After Effects panel.
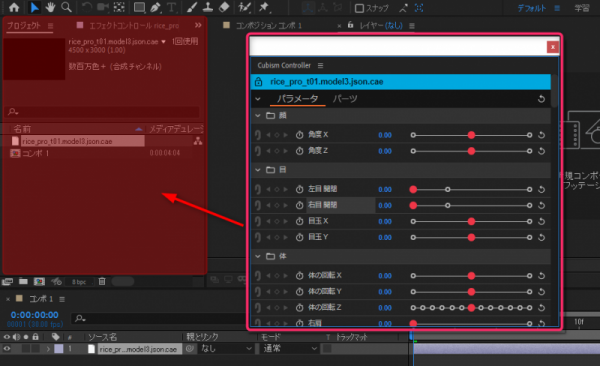
Place them anywhere as needed.
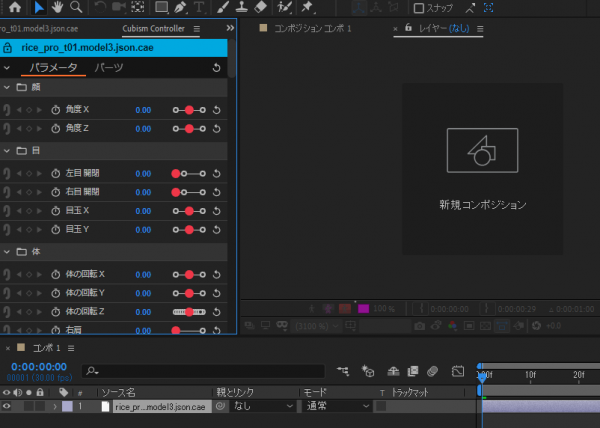
Switch Cubism Controller Display
When working with multiple models loaded, the controllers for each layer must be displayed.
The layer on which the controller is to be displayed can be selected directly or switched by clicking the [Open] button in the figure below.
Lock the Layer to Be Operated On
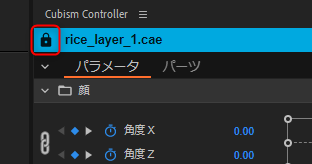
Clicking the lock icon button at the left end of the title bar prevents the display from switching to the other layers even if they are selected.
This ensures that Cubism Controller operations while locked will only be performed on the layer that is locked.
Cubism AE Plugin R1 and Previous Cubism Controller
This section describes the functions within the Cubism Controller prior to the Cubism AE Plugin R1.
Note: Since the Cubism AE Plugin R2, the operability of the Cubism Controller has been greatly improved, so please try the latest version.
Parameters
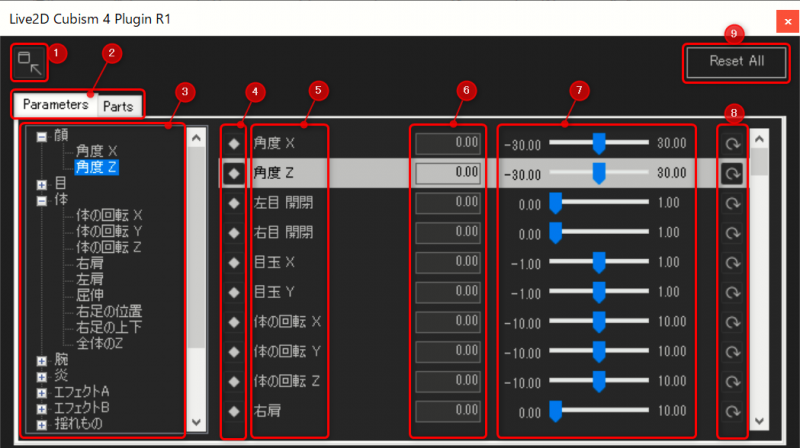
| No. | Item | Details |
|---|---|---|
| (1) | Cubism Controller minimize button | Minimizes the Cubism Controller. Click again to return to the original size. |
| (2) | Switching tab | Use tabs to switch between parameters and parts. |
| (3) | Parameter expansion tree | Parameters are displayed in a tree view and can be expanded. Reproduces the name on the Animation View by loading cdi3.json. |
| (4) | Add Keyframe button | Adds a key to the playback position in the After Effects timeline. |
| (5) | Parameter name | The parameter ID is displayed. |
| (6) | Numeric input box | Enter numerical values directly to change parameter values. |
| (7) | Slider | Drag the slider to change the parameter value. |
| (8) | Reset button for parameter values | Resets individual parameter values to default values. |
| (9) | Batch reset button for parameter values | Resets the values of all parameters to their default values. |
Part(s)
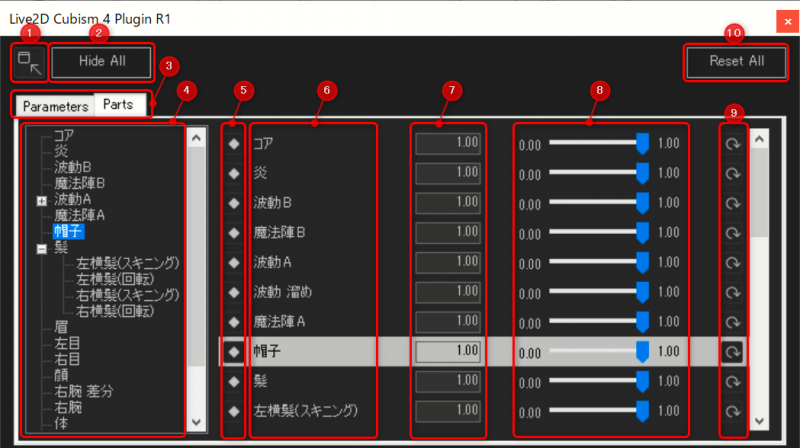
| No. | Item | Details |
|---|---|---|
| (1) | Cubism Controller minimize button | Minimizes the Cubism Controller. Click again to return to the original size. |
| (2) | Batch hide button for parts | Hides all parts at once. |
| (3) | Switching tab | Use tabs to switch between parameters and parts. |
| (4) | Parameter expansion tree | Parts are displayed in a tree view and can be expanded. Reproduces the name on the Animation View by loading cdi3.json. |
| (5) | Add Keyframe button | Adds a key to the playback position in the After Effects timeline. |
| (6) | Part name | The part ID is displayed. |
| (7) | Numeric input box | Enter numerical values directly to change part values. |
| (8) | Slider | Drag the slider to change the opacity value of part. |
| (9) | Reset button for parts | Resets individual part values to default values. |
| (10) | Batch reset button for parts | Resets the values of all parts to their default values. |
