关于模型(Web)
最終更新: 2026年1月29日
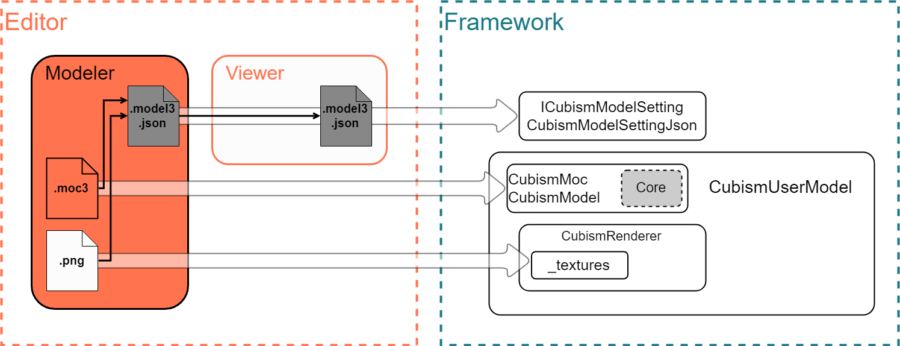
关于编辑模型信息
模型信息基本上由Modeler创建。
.moc3文件中记录了相对于参数的顶点等动作。
附加到其他物理模拟、图形网格的用户数据等作为单独的文件输出,.model3.json文件记录模型相关的所有文件参考。
从Modeler输出.moc3文件时,可以同时输出。“输出嵌入数据”
您还可以使用Cubism Viewer(for OW)追加动态、表情文件和姿势文件的内置设置。
使用Framework从.model3.json文件导入
使用Framework导入时,从.model3.json文件中提取模型所需的信息,
然后考虑将维护和使用继承CubismUserModel类的副本。
// TypeScript
const dir: string = "example/";
const fileName: string = "example.model3.json";
const path: string = dir + fileName;

fetch(path).then(
    (response) =>
    {
        return response.arrayBuffer();
    }
).then(
    (arrayBuffer) =>
    {
        let buffer: ArrayBuffer = arrayBuffer;
        let size = buffer.byteLength;
        let setting: ICubismModelSetting = new CubismModelSettingJson(buffer, size);
        deleteBuffer(buffer, path);
// 省略
    }
ICubismModelSetting类中提取的各元素都可以通过CubismUserModel.load~~系函数进行导入。
// TypeScript

// buffer是.model3.json的ArrayBuffer
this.loadModel(buffer);
.model3.json文件开始的全体读取流程按照范例中的LAppModel.loadAssets函数
到LAppModel.setupModel函数、CubismUserModel.createRenderer函数、LAppModel.setupTextures函数的流程将会容易理解。
创建副本(导入.moc3文件)
首先,将.moc3文件导入到内存记忆中。
将导入缓冲区和大小传递给CubismMoc.create函数,并首先创建一个CubismMoc副本。
然后调用CubismMoc.createModel函数来创建一个CubismModel副本。
从这个CubismModel副本中,您可以操作参数并获取绘图信息等。
// TypeScript

// buffer是.moc3的ArrayBuffer
this._moc = CubismMoc.create(buffer);
this._model = this._moc.createModel();
图形环境关联
Framework使用从CubismRenderer类派生的类,以便模型的纹理信息不依赖于图形API。
所有与模型相关的图形相关信息都由CubismRenderer类的派生类管理。
从CubismRenderer类中生成图形API的派生类,并通过使用CubismRenderer_WebGL.initialize函数注册CubismModel副本,关联CubismRenderer副本和CubismModel副本。
// TypeScript
let renderer: CubismRenderer_WebGL = new CubismRenderer_WebGL();

renderer.initialize(model);
纹理关联
Framework中模型的纹理由CubismRenderer类的派生类管理。
但是,该方法没有在CubismRenderer类中注册,因为该功能避免了对图形API的依赖。
请注意,方法规格会根据对象图形API的不同而有所不同。
在WebGL处理中,使用CubismRenderer类的派生CubismRenderer_WebGL类中的CubismRenderer_WebGL.bindTexture函数注册。
第一个参数可以通过模型纹理编号和Editor上的纹理集编号来确认。
第二个参数是纹理在WebGL中的管理编号。
下面的例子是在WebGL中导入纹理。
// TypeScript
// 将纹理读取到WebGL纹理单元中
let texturePath = this._modelSetting.getTextureFileName(modelTextureNumber);
texturePath = this._modelHomeDir + texturePath;

img[modelTextureNumber] = new Image();
img[modelTextureNumber].onload = () =>
{
    // 创建纹理物体
    let tex: WebGLTexture = gl.createTexture();

    // 选择纹理
    gl.bindTexture(gl.TEXTURE_2D, tex);

    gl.texParameteri(gl.TEXTURE_2D, gl.TEXTURE_MIN_FILTER, gl.LINEAR_MIPMAP_LINEAR);
    gl.texParameteri(gl.TEXTURE_2D, gl.TEXTURE_MAG_FILTER, gl.LINEAR);

    // 进行Premult处理
    if(usePremultiply)
    {
        gl.pixelStorei(gl.UNPACK_PREMULTIPLY_ALPHA_WEBGL, 1);
    }

    // 将像素写入纹理
    gl.texImage2D(gl.TEXTURE_2D, 0, gl.RGBA, gl.RGBA,
                  gl.UNSIGNED_BYTE, img[modelTextureNumber]);

    // 生成Mipmap
    gl.generateMipmap(gl.TEXTURE_2D);

    this.getRenderer().bindTexture(modelTextureNumber, tex);
}
img[modelTextureNumber].src = texturePath;

this.getRenderer().setIsPremultipliedAlpha(usePremultiply);
指定显示位置和大小
您可以通过到目前为止的设置绘制模型,但在很多情况下,显示位置和比例尺相差太大,无法在画面上显示。
有关csmGetDrawableVertexPositions函数返回的顶点范围,请参考“DrawableVertexPositions范围”。
使用CubismModelMatrix类、CubismModel.getCanvasWidth函数和getCanvasHeight函数来调整大小。
// TypeScript
let modelMatrix: CubismModelMatrix =
  new CubismModelMatrix(this._model.getCanvasWidth(),
                        this._model.getCanvasHeight());
这个矩阵在绘制前乘以Projection矩阵,作为MVP矩阵传递给渲染器。
// TypeScript
let projectionMatrix: CubismMatrix44 = new CubismMatrix44();
projectionMatrix.scale(1, window.width / window.height);
projectionMatrix.multiplyByMatrix(modelMatrix);

this.getRenderer().setMvpMatrix(projectionMatrix);
this.getRenderer().drawModel();
顶点更新
执行CubismModel.update函数,将CubismModel副本相对的参数操作应用在图形网格的顶点上。
// TypeScript
model.update();
绘制
绘制不是从CubismModel副本执行的,而是被指示给关联的渲染器。
// TypeScript
let projectionMatrix: CubismMatrix44 = new CubismMatrix44();
projectionMatrix.scale(1, window.width / window.height);
projectionMatrix.multiplyByMatrix(modelMatrix);

this.getRenderer().setMvpMatrix(projectionMatrix);

this.getRenderer().drawModel();
在CubismModel类中使用模型中不存在的参数ID
在CubismModel类的参数和部件不透明度的操作中,可以处理.moc3文件中不存在ID的功能。
该功能被CubismMotion类、CubismPose类等使用,使用它创建新结构时,请注意您使用的ID,避免与现有功能冲突。
另外,请注意使用解读Framework时也会创建的参数与其他功能联动的可能性。
* 访问不存在的最大值、最小值和初始值时会出现错误。
// TypeScript
// CubismModel
public getParameterIndex(parameterId: CubismIdHandle): number
{
    let parameterIndex: number;
    const idCount: number = this._model.parameters.count;

    for(parameterIndex = 0; parameterIndex < idCount; ++parameterIndex)
    {
        if(parameterId != this._parameterIds[parameterIndex])
        {
            continue;
        }

        return parameterIndex;
    }

    // 如果模型中不存在,则搜索不存在的参数ID列表并返回其索引
    if(this._notExistParameterId.isExist(parameterId))
    {
        return this._notExistParameterId.get(parameterId);
    }

    // 如果不存在的参数ID列表中没有,则追加一个新元素
    parameterIndex = this._model.parameters.count + this._notExistParameterId.length;

    this._notExistParameterId.set(parameterId, parameterIndex);
    this._notExistParameterValues.appendKey(parameterIndex);

    return parameterIndex;
}