Build DirectX 11 samples
Updated: 10/30/2025
This page describes how to compile the DirectX 11 sample project included in the Live2D Cubism SDK for Native with Visual Studio in a Windows environment.
Note: The content of this article is based on the Cubism 4 SDK for Native R1.
The method and procedure may differ depending on the Cubism SDK version.
What to download
• Live2D Cubism SDK for Native
The main body of the SDK. Download from the “official download page.”
This is the development environment that will be used here. The language will be C++.
• CMake
Used to generate project files.
DirectX 11 library.
This can be downloaded using the batch file included in the Cubism SDK sample.
For libraries such as CMake, DirectXTK, etc., please check the procedures and version described in ‘README.md’ located at “[root]Samples/D3D11” in the sample SDK ZIP file.
Installation process
Visual Studio
Install the integrated development environment.
Set up the system so that C++ can compile.
Please use Visual Studio 2017 or later.
CMake
Install CMake.
CMake operations are used from a batch file, so the CMake path setting should be set so that it can be referenced by the user who will use it.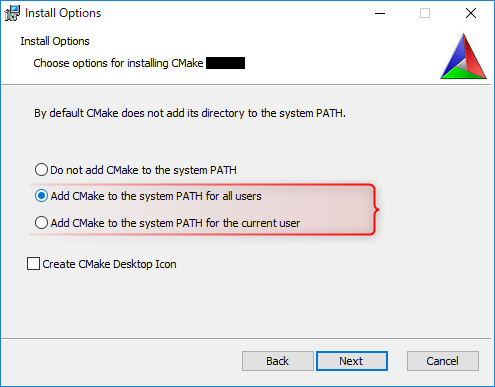
Note: Images may differ from the actual screen.
DirectXTK
Install DirectXTK.
Run “setup_msvcxxxx.bat” in “/Samples/D3D11/thirdParty/scripts” where the Visual Studio to be used is listed and download DirectXTK.
When the batch processing is completed, a folder named “DirectXTK” is created in “/Samples/D3D11/thirdParty.”
Execute CMake
CMake can also be used from the GUI, but at this time use the batch file included in the sample.
The batch file can be found in “Samples/D3D11/Demo/proj.d3d11.cmake/scripts.”
This batch file selects from several combinations of settings.
• NMake or Project
NMake builds from the command prompt and generates an executable file; use a batch file starting with nmake_.
Use batch files starting with proj_ when editing code, etc. from Visual Studio.
• Version of Visual Studio
Please select the version of Visual Studio you have installed.
In this example, the “proj_msvc2017.bat” file is executed to select the project containing the Visual Studio 2017 solution file.
When executed, choices will be displayed as shown in the image below, so enter the corresponding number in single-byte numbers.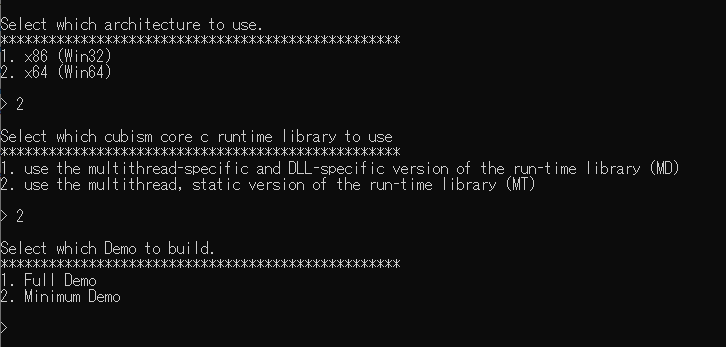
• Selecting the architecture
Select x86(Win32) or x64(Win64).
Select as appropriate depending on the environment in which it is used.
• Selecting modules for Cubism Core
Select the Cubism Core runtime library to be used.
See the official Microsoft documents for the meanings of MD, MT, etc.
• Selecting project content
Select the content of the project to be generated.
If you select Full Demo: A sample project will be generated that utilizes all the features of the Cubism SDK for Native.
If you select Minimum Demo: A minimally configured project is generated that displays a model that repeats a single motion. The following features are used in this project.
- Load and display Cubism models
- Ability to loop a single motion
- Eye tracking using mouse dragging
- Physics
- Breath
- Pose
If the input is successful, CMake generation will begin.
Note: If an error occurs after the generation starts, please check the version of CMake and the version of Visual Studio you are specifying.
Build
When CMake generation is finished, open the solution file from the generated files.
In this example, execute
• proj_msvc2017.bat
and select
• x64(Win64)
• use the multithread-specific and DLL-specific version of the run-time library (MD)
and then
open the output file “Demo.sln” in “[root]/Samples/D3D9/Demo/proj.d3d11.cmake/build/proj_msvc2017_x64_md” in Visual Studio, and execute the build.
If the build is successful, let’s run it through debugging.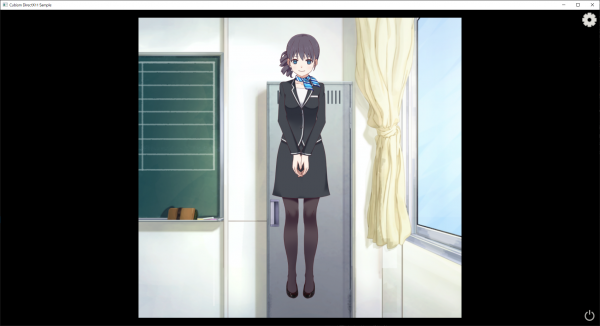
If a large screen appears, you have succeeded.
Note: In the smallest sample, UI such as the background and the gear icon for switching models are not displayed.
To adjust the window size, change the values of the 4th and 5th arguments of SetRect() used in LAppDelegate::Initialize() in “/Sample/D3D11/Demo/proj.d3d11.cmake/src/LAppDelegate.cpp.”
SetRect(&rect, 0, 0, RenderTargetWidth, RenderTargetHeight);
Note: Actual values for RenderTargetWidth and RenderTargetHeight are defined in “/Sample/D3D11/Demo/proj.d3d11.cmake/src/LAppDefine.cpp.”
Destination Where the Executable File Will Be Output
In this project created from CMake, unlike normal projects, the output destination of the file is under “bin,” which is created in the same hierarchy as the project folder.
Specifically, when the project folder is “[root]/Samples/D3D11/Demo/proj.d3d11.cmake/build/proj_msvc2017_x64_md,” the executable file will be output to “[root]/Samples/D3D11/Demo/proj.d3d11.cmake/build/proj_msvc2017_x64_md/bin/[Configurations]/.”
Example: “[root]/Samples/D3D11/Demo/proj.d3d11.cmake/build/proj_msvc2017_x64_md/bin/Release/”