Import SDK
Updated: 03/14/2023
This tutorial covers the process of importing a model file for embedding exported from Cubism Editor into a Cocos Creator project and displaying it on the screen.
What to Prepare
Cocos Creator and Cubism SDK for Cocos Creator
The Cubism SDK for Cocos Creator supports Cocos Creator version v3.6.2 or later.
If the version is prior to v3.6.2, the information serialized in the assets in the SDK may be discarded.
Click here for more information on installing Cocos Creator.
Also, please download the Cubism SDK for Cocos Creator in advance.
This is distributed as a zip file.
The SDK is also available on Github, but it does not include the Cubism Core libraries, so please use the package or place the Cubism Core libraries from the package in the same directory when incorporating models.
Node.js
When using the Cubism SDK for Cocos Creator, you need to install the module using the npm command.
Be sure to install a version of Node.js that is compatible with the Cubism SDK for Cocos Creator from the following links.
Node.js
It can be installed from a Node.js management tool such as nvm.
Set environment variables that allow npm to run at the same time as installation.
Cubism Model Data
When working with Live2D models in the SDK, you need to export them as built-in models, not as .cmo3 or .can3 for editing.
See “Data for Embedded Use” for information on how to export models for embedded use.
The data to be exported are the .moc3 file, the .model3.json file, and the folder containing the textures.
Please keep these in one folder.
Import the SDK into a Project
- Create a new Cocos Creator project.
- Click here for more information on creating a new Cocos Creator project.


- Add the Cubism SDK for Cocos Creator to Extension.
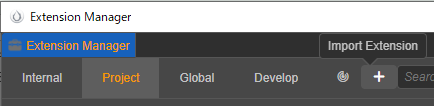
- Open the Extension Manager. (Menu->Extension->Extension Manager)
- Select Project in the Extension Manager and click Import Extension ([+] button).
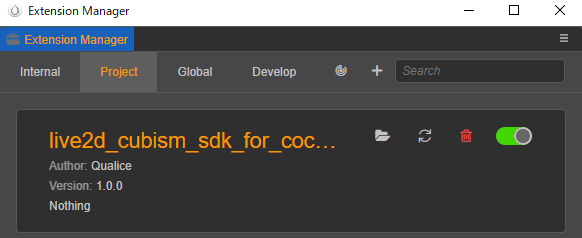
- Select and open the Cubism SDK for Cocos Creator (.zip file).
- Once the import is complete, close Cocos Creator.
- Note: You can also create an extensions folder in the project root in Explorer without using Extension Manager and extract the zip file there.
- Build the Extension project.
- Go to the Extension added above ({project root}/extensions/{SDK folder}) and execute the following command at the command prompt, etc.
- npm install
- npm run build
- When the build is complete, reopen the project.
Import Models
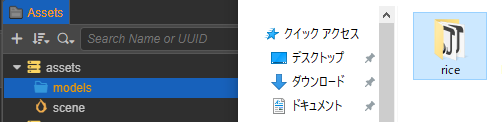
Drag and drop a set of models for embedding exported from the Cubism Editor into the Asset panel, folder by folder.
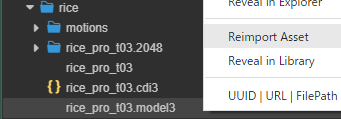
After successful import, a Prefab is automatically generated by Cubism’s Importer included in the SDK.
Note: If Prefab is not generated, right-click the model3.json file and click Reimport Asset.
This generated Prefab is a Live2D model converted to a state that can be handled by Cocos Creator.
The display of parameters and parts can be manipulated from the Hierarchy panel at this stage.
The model can be placed by adding the generated Prefab to the Hierarchy or Scene panel and running the scene.
Original Workflow Method
When importing a model using the Original Workflow method, before dragging and dropping it into the Project window, check Live2D > Cubism > Original Workflow > Should Import As Original Workflow in the menu bar.
The Cubism SDK for Cocos Creator has the Original Workflow method of import enabled by default.
If you do not use the Original Workflow method, uncheck Live2D > Cubism > Original Workflow > Should Import As Original Workflow in the menu bar.
When importing with this checked, an additional OW method component will be attached to the generated Prefab.