Build Web Samples
Updated: 08/26/2025
This page describes the steps to transpile the TypeScript sample project included in the Live2D Cubism SDK for Web on Windows with Visual Studio Code.
Note: The content of this article is based on the Cubism 5 SDK for Web R1.
The method and procedure may differ depending on the Cubism SDK version.
What You Need
The main body of the SDK. Download from the “official download page.”
• Node.js
JavaScript execution environment.
This is the development environment that will be used here. The language is TypeScript.
Installation process
1. Visual Studio Code
After installing and launching Visual Studio Code, open the top folder of the Cubism SDK for Web and install the following as extensions.
• EditorConfig for VS Code
Development tools.
This is used to unify code formatting.
This can also be found by typing “@recommended” in the extension’s search window.
After installation is complete, restart the Editor to activate the extension.
2. Node.js
Install Node.js to manage each package required for the build and as a JavaScript execution environment.
Install using the installer available on the official website.
After the installation is complete, open a command prompt and input the following.
node --version
npm --version
Confirm that the npm command is available.
Success is indicated when version information is output.
3. Vite and other packages needed for building and running
Install the necessary packages to install Vite and resolve TypeScript and JavaScript dependencies.
In Visual Studio Code with the Cubism SDK for Web folder open, press “Ctrl + Shift + P,” select “npm: install – Samples/TypeScript/Demo” from “Tasks: Run Task,” and install.
Build
To build, open the Cubism SDK for Web top directory in Visual Studio Code
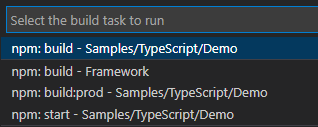
and select Terminal > Run Build Task… from the menu bar or press “Ctrl + Shift + B” and select “npm: build – Samples/TypeScript/Demo” etc., from the displayed list of build tasks.
After the build is complete, a dist folder will be created in the Samples/TypeScript/Demo folder, and a JavaScript file (index.js) will be output to the dist folder.
This dist folder also contains Cubism Core and Live2D model resources.
Execute
If the build is successful, the next step is to execute the build.
To check the execution, press “Ctrl + Shift + P” in Visual Studio Code with the Cubism SDK for Web folder open and select “npm: serve – Samples/TypeScript/Demo” from “Tasks: Run Task.”
to start a simple local server.
With the local server running, press the F5 key or select [Debug] > [Start Debugging] from the menu bar to start Chrome for debugging.
When asked to select a configuration for the first time only, select remote web site with sourcemap.

Success is indicated when the browser starts, a screen appears, and the model is displayed.
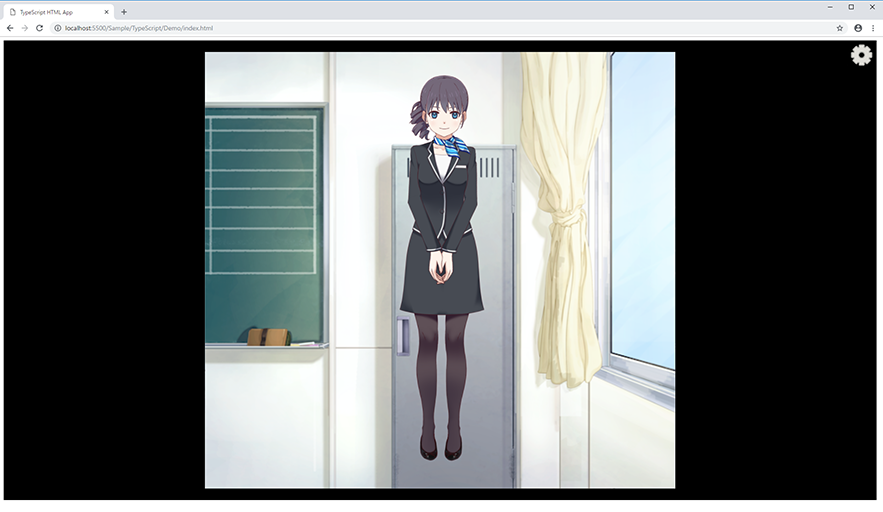
Also, in any browser, access [address displayed by npm: serve] to check index.html.
If there is a port conflict at this time, the connection may be denied.
In that case, please check if the port number specified in the “serve” item in “/Samples/TypeScript/Demo/package.json” does not conflict with the port number specified in the “serve” item.
// Specify the port number following -p
"serve": "vite preview –port  5000",
The port number is also specified in the Vite configuration file vite.config.mts. Please specify this port number as well.
 server: {
   port: 5000,
 },
In addition, if you are using Chrome for development purposes, the connection URL is specified in the “url” item of “/.vscode/launch.json,” so please check the connection URL as well.
"url": "http://localhost:5000/",
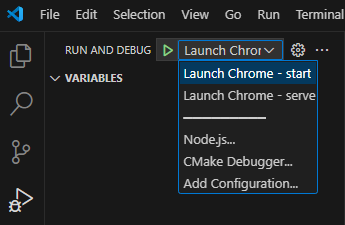
Debug settings
Starting from the Cubism SDK for Web R5 beta1, debug settings can be switched according to the command to be executed.
Specifically, launch.json has been changed to have debug settings for start and serve executions respectively. This eliminates the need to rewrite launch.json according to the command execution.
The default is to refer to the start setting.
When executing serve or switching between commands to be executed, switch to the setting that matches the command you executed from “Run and Debug” in Visual Studio Code.