4. Adding Body Movement
You can download the latest Cubism Editor here.

In this case, use the Live2D “Deformer” tool to add movement to the body and hair.
In the video, we explain how to use a deformer while adding [facial tilt], [hair swing], [arm movement], and [body up/down and tilt].
Basic Tutorial List
- Illustration Processing
- Preparing to move the illustration
- Adding facial expressions
- Adding body movement
- Adding XY facial movement
- Creating animations
Tutorial Video
Below are links to the pages in a manual that explains in more detail the items described in the video.
- About Deformer [0:10]
- Rotation Deformer [1:27]
Parent-Child Hierarchy Structure
Inspector palette - Edit Parameter [3:00]
Parameter Palette - Warp Deformer [6:22]
Keyforms (Make X, Y Movements)
You can download the data for the movements created in the video here. Use the data as a reference.
Note: Please be sure to read the Free Material License Agreement before downloading.
The completed sample model of “Hiyori Momose” appearing in the video => Click here to download
Note: Some browsers may not allow you to download the file even if you click the link.
In that case, please right-click and save the link.
Video Review
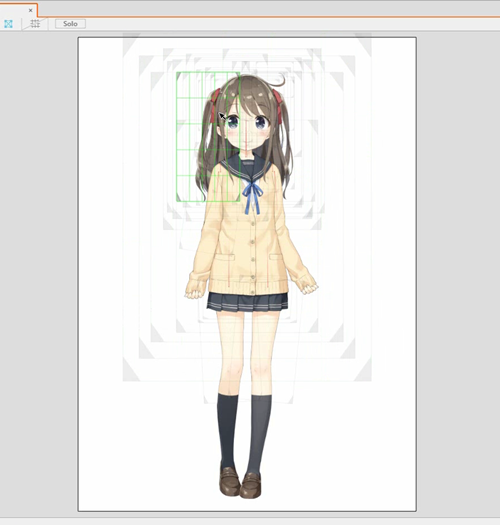
Here, the ArtMesh is placed in a “deformer” to add movement.
The following four movements are added.
• Tilting movement of the face
• Hair sway
• Arm movement
• Tilt of the body and vertical movement
About Deformers
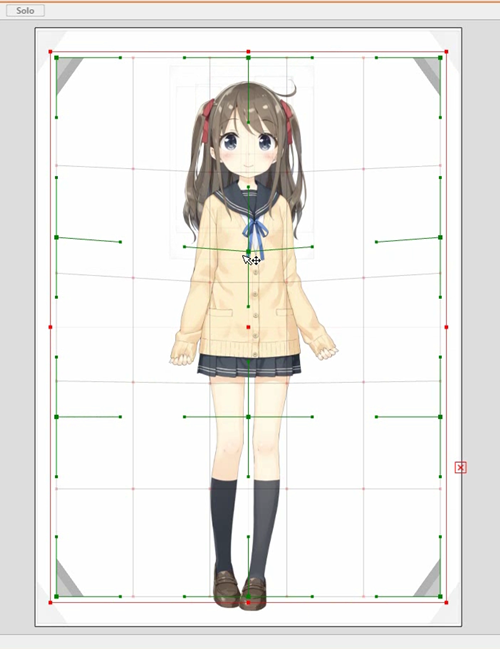
When the sample model is displayed, it shows a gray square and several red bars.
These are deformers.
Transformation and rotation can be performed by placing an ArtMesh inside a deformer.
Like ArtMeshes, deformers can be parameterized, so if you learn how to use them, you can add a variety of movements to your characters.
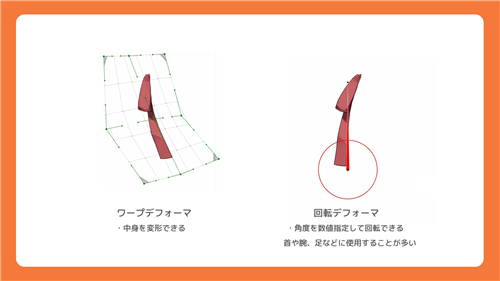
Types of Deformers
The gray square and red bar are both deformers, but they are used for separate purposes.
The gray squares are called “warp deformers.”
Warp deformers can deform the ArtMesh contained within.
The red bar is called a “rotation deformer.”
The rotation deformer is a deformer specialized in rotational movements, allowing the user to rotate the target by specifying a numerical angle.
It is primarily used on the neck, arms, and legs to create a leaning motion.
Create a Face-Tilting Movement
The tilting motion of the face is called [Angle Z] in the Live2D parameters.
First, place the head part in a rotation deformer.
From the Parts palette, lock the neck, arms, body, and legs.
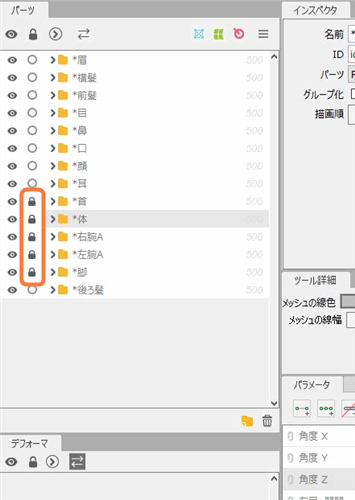
Once locked, use Ctrl + A to select all ArtMeshes that are not locked.
With those ArtMeshes selected, click [Create Rotation Deformer] at the top of the screen.
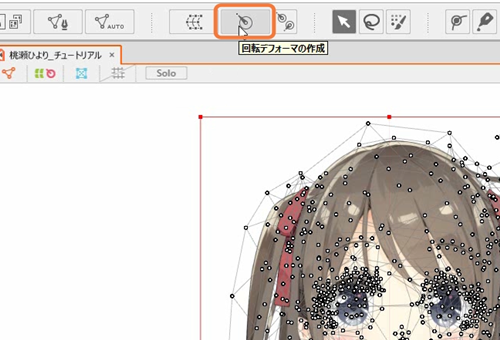
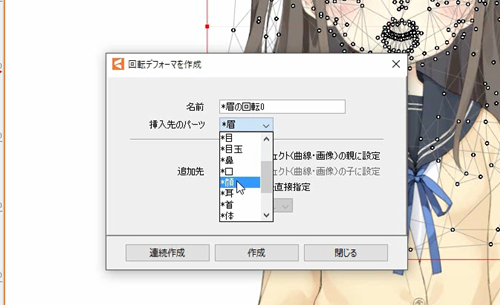
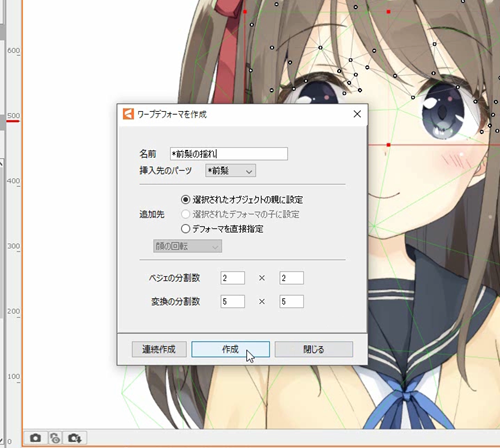
Clicking on [Create Rotation Deformer] will bring up a new dialog box.
The Name field can be set as desired.
You can use the list to select the part in which to insert the deformer. For this example, select a face since it is a face rotation.
Be sure to select “Set as Parent of Selected Object” option for Addition Destination.
After confirming the various settings, click [Create].
The rotation deformer is now ready.
When rotated, the selected face parts will rotate.
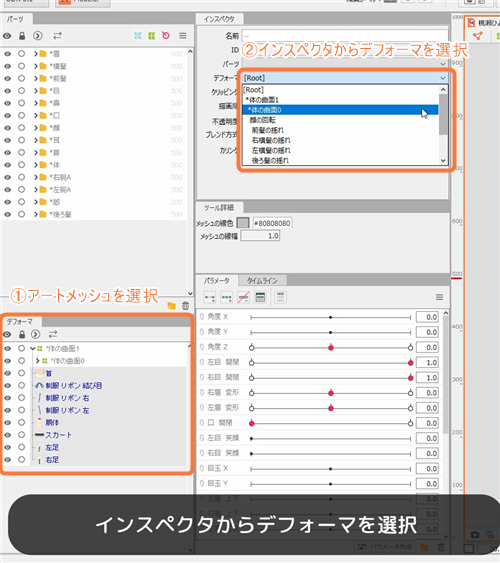
If any parts are missing, they can be inserted by selecting the ArtMesh and then selecting Deformer from the Inspector.
Deformers can be positioned by holding down Ctrl and moving them. This operation is similar for warp deformers.
Make sure to hold down Ctrl; otherwise the ArtMesh inside will move with it.
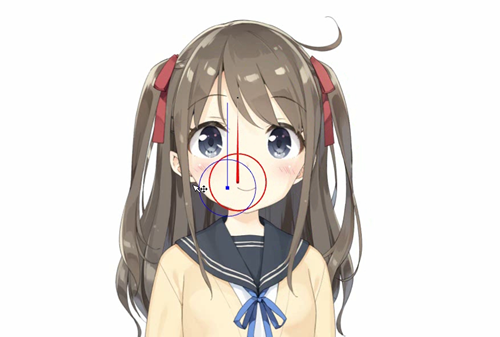
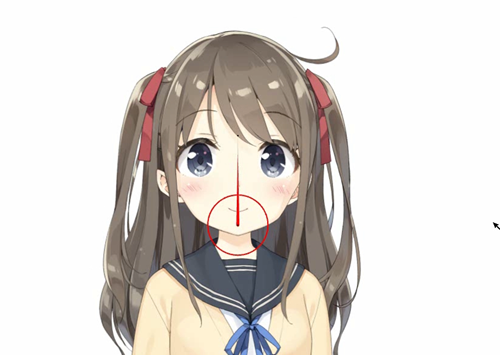
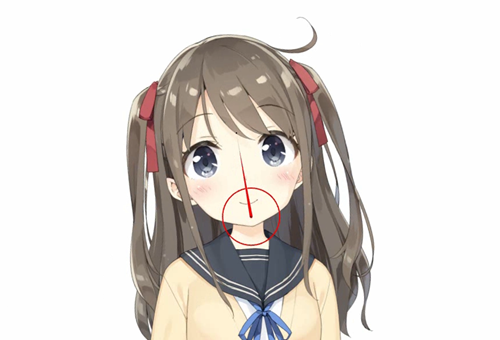
Move the rotation deformer to the chin position.
Once the position has been adjusted, the parameters are used to add movement.
The procedure for attaching parameters is the same as for an ArtMesh.
Add three keys to the face rotation Z parameter to add motion. Here, each side should move 10 degrees.
Add Hair Swing Movement
Next, let’s create the hair swing movement. Movement is applied to the front, sides, and back of the hair, respectively.
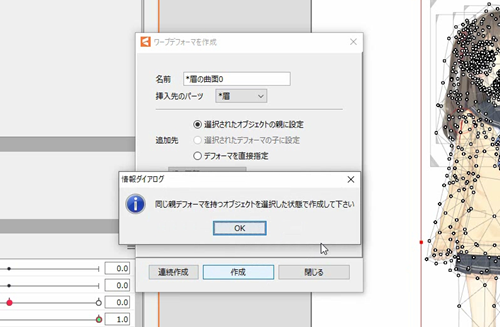
First select the bangs ArtMesh and click on [Create Warp Deformer] in the center of the menu above.
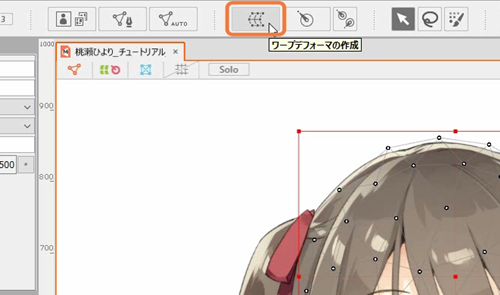
As with the rotation deformer, a dialog box will appear to confirm each item.
The bottom item is one that was not used for the rotation deformer.
For the time being, the number of Bezier divisions is 2 x 2 and the number of conversion divisions is 5 x 5.
When you have finished entering the values, click [Create].
The warp deformer is now ready.
When the deformer is deformed, the bangs are deformed together.
Now, let’s add a swinging movement for the bangs to the deformer.
The procedure for attaching parameters is the same as for an ArtMesh.
Add three keys to the “Hair swing Front” parameter.
Add a movement such that the tips of the hairs sway to the left side of the screen when the parameter moves to the left, and to the right side of the screen when the parameter moves to the right.
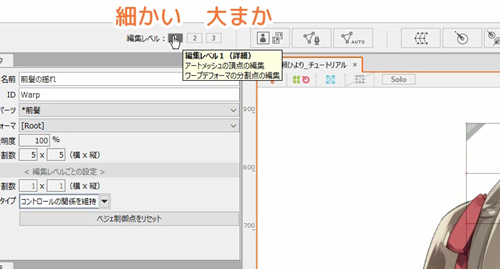
When deforming the warp deformer, pay attention to the “Level edit” in the menu.
Level edit 3 is suitable for rough movement and 1 for detailed movement.
Once you get used to it, you can work more efficiently using the Level edit, but until you get used to it, we recommend that you normally use Level edit 2.
The swing motion can be easily added by simply moving the bottom of the deformer.
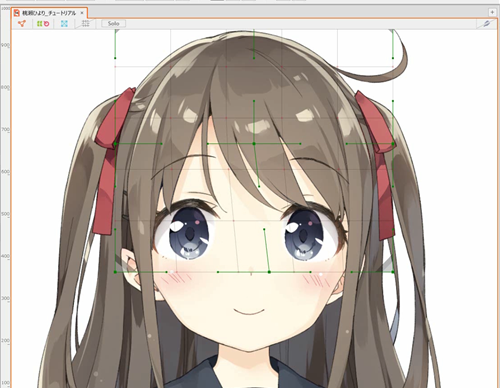
This completes the swing of the bangs.
Create deformers and add movement to the sides and back of the hair as well.
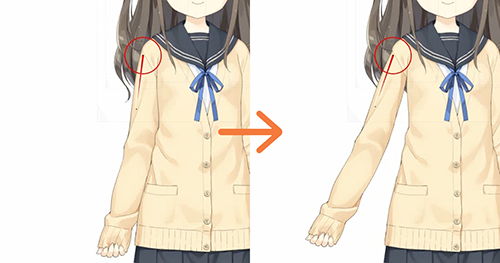
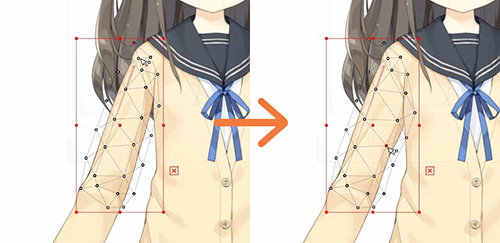
Create Arm Movements
As with the face, select the ArtMesh and then create a rotation deformer on the arms.
However, if this is left as is, the arm is down but the rotation deformer is pointing up, making it difficult to operate, so the default angle is set to match the arm.
The angle can be adjusted by turning the handle while pressing Ctrl.
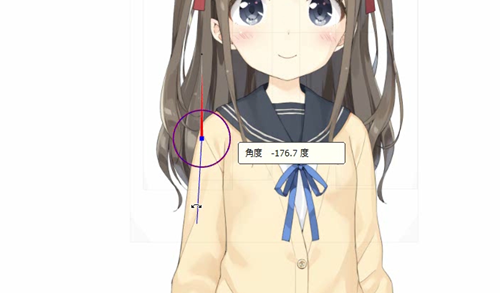
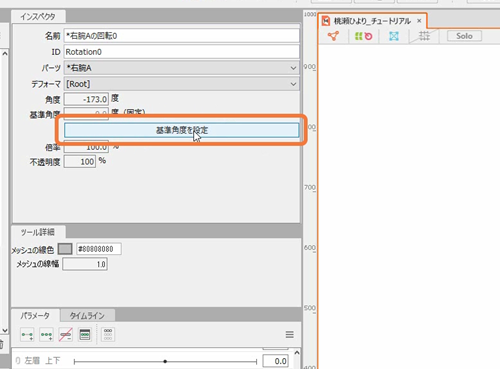
After adjusting the angle, click [Set Standard Angle] in the inspector to set the standard angle.
Setting a standard angle makes it easier to specify the angle numerically.
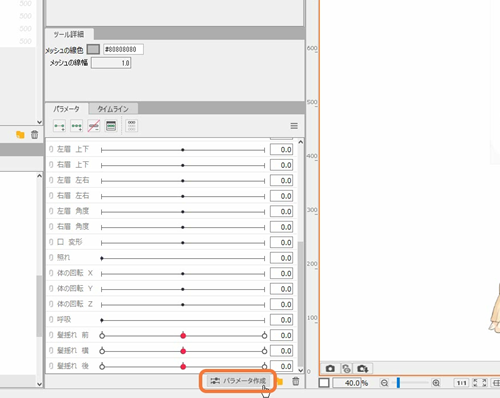
After adjusting the deformer, movement will be added. Before that, add a new parameter since arm movement is not included in the default parameters.
On the Parameter palette, use the [Create Parameter] function to add a new parameter.
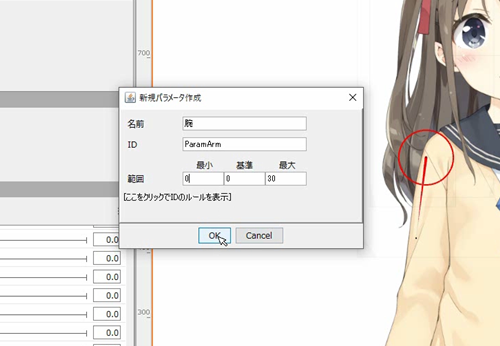
The name should be “Arm” and the ID “ParamArm.”
The range of the parameter is 0 to 30, since only an arm raising motion is added here.
If you want to add a downward movement as well, set the Minimum [-30], Standard [0], and Maximum [30].
Insert two parameters into the rotation deformer to make the arm go up when it reaches 30.
The arm looked thin when raised, so this time a parameter was added to the ArtMesh to adjust the thickness.
Let’s add movements for the left arm in the same way.
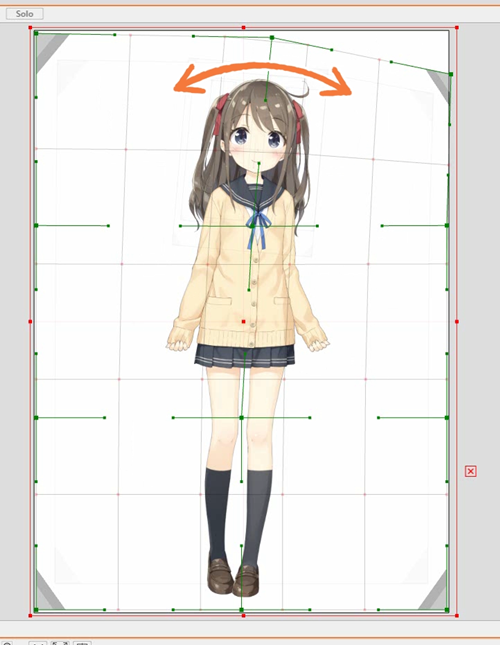
Create Body Tilt and Vertical Movements
Tilting and up-and-down movements of the body are made by placing the entire body in a warp deformer.
The procedure so far has been to select all ArtMeshes and create a deformer, but since the head, hair, etc. are already in deformers, it is not possible to set and create a deformer as the parent for the entire body.
For this reason, in this case, first create an empty deformer and then insert objects.
Two deformers are also required, one for tilt and one for up/down.
If you want to create two deformers in succession, press [Sequential Creation] on the far left to continue creating deformers.

To put an object into a deformer, drag and drop it from the deformer palette.
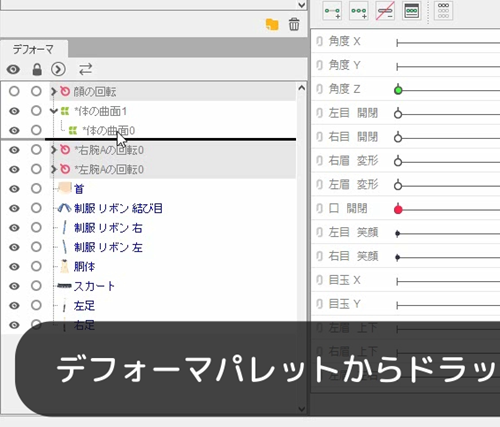
Alternatively, the object can be placed in a deformer by selecting the deformer from the Inspector with the object selected.
Now let’s add vertical movement to the smaller warp deformer and tilt movement to the larger one.
The ups and downs of the body are moved by the parameter [Body rotation Y]. Insert three points as you make a move up and a move down.
If the feet float, it will be difficult to attach motions, so deform the feet so that they do not leave the ground surface.

The tilt of the body is moved by the parameter [Body rotation Z].
The tilt of the body should be transformed into an arc, rather than translating sideways.
For male characters, it is better to make a movement to shift the body’s center of gravity.
This completes adding movement.
If you use deformers well, you will be able to create a variety of movements.
The basic method of adding movement is the same for all parts, so try moving the character around a lot while referring to sample models.
The movements we have learned so far are enough to move the characters, so try your hand at animation!
Previous section “3. Adding Facial Expressions” | Next section “5. Adding XY Facial Movement”