1. Illustration Processing
You can download the latest Cubism Editor here.

You will learn the first steps of processing an illustration when moving it in Live2D.
In this video, we are working with Photoshop.
The following drawing tools are recommended when creating PSDs.
- Photoshop (Adobe)
- CLIP STUDIO PAINT (Celsys)
The drawing data is imported into the Cubism Editor, but in rare cases, depending on the drawing tool you are using, please note that normal reading and writing may not be possible.
Basic Tutorial List
- Illustration Processing
- Preparing to Move the Illustration
- Adding facial expressions
- Adding body movement
- Adding XY Facial Movement
- Creating Animations
Tutorial Video
The import PSD created in the video can be downloaded here. Use the data as a reference.
Script for Photoshop => Download here
The completed sample model of “Hiyori Momose” appearing in the video => Click here to download
Note: Some browsers may not allow you to download the file even if you click the link.
In that case, please right-click and save the link.
Video Review
Processing an illustration is the first step in moving an illustration in Live2D.
The processing of your illustrations will make or break your model, so learn all about it here!
Illustration Processing
The illustration moved by Live2D looks like a single illustration when it is still, but in reality it is divided into parts such as hair, eyebrows, eyelashes, and ears.
By separating the parts, the character can be made to move, for example, to shake its hair or blink.
It is possible to move an illustration in Live2D without separating the parts, but if you want to move the character in an attractive way, you need to separate the minimum number of necessary parts.
First, prepare materials for processing illustrations.
Please prepare the illustration you want to process, or download the data used in the video from here.
Note: Please be sure to read the Free Material License Agreement before downloading the data used in the video.
Note: Some browsers may not allow you to download the file even if you click the link.
In that case, please right-click and save the link.
The illustrations are roughly divided into three categories: hair, face, and body, but from there they are further subdivided.
Separate the Hair into Parts
The hair will be divided into three sections: bangs, sides, and back.
If the hair is split to the left or right, such as sideburns or pigtails, use separate layers for each side.
Also, if you have a cowlick or other hair that you want to move, separate it into separate layers to make it easier to move it around.
When dividing, do not forget to add the parts that were hidden in the source image.
If there are no additions, the part will appear disconnected when it moves, as shown in the following image.
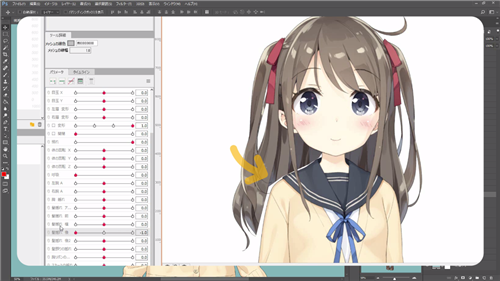
It is possible to adjust the illustration after it has been modeled, so you can watch it in motion.
If you have trouble making multiple adjustments to an illustration, it is recommended that you make larger additions to the drawing from the beginning.
Separate the Face into Parts
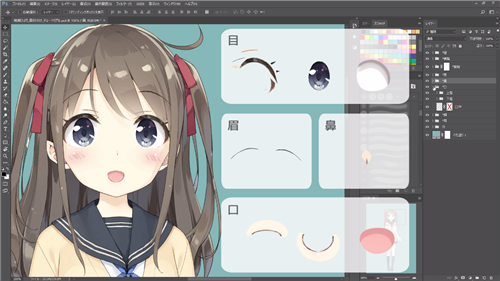
The face will be divided into eyes, nose, eyebrows, mouth, contours, and ears.
Eyes
Separate the eyelashes, eyeballs, and whites of the eyes.
Lashes are easier to transform if they are separated from the bouncing part at the corner of the eye.
The white eyes can be used as clipping material. Don’t forget to add the white eyes because the part hidden by the eyeballs is visible when the eyeballs are moved.
Eyebrows and nose
Since it is not a component that can be significantly deformed, it does not matter as long as it is separated on its own.
Mouth
Separate the lips at the top and bottom.
Also, separate the inside part of the mouth, as the inside part of the mouth should not be visible when closed.
When dividing the inside part of the mouth, make the drawing one size larger than the source image.
However, since the mouth protrudes from the line as it is, a skin-colored area should be added to the lips.
Tips
It is possible to create a mouth using the mouth as clipping material as well as eyes, but with the following disadvantages.
- Clipping masks are used extensively, resulting in a burden when installing the masks
- Mouth parts may protrude beyond concealment in line drawings of the mouth
- The greater the deformation of the mouth, the more work-hours required for its production and adjustment
(In the image below, the mouth is subtly protruding from the line drawing.)
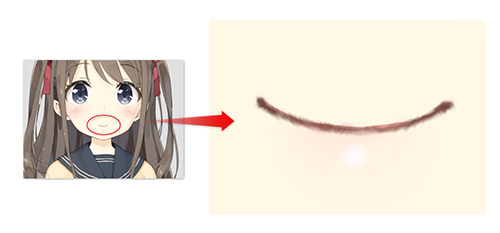
Rather than using clipping on the mouth, we recommend using skin-colored fill to conceal the mouth.
However, clipping can be used effectively in the following situations.
Use different types depending on the source image and the application.
• For applications in which the capacity of the model is not important, such as videos, etc.
• If thickly painted or unevenly painted around the lips, depending on the painting style
• Simple image with little deformation of the mouth
Outline and ear
The outline should be painted so that the area hidden by the hair is also painted and only the skin color is used.
A round head makes it easier to get a sense of the three-dimensionality of the model, and it also makes it easier to add movement when modeling.
Although it is acceptable to treat the ears as the same parts as the contours, we will separate them this time because it is possible to control their movements more precisely and the quality of the model will be higher if they are separated.

Separate the Body into Parts
It is sufficient if the body is divided into neck, torso, arms, and legs.
The neck should be drawn larger so that it is not visibly cut off when the face is moved.
It is sufficient if the neck size is up to the mouth area.
Neck
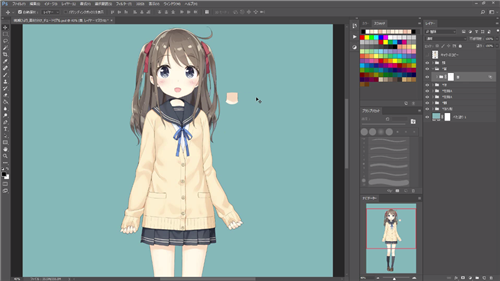
Torso
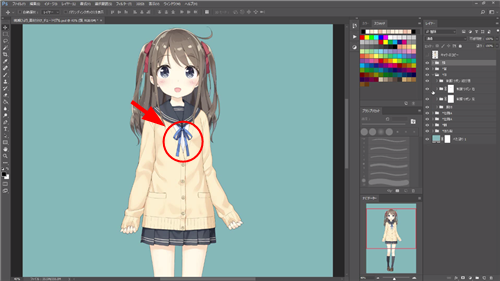
Keep the body separate if there are ribbons that you want to shake.
Separating each collar and cardigan makes it easier to add movement and improves quality, but there is no problem if they are grouped together.
Arms
The arms should be separated by the upper arm, forearm, and hand.
Legs
Legs are divided by skirt, left leg, and right leg.
This concludes the processing of the illustration.
This is enough separation to move the character at a sufficient level.
About Editor Import
Finally, prepare to load the file into the Editor.
When importing PSDs into the Editor, line art and fill must be combined into a single layer, not separate.
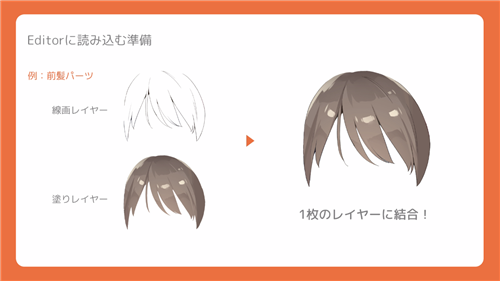
It is also easier to manage the parts in the Editor if they are roughly divided into groups.
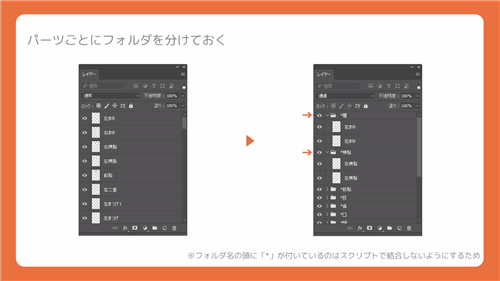
If you are using Photoshop, we recommend that you use the merging scripts that are available.
When saving data, please save it in PSD format.
This concludes the tutorial on illustration processing.
The video includes audio for a more complete understanding, so please listen to it along with reading the text!
■ Please refer to the following pages for more information on illustration processing. Detailed instructions are also provided.
Cubism Editor Manual: About Material Separation
Cubism Editor Manual: Notes on PSD Creation
■ In addition to the method of dividing and processing from a single illustration, there is another method of dividing the parts layer while keeping in mind that the illustration will be moved in Live2D at the stage of drawing.
The next step is to prepare to move the illustration.
Next section “2. Preparing to Move the Illustration”