Parameter controller utilization techniques
Updated: 02/04/2025
This page summarizes techniques for effectively using parameter controllers.
A wide range of explanations will be provided, including common mistakes and problems, and applied techniques for advanced users.
Learn practical points to optimize and efficiently control performance.
See below for basic usage of parameter controllers.
“Basic operation of parameter controllers” (Tutorial video)
“About the parameter controller”
“Controller target settings”
About model structures that are easy to control with a controller
Match the amount of change in parameters with the amount of change in movement
The parameter controller looks for the best parameter values when controlling parameters collectively.
Matching the ratio of the parameter to the amount of change in movement makes it easier to find the optimal parameter values.
When creating large rotational movements for parts such as arms and legs, it is recommended to set the key value according to the angle.
This reduces the number of calculations during control and makes it easier to create smooth movements.
First, set the standard angle to the default position.
Click the [Set Standard Angle] button at the bottom in the red frame, and the angles of the setting items will be reset to 0 degrees.
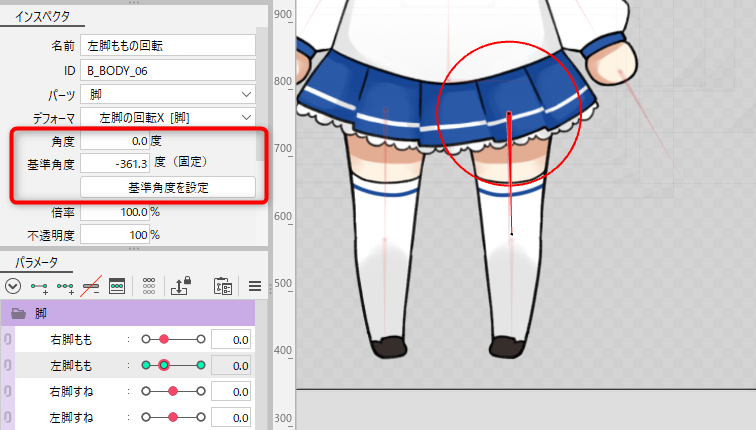
In this model, the movement is set to rotate the left leg 30 degrees inward and 60 degrees outward.
Adjust the movement by entering the actual values so that the left key is 30 degrees and the right key is -60 degrees.
TIPS
Since it is important to match the amount of change in parameters with the amount of change in motion, angular values can be on a 1/10 scale.
Example: -30 , 0 , 60 -> -3 , 0 , 6
Match key values of related parameters
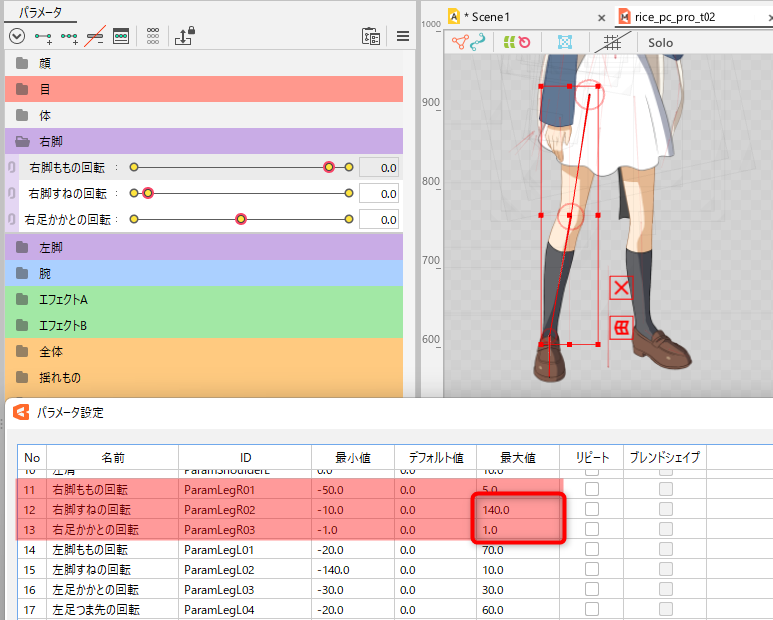
Key value may exceed 100 when setting angles for leg rotation, etc.
In the model below, “heel rotation” has extremely small values ranging from -1.0 to 1.0, and there are large differences between the maximum and minimum values for “shin rotation,” so the optimal parameter may not be easily identified.
“Heel rotation” can also be adjusted to the actual angle values to reduce the calculation load and create a smooth movement.
If you experience extremely slow movement while operating a controller, check the key values of the relevant parameters.
Tips for operating the controller
How to select and edit overlapping controllers
Setting targets may cause controllers to overlap.
Overlapping controllers can be selected alternately by clicking on them.
In addition, you can use the [Change] button in the inspector palette to change the ties of the overlapping ArtMesh to the controller.
How to check calculation units
Depending on the order in which the controllers are calculated, the final appearance may change.
The following state shows blue following a red target and yellow following a green target.
However, when yellow follows green, it moves slightly out of position.
The reason it does not follow the intended position is the order in which the controllers are calculated.
After the calculation that makes yellow follow the green target in “order 2,” the calculation that makes blue follow the red target is performed in “order 4.”
This causes yellow to refer to green’s past position because green is moved by blue, which is calculated later.
When the controller is moved even slightly, the calculations are performed in the order set, so the calculation order must be changed to make yellow follow green.
In this case, the blue arm1 is shown with a green background in [Hint].
The green background indicates that this problem can be solved by changing the order, allowing the controller to follow the position as calculated, as shown in the figure below.
In addition, by pressing the [Automatic] button in the calculation unit settings dialog box, you can automatically rearrange the controllers according to the hints on the green background to produce the result as calculated.
TIPS
A hint (green) or hint (red) condition only indicates that the recommended calculation result has not been reached.
If the motion is played back and the intended movement is achieved, it does not matter if a hint is indicated.
Advantages of Target Tracking
By following the controller, a parent-child structure can be created for the animation.
The following model has target settings to adsorb the arrow to the bow and the bow to the left hand.
Each part only performs simple rotational and translational movements, and complex movements are controlled by target tracking.
Targets can also be easily replaced, which has the advantage of facilitating trial-and-error in animation.
Thus, target tracking allows for flexible motion creation and reduced rework in modeling.
Make the motion of walking
To have the legs placed on the ground, a target ArtMesh must be prepared.
In some cases, such as 2D characters, a single target may be used, but quality can be improved by preparing separate target models for the “toe” and “heel.”
The following target models are structured to be easy to move with a controller by creating parameters for overall movement, rotation, width adjustment, etc.
The target model can be a simple structure such as a circle, but it should be in a shape that makes it easy to place the controller in the center.
First, load the target models into the animation and align them with the toe and heel.
Make the leg follow the target, and associate the parameters to each controller.
See “Controller target settings” of the parameter controller for information on how to track.
This way, the whole leg can be moved as the target model track is manipulated.
This also facilitates movements such as lowering the hip position with the foot fixed.
TIPS
Legs are sometimes not calculated properly and knees do not bend when standing upright.
If this happens, turn target tracking off, bend the knee, and then turn tracking back on.
Let’s set targets for the left leg in the same way and create a walking animation.
What to do when a positional relationship with a target is lost
After an operation such as [Undo], the positional relationship with the target may be significantly disrupted.
In such cases, moving keyframes in the timeline will update the movement and return it to the normal state.