Workspace
Updated: 04/25/2026
The Workspace is the main area where you perform your basic tasks tasks such as video editing and animation creation.
This page explains the basic functions, buttons, and interface elements of the Workspace.
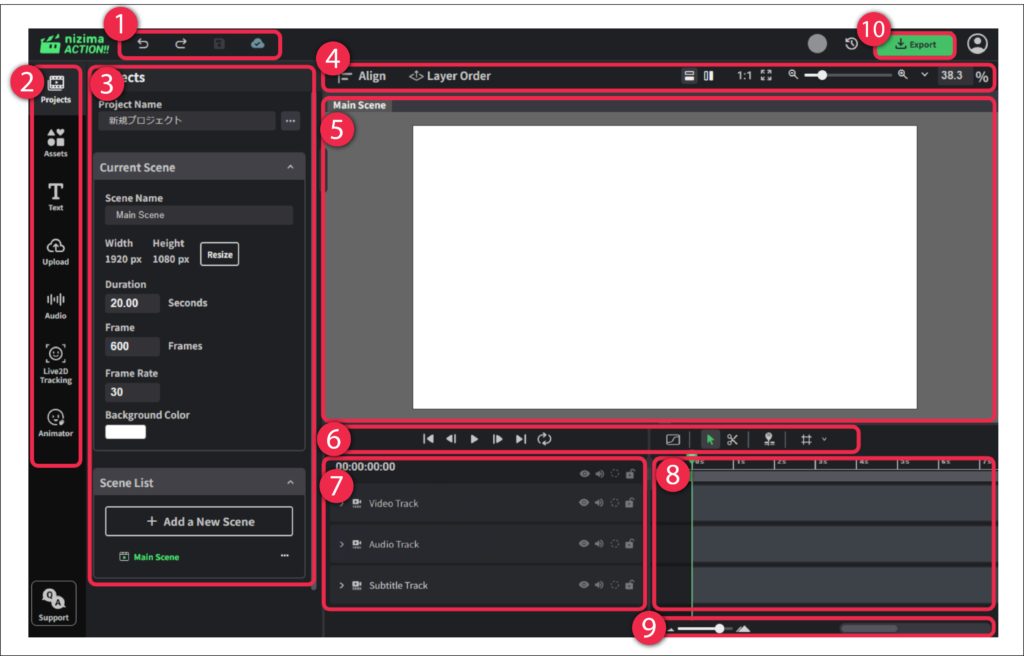
(1) Undo / Redo / Save
Allows you to undo or redo actions and save your work during editing.
(2) Sidebar
Selecting an item in the Sidebar displays its editing options in the Palette.
(3) Palette
Allows you to configure detailed settings and perform edits for the item selected in the Sidebar.
Settings and editing options for a layer selected on the Timeline are also displayed in the Palette.
(4) Option Bar
Allows you to align objects placed on the canvas, change their stacking order, scale objects and zoom in or out.
(5) Canvas
Displays videos, images, audio, Live2D models, and other elements within the scene timeline.
You can add layers by dragging and dropping prepared images, videos, audio files, and Live2D models onto the canvas.
If multiple scenes are created, you can switch between them using tabs.
(6) Timeline Toolbar
Allows you to play scenes, enable loop playback, and cut or trim layer contents.
(7) Track / Layer List
Displays a list of layers and tracks added to the current scene.
(8) Timeline
Allows you to adjust layer timing and duration, cut layer contents, and edit animation settings.
Transitions can also be set on the Timeline.
You can switch between two editing modes: Dope Sheet and Curve Editor.
(9) Timeline Zoom
Allows you to zoom in or out on the timeline.
(10) Export
Allows you to export the created video.
You can choose from the following export formats: MP4, WebM, WebP, GIF, PNG (image sequence), and PNG (current frame).
Sidebar Description
[Project]
Click to open the Project Palette.
You can configure the screen size and video length.
[Assets]
Click to open the Assets Palette.
You can browse and manage assets available for use in the project.
[Text]
Click to open the Text Palette.
Click the Add Text button to add a text layer to the canvas.
You can also create a text layer by right-clicking on the canvas or in the Layer List and selecting New Layer > Text.
[Upload]
Click to open the Upload Palette.
You can upload files via drag and drop or by clicking Select File.
[Audio]
Click to open the Layer Volume Palette.
Displays the master volume and the volume of layers that contain audio.
[Live2D Tracking]
Click to open the Live2D Tracking palette.
You can link with nizima LIVE and VTube Studio.
[Animator]
Click to open the Animator Palette.
Automatically generates Live2D animations.
Palette Description
[Project]
Project Name
Allows you to set the name of the current project.
Current Scene
| Scene Name | Allows you to name the currently displayed scene. |
| Width | Sets the horizontal size of the scene. |
| Height | Sets the vertical size of the scene. |
| Duration | Sets the playback time of the scene. |
| Frame | Sets the number of frames. |
| Frame Rate | Sets the frame rate. |
| Background Color | Sets the background color of the scene. |
Scene List
Allows you to add new scenes and manage scenes within the project.
[Assets]
| History | Displays assets that have been used so far. |
| Video | Displays video files available for use in the project. |
| Photo | Displays still images available for use in the project. |
| Illustrations, Animations, etc. | Displays illustration and animation assets available for use. |
| Live2D | Displays Live2D models available for use in the project. |
| Live2D Action Frame | Displays assets created with Live2D. |
| Audio | Displays music and audio assets available for use. |
| nizima | Displays Live2D works sold on “nizima.” Clicking a thumbnail opens the nizima website. *Available only in Japanese |
| Shape | Displays shape assets available for use in the project. |
[Text]
Add text
Adds a text layer to the currently edited scene.
[Upload]
- Upload files via drag and drop or by clicking Select File.
- Allows you to check available storage capacity.
[Audio]
Displays the master volume and the volume of layers that contain audio.
[Live2D Tracking]
You can track the motion of a Live2D model by linking with nizima LIVE or VTube Studio.
Plugin Registration (nizima LIVE / VTube Studio)
Click the plugin toggle displayed in the selected application to enable it.
When the toggle turns green, the plugin registration is complete.
For details on how to link with the plugin, see How to Use Live2D Tracking.
Connect (nizima LIVE / VTube Studio)
After registering the plugin, click the Connect button to link with the application.
Play During Recording
When enabled, the video will play while recording the motion.
Record Audio During Recording
When enabled, audio will be recorded during recording.
Target Live2D Layer
Select the Live2D model you want to track.
[Animator]
Automatically generates motion for a Live2D model based on the uploaded audio layer.
Layers
- Audio Layer Select the audio layer to be used for automatic generation.
- Live2D Layer Select the Live2D model to apply motion to.
Settings
| Audio Offset Frame | Specifies the offset (in frames) to delay or advance the timing between the audio and the Live2D character’s lip-sync motion. The default value is 4 frames. Adjust this value if the lip-sync timing does not match the audio. A positive value causes the mouth motion to start before the audio. A negative value causes the audio to start before the mouth motion. |
| Lip-sync Interval Frame | Specifies the interval (in frames) at which lip-sync keys are generated. Smaller values result in more detailed mouth movement. |
Adjustment Parameters
| Volume application rate | Higher values result in larger mouth movements in response to volume. |
| Default Mouth Form | The reference mouth shape used for lip-sync. |
| Motion Intensity | Higher values result in larger overall motion. |
Automatic Motion
Random motion can be automatically generated for the Live2D model set in the Live2D layer based on the audio layer.