Cubism DIY Viewer 만들기
업데이트: 2017/08/09
by Traitam
Live2D의 GitHub에는 직접 커스터마이징할 수 있는 Cubism DIY Viewer가 있습니다.
여기에서는 Cubism DIY Viewer를 만드는 방법에 대해 설명합니다.
흐름으로는 Unity에서 프로젝트를 만들고 빌드, 커스터마이징해 최종적으로 애플리케이션으로서 출력합니다.
Cubism DIY Viewer용 Unity 프로젝트 생성
먼저 Unity의 새 프로젝트를 만들고 unitypackage화된 SDK를 프로젝트에 추가합니다.
SDK 가져오기에 대해서는 「SDK 가져오기」의 「SDK를 프로젝트로 가져오기」를 참조하십시오.
또 이 Cubism DIY Viewer를 취급하는 경우에는 최신 버전의 SDK 컴포넌트가 필요합니다.
아래 링크에서 최신 SDK 컴포넌트를 다운로드합니다.
https://github.com/Live2D/CubismUnityComponents/tree/develop
위의 페이지에서 빨간색 테두리 내의 “Clone or download”를 누른 다음 “Download ZIP”을 눌러 ZIP 데이터를 다운로드합니다.
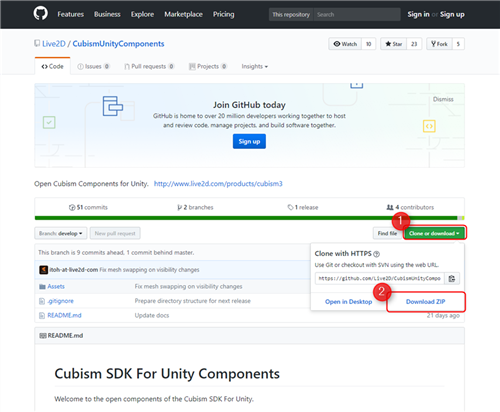
최신 버전의 CubismUnityComponents를 다운로드하고 압축을 풉니다.
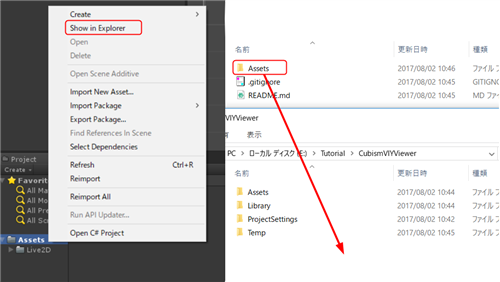
압축을 푼 폴더에 포함된 Assets 폴더를 탐색기에서, 위에서 만든 Unity 프로젝트의 Assets 폴더가 있는 위치에 덮어씁니다.
Unity에서 덮어쓰면 폴더 이름이 이름이 바뀌므로 덮어쓰기는 탐색기에서 수행하십시오.
덮어쓰기가 끝나면 아래 링크에서 DIY Viewer를 다운로드합니다.
https://github.com/Live2D/CubismViewer
최신판 SDK 다운로드와 마찬가지로 녹색 버튼의 “Clone or download”를 클릭하고 “Download ZIP”을 클릭하면 다운로드가 시작됩니다.
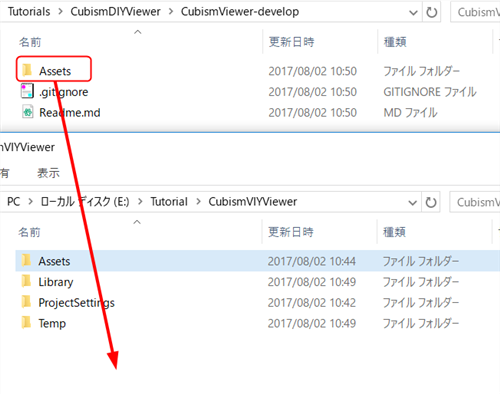
다운로드 후 압축을 풀고 Unity 내에 추가합니다.
압축을 푼 폴더의 Assets 폴더를 Unity 내의 Assets 폴더와 같은 위치에 추가합니다.
방금 전의 최신판 SDK의 덮어쓰기와 마찬가지로 탐색기상에서 실시합니다.
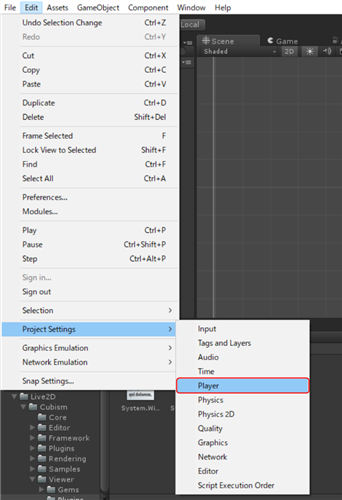
다음은 Unity 에디터 설정입니다. Unity 에디터의 설정은 1개뿐입니다.
Unity의 “Edit”→“Project Settings”→“Player”를 눌러 Player Settings을 엽니다.
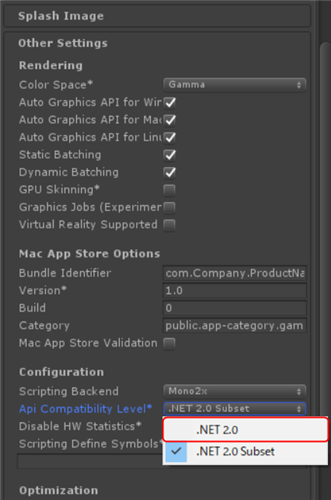
그런 다음 “Other Settings”을 열고 Configuration의 Api Compatibility Level의 “.NET 2.0 Subset”을 “.NET 2.0″으로 변경합니다.
이것으로 Unity 에디터 설정이 완료됩니다.
필요한 Dll 추가
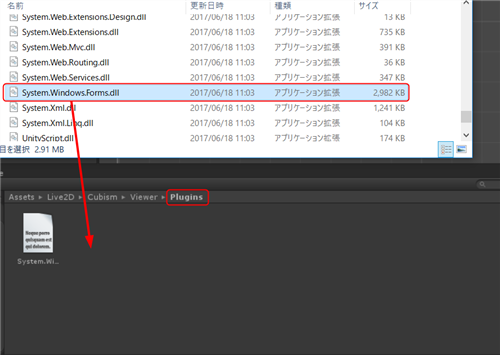
Viewer를 추가하면 Unity에서 오류가 발생합니다. 이 오류를 해결하기 위해 System.Windows.Forms.dll이라는 파일을 복사하여 추가합니다.
Unity 설치 위치가 표준인 경우
“C:¥ProgramFiles¥Unity¥Editor¥Data¥Mono¥lib¥mono¥2.0¥System.Windows.Forms.dll”에 있습니다.
Unity로 붙여넣을 곳은 “Assets/Live2D/Cubism/Viewer/Plugins/”입니다.
뷰어의 장면 생성
현재 프로젝트에 Viewer용 장면을 만듭니다.
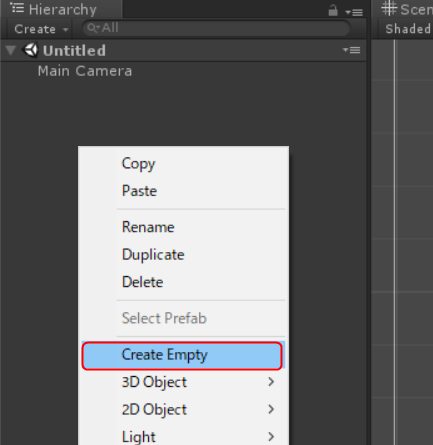
Hierarchy 창을 오른쪽 클릭하여 컨텍스트 메뉴를 엽니다.
메뉴에서 “Create Empty”를 클릭하여 빈 GameObject를 작성합니다.
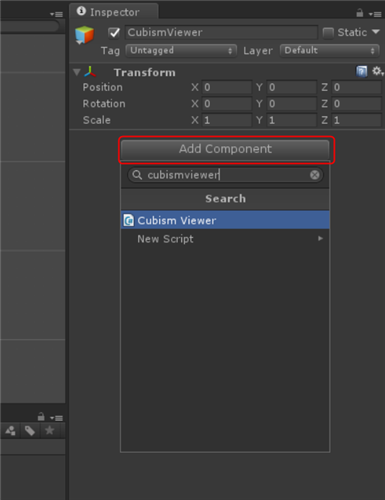
생성된 빈 GameObject의 이름을 “CubismViewer”로 변경합니다.
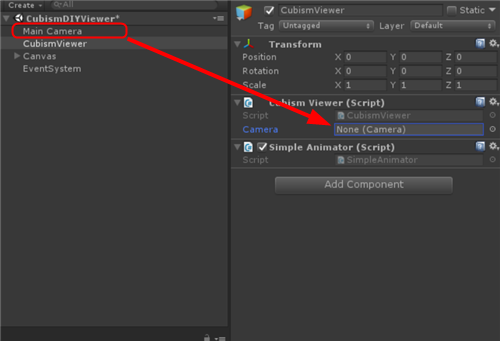
“CubismViewer”를 선택하고 “Inspector”>”Add Component”>”Cubism Viewer.cs“를 클릭합니다. 그런 다음 추가한 Cubism Viewer 구성 요소의 Camera에 기본으로 사용하는 Camera의 오브젝트를 설정합니다.
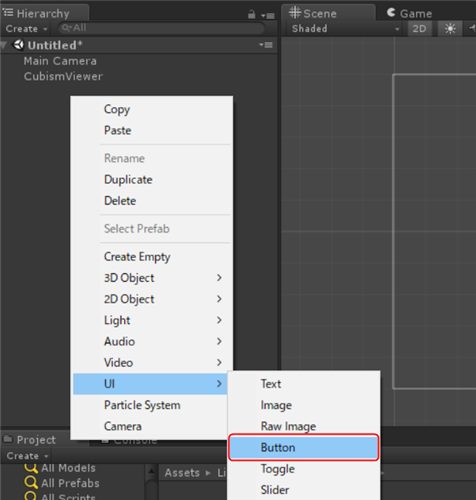
GameObject 설정이 끝나면 다음으로 장면에서 처리를 호출하기 위해 버튼을 만들고 설정합니다.
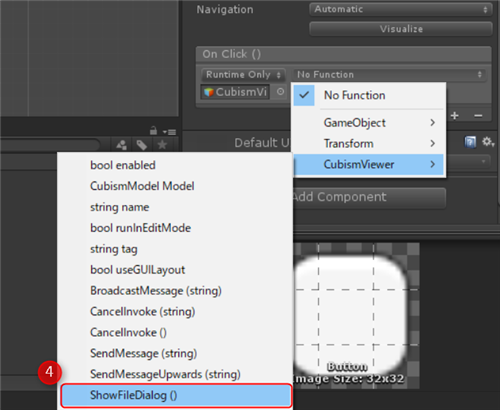
Hierarchy 창을 오른쪽 클릭하고 “UI”→”Button”을 눌러 버튼을 작성합니다.
만든 버튼을 선택하고 “OnClick()”을 설정합니다.
OnClick()의 “+”를 누른 후 CubismViewer 오브젝트를 추가합니다.
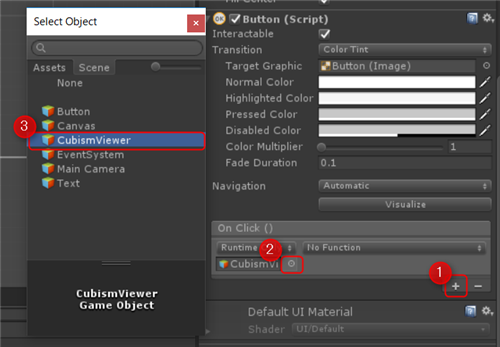
CubismViewer.ShowFileDialog를 선택합니다.
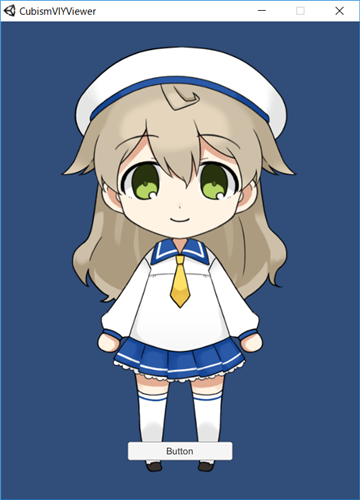
이것으로 Cubism DIY Viewer 프로젝트 생성이 완료됩니다.
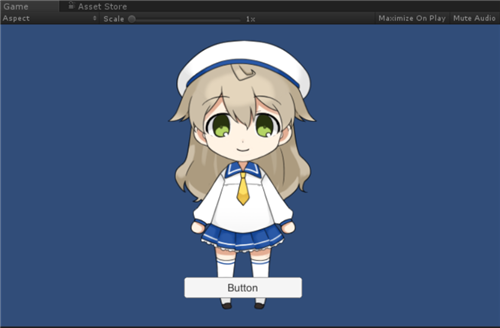
모델을 표시하려면 다음 절차를 실시하십시오.
장면을 실행하고 버튼을 눌러 파일 참조 창을 표시합니다.
그런 다음 .model3.json을 지정합니다.
Gems로 커스터마이징
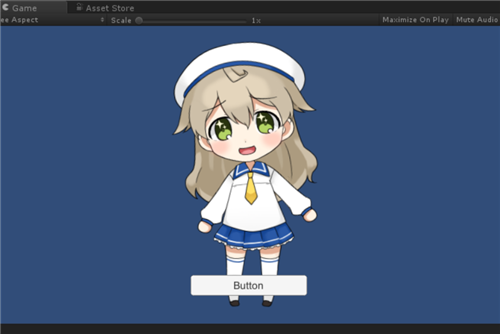
model3.json 모션을 처리하는 경우 Gems/Animation/SimpleAnimator.cs를 CubismViewer 오브젝트에 추가합니다.
.model3.json을 로드한 후 같은 방법으로 .motion3.json을 로드하면 표시 중인 모델에 모션이 적용됩니다.
이 외에도 Gems에는 Cubism DIY Viewer를 커스터마이징할 수 있는 옵션 기능이 포함되어 있습니다.
다른 사용자가 만든 Gems도 있습니다.
GitHub의 Built-in Gems, User Gems 링크를 참조하십시오.
https://github.com/Live2D/CubismViewer#built-in-gems
exe 파일로 내보내기
마지막으로 이 프로젝트를 standalone 애플리케이션으로서 내보냅니다.
내보내기 전에 미리 위에서 만든 장면을 저장하십시오.
“File”→“Build Settings”을 눌러 빌드 설정을 합니다.
“Add Open Scenes”을 눌러 방금 저장한 장면을 Scenes In Build에 추가합니다.
마지막으로 “Build”또는 “Build And Run”을 누르고 임의의 exe명을 기입해 빌드합니다.
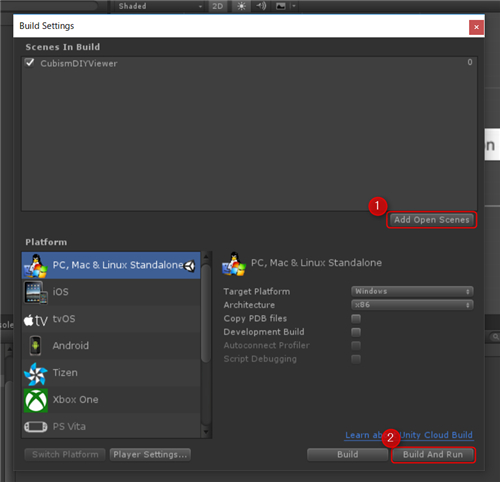
“Build And Run”을 클릭하면 빌드가 완료된 후 자동으로 exe가 시작됩니다.
설정에 결함이 없으면 Unity에서와 마찬가지로 모델을 로드하고 표시할 수 있습니다.