Mask Preprocessing Method (Java)
Updated: 12/08/2022
In order to maintain drawing speed on smartphones and other devices,
the Live2D Cubism SDK for Java uses the “preprocessing method” in which all mask shapes are drawn in a single mask buffer at the beginning of the model drawing process.
In the general drawing method, the mask shape is drawn each time a Drawable that requires a mask is drawn (see figure).
This method would result in a relatively expensive process of switching render targets, clearing buffers, etc. each time the Drawable needs a mask.
This may cause slow rendering speeds on smartphones and other devices.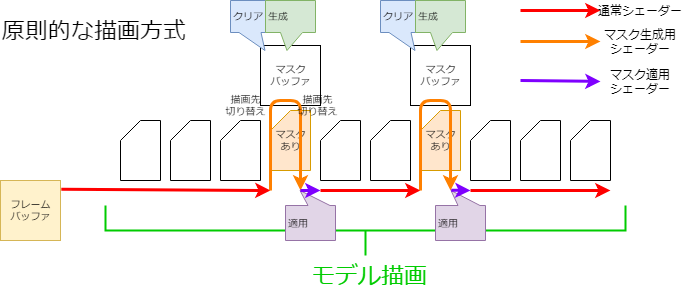
However, simply preparing masks in advance requires multiple mask buffers, which can overwhelm memory.
To solve this problem, the following processing can be performed on a single mask buffer to minimize memory usage while treating it as if multiple mask buffers were used.
Mask Integration
Since all masks are generated in advance, Drawables with the same mask specification can use the same mask image to reduce the number of masks to be generated.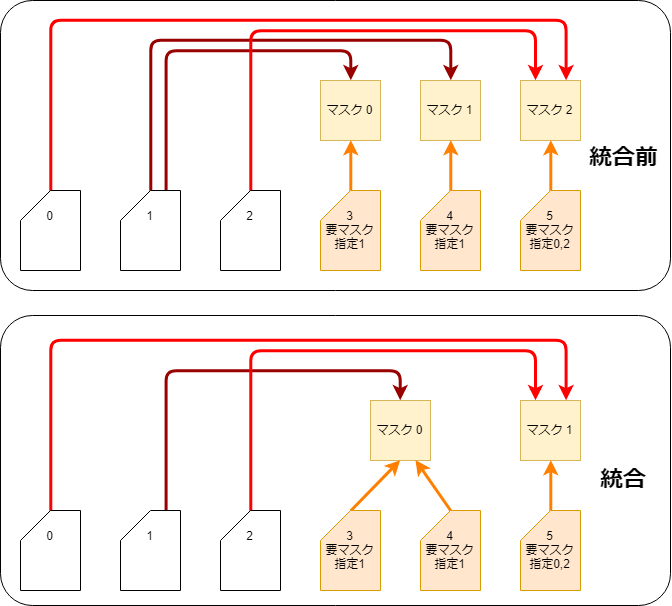
This is done, in the CubismRendererAndroid.initialize function call, by the CubismClippingManagerAndroid.initialize function.
void initialize(
    int drawableCount,
    final int[][] drawableMasks,
    final int[] drawableMaskCounts
) {
    // Register all drawable objects that use clipping masks.
    // Clipping masks should normally be used only for a few pieces
    for (int i = 0; i < drawableCount; i++) {
    if (drawableMaskCounts[i] <= 0) {
        // ArtMeshes without clipping masks (often not used).
        _clippingContextListForDraw.add(null);
        continue;
    }

    // Check if it is the same as an already existing ClipContext
    CubismClippingContext cc = findSameClip(drawableMasks[i], drawableMaskCounts[i]);
    if (cc == null) {
    // Generate if the same mask does not exist.
    cc = new CubismClippingContext(this, drawableMasks[i], drawableMaskCounts[i]);
    _clippingContextListForMask.add(cc);
    }

    cc.addClippedDrawable(i);

    _clippingContextListForDraw.add(cc);
    }
}
Use of Multiple Mask Textures
In Cubism SDK for Java R1 beta1 or later, you can optionally use multiple textures for masks.
Therefore, even if a model is set with more masks than the maximum number of masks (36) that existed up to alpha1, the model will be displayed correctly in the SDK.
However, if two or more mask textures are used, the maximum number of masks generated for each mask texture is 32.
(The maximum number of masks is 36 when only one mask is used. Details are described below.)
If two mask textures are used, the maximum number of masks that can be used is 32 × 2, or 64.
The settings for using multiple textures for masks are as follows.
| 1234 | int maskBufferCount = 2;CubismRenderer renderer = CubismRendererAndroid.create();renderer.initialize(cubismModel, maskBufferCount); |
If nothing is passed to the second argument of CubismRendererAndroid.initialize(), only one texture for the mask will be generated and used.
| 1 | renderer.initialize(cubismModel); |
Separation by Color Information
The mask buffer is an RGBA video array, just like a normal texture buffer, etc.
The normal mask process uses only this A channel to apply the mask, but not the RGB channels.
Therefore, by having separate mask data for R, G, B, and A, one mask buffer can be treated as four mask buffers.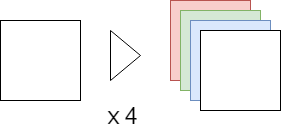
Separation by Dividing
When 4 mask images are not enough, the number of masks can be increased by handling the mask buffer in 2, 4, or 9 divisions.
Combined with the separation by color information, up to 36 (4 x 9) different masks can be held.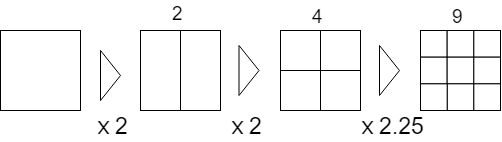
Also, to prevent the mask image from being crushed, the mask is drawn on all Drawable rectangles to which the mask is applied.
This requires range generation as well as matrix generation for the mask generation and the use of masks.
When multiple mask textures are used, the division method is the same as when only one mask texture is used.
However, if multiple mask textures are used, the quality of the drawing of the same model will be improved because the allocation of masks to each mask texture will be equally divided as much as possible. (More textures for masks will cost more.)
For example, if a model has 32 masks, normally one mask texture is used to try to draw 32 masks, but if two mask textures are used, the mask allocation is “16 masks per texture.”
Checking rectangles
In the first step of mask generation, for each mask, check the rectangle that fits all the mask application destinations.
private void calcClippedDrawTotalBounds(CubismModel model, CubismClippingContext clippingContext) {
    // The entire rectangle of the clipped mask (drawable object to be masked).
    float clippedDrawTotalMinX = Float.MAX_VALUE;
    float clippedDrawTotalMinY = Float.MAX_VALUE;
    float clippedDrawTotalMaxX = -Float.MAX_VALUE;
    float clippedDrawTotalMaxY = -Float.MAX_VALUE;

    // Determine if this mask is actually needed
    // If even one “Drawable Object” that uses this clipping is available, a mask must be generated
    final int clippedDrawCount = clippingContext.getClippedDrawableIndexList().size();

    for (int clippedDrawableIndex = 0; clippedDrawableIndex < clippedDrawCount; clippedDrawableIndex++) {
        // Find the rectangle to be drawn for the drawable object that uses the mask
        final int drawableIndex = clippingContext.getClippedDrawableIndexList().get(clippedDrawableIndex);

        final int drawableVertexCount = model.getDrawableVertexCount(drawableIndex);
        float[] drawableVertices = model.getDrawableVertices(drawableIndex);

        float minX = Float.MAX_VALUE;
        float minY = Float.MAX_VALUE;
        float maxX = -Float.MAX_VALUE;
        float maxY = -Float.MAX_VALUE;

        int loop = drawableVertexCount * VERTEX_STEP;
        for (int pi = VERTEX_OFFSET; pi < loop; pi += VERTEX_STEP) {
            float x = drawableVertices[pi];
            float y = drawableVertices[pi + 1];
            if (x < minX) minX = x;
            if (x > maxX) maxX = x;
            if (y < minY) minY = y;
            if (y > maxY) maxY = y;
        }

        // If a single valid point was not obtained, skip it.
        if (minX == Float.MAX_VALUE) {
            continue;
        }

        // Reflected in the entire rectangle
        if (minX < clippedDrawTotalMinX) clippedDrawTotalMinX = minX;
        if (maxX > clippedDrawTotalMaxX) clippedDrawTotalMaxX = maxX;
        if (minY < clippedDrawTotalMinY) clippedDrawTotalMinY = minY;
        if (maxY > clippedDrawTotalMaxY) clippedDrawTotalMaxY = maxY;
    }

    if (clippedDrawTotalMinX == Float.MAX_VALUE) {
        clippingContext.setUsing(false);
        CubismRectangle clippedDrawRect = clippingContext.getAllClippedDrawRect();
        clippedDrawRect.setX(0.0f);
        clippedDrawRect.setY(0.0f);
        clippedDrawRect.setWidth(0.0f);
        clippedDrawRect.setHeight(0.0f);
    } else {
        clippingContext.setUsing(true);
        float w = clippedDrawTotalMaxX - clippedDrawTotalMinX;
        float h = clippedDrawTotalMaxY - clippedDrawTotalMinY;
        CubismRectangle clippedDrawRect = clippingContext.getAllClippedDrawRect();
        clippedDrawRect.setX(clippedDrawTotalMinX);
        clippedDrawRect.setY(clippedDrawTotalMinY);
        clippedDrawRect.setWidth(w);
        clippedDrawRect.setHeight(h);
    }
}
Layout settings with color separation and divisional separation
Defines the color channel and divisional position of the mask buffer that each mask belongs to.
private void setupLayoutBounds(int usingClipCount) {
    // Layout masks using a single RenderTexture that is as full as possible
    // If the number of mask groups is 4 or less, 1 mask is placed on each RGBA channel; if the number is between 5 and 6, 2 masks are in each RG channel and 1 mask is in each BA channel

    // Use RGBA in order
    final int div = usingClipCount / COLOR_CHANNEL_COUNT; // Basic number of masks to be placed on one channel.
    final int mod = usingClipCount % COLOR_CHANNEL_COUNT; // Allocate the remainder, one by one, to this numbered channel.

    // Provide a channel for each RGBA. (0:R, 1:G, 2:B, 3:A)
    int curClipIndex = 0; // Set in order.

    for (int channelNo = 0; channelNo < COLOR_CHANNEL_COUNT; channelNo++) {
        // Number of layouts for this channel
        final int layoutCount = div + (channelNo < mod ? 1 : 0);

        // Determine the separation method
        if (layoutCount == 0) {
            // Do nothing.
        } else if (layoutCount == 1) {
            // Use everything as is
            CubismClippingContext cc = _clippingContextListForMask.get(curClipIndex++);
            cc.setLayoutChannelNo(channelNo);
            CubismRectangle bounds = cc.getLayoutBounds();
            bounds.setX(0.0f);
            bounds.setY(0.0f);
            bounds.setWidth(1.0f);
            bounds.setHeight(1.0f);
        } else if (layoutCount == 2) {
            for (int i = 0; i < layoutCount; i++) {
                final int xpos = i % 2;
                CubismClippingContext cc = _clippingContextListForMask.get(curClipIndex++);
                cc.setLayoutChannelNo(channelNo);
                CubismRectangle bounds = cc.getLayoutBounds();
                bounds.setX(xpos * 0.5f);
                bounds.setY(0.0f);
                bounds.setWidth(0.5f);
                bounds.setHeight(1.0f);
                // Divide UV into 2 and use
            }
        } else if (layoutCount <= 4) {
            // Divide into 4 and use
            for (int i = 0; i < layoutCount; i++) {
                final int xpos = i % 2;
                final int ypos = i / 2;
                CubismClippingContext cc = _clippingContextListForMask.get(curClipIndex++);
                cc.setLayoutChannelNo(channelNo);
                CubismRectangle bounds = cc.getLayoutBounds();
                bounds.setX(xpos * 0.5f);
                bounds.setY(ypos * 0.5f);
                bounds.setWidth(0.5f);
                bounds.setHeight(0.5f);
            }
        } else if (layoutCount <= 9) {
            // Divide into 9 and use
            for (int i = 0; i < layoutCount; i++) {
                final int xpos = i % 3;
                final int ypos = i / 3;
                CubismClippingContext cc = _clippingContextListForMask.get(curClipIndex++);
                cc.setLayoutChannelNo(channelNo);
                CubismRectangle bounds = cc.getLayoutBounds();
                bounds.setX(xpos / 3.0f);
                bounds.setY(ypos / 3.0f);
                bounds.setWidth(1.0f / 3.0f);
                bounds.setHeight(1.0f / 3.0f);
            }
        } else {
            cubismLogError("not supported mask count : " + layoutCount);

            // Stop the program if it is in developer mode.
            assert false;

            // If you continue execution, the setupShaderProgram() method will cause excessive access. Therefore, there is no choice but to put it in the proper location.
            // As expected, the drawing results are not satisfactory.
            for (int i = 0; i < layoutCount; i++) {
                CubismClippingContext cc = _clippingContextListForMask.get(curClipIndex++);
                cc.setLayoutChannelNo(0);

                CubismRectangle bounds = cc.getLayoutBounds();
                bounds.setX(0.0f);
                bounds.setY(0.0f);
                bounds.setWidth(1.0f);
                bounds.setHeight(1.0f);
            }
        }
    }
}
Matrix generation for drawing and using masks
Prepare transformation matrices for mask generation and mask use based on the area and the location of the rectangle examined before drawing.
/* Omitted */
// --- Actually draw one mask ---
for (CubismClippingContext clipContext : _clippingContextListForMask) {
    CubismRectangle allClippedDrawRect = clipContext.getAllClippedDrawRect();
    CubismRectangle layoutBoundsOnTex01 = clipContext.getLayoutBounds();

    // Use a rectangle on the model coordinates with appropriate margins.
    CubismRectangle tmpBoundsOnModel = CubismRectangle.create(allClippedDrawRect);
    final float margin = 0.05f;
    tmpBoundsOnModel.expand(
        allClippedDrawRect.getWidth() * margin,
        allClippedDrawRect.getHeight() * margin
    );
    // ######## Essentially, do not use the entire allocated area, but keep the size to the minimum necessary.

    // Calculate the formula for shaders. The following is the case when rotation is not considered
    // movePeriod' = movePeriod * scaleX + offX [[movePeriod' = (movePeriod' - tmpBoundsOnModel.movePeriod) * scale + layoutBoundsOnT
    final float scaleX = layoutBoundsOnTex01.getWidth() / tmpBoundsOnModel.getWidth();
    final float scaleY = layoutBoundsOnTex01.getHeight() / tmpBoundsOnModel.getHeight();

    // Obtain the matrix to be used when generating the mask.
    CubismMatrix44 tmpMatrix = CubismMatrix44.create();

    // Obtain the matrix to be passed to the shader <<<<<<<<<< Optimization required (can be simplified by calculating in reverse order)
    // Translate Layout 0..1 to -1..1
    tmpMatrix.translateRelative(-1.0f, -1.0f);
    tmpMatrix.scaleRelative(2.0f, 2.0f);
  // view to Layout0..1
    tmpMatrix.translateRelative(
        layoutBoundsOnTex01.getX(),
        layoutBoundsOnTex01.getY()
    );
    tmpMatrix.scaleRelative(scaleX, scaleY);
    tmpMatrix.translateRelative(
        -tmpBoundsOnModel.getX(),
        -tmpBoundsOnModel.getY()
    );
    clipContext.getMatrixForDraw().setMatrix(tmpMatrix);

    /* Omitted */
}
Dynamic Resizing of Mask Buffers
The OpenGL ES 2.0 renderer provides an API to resize the mask buffer at runtime.
Currently, the mask buffer size is initially set to 256*256 (pixels), but if the mask generation area is to be cut into 9 pieces, the mask shape drawn in an 85*85 (pixels) rectangle area will be further enlarged and used as the clipping area.
As a result, the edges of the clipping result are blurred or blotchy.
As a solution to this problem, an API is provided to change the size of the mask buffer at program execution time.
For example, if the mask buffer size is 256*256 => 1024*1024 and the mask generation area is cut into 9 pieces, the mask shape can be drawn in a rectangle area of 341*341, so when enlarged and used as a clipping area, it eliminates edge blurring or blotches.
Note: Increase the size of the mask buffer => The more pixels to be processed, the slower the speed, but the cleaner the drawing result.
Note: Reduce the size of the mask buffer => The fewer pixels to be processed, the faster the speed, but the drawing result will be less clean.
public void setClippingMaskBufferSize(final float width, final float height) {
    // Recreate instances to resize the FrameBuffer.
    _clippingManager = new CubismClippingManagerAndroid();
    _clippingManager.setClippingMaskBufferSize(width, height);

    CubismModel model = getModel();
    _clippingManager.initialize(
        model.getDrawableCount(),
        model.getDrawableMasks(),
        model.getDrawableMaskCounts()
    );
}
Why Preprocessing Methods Can Improve Performance
Specifically for mobile devices, the processing cost of the Clear instruction and rendering target switching instruction to the GPU may be higher than other instructions.
When drawing using the general method, these instructions with high processing costs are executed as many times as the number of Drawables that require masks.
However, with the preprocessing method, the number of times these instructions are executed can be reduced, resulting in improved performance in smartphones and other devices.
We are currently conducting experiments to ascertain its effectiveness.
See “Why pre-processing methods can improve performance” in “Mask Preprocessing Method (Native)” for the measurement method and results of this experiment.
Switching to a high-definition method for processing masks
The method of generating a mask each time a drawing is made will affect performance on low-end devices.
However, this method is more suitable when screen quality is more important than performance at runtime, as in the case of final output as video.
In the Cubism SDK for Java, the mask process can be switched to a high-definition method.
To switch to the high-definition method, pass true to the following API.
CubismRenderer.isUsingHighPrecisionMask()