マスクの前処理方式 (Web)

最終更新: 2023年2月21日

このページはCubism 4.2以前の古いバージョン向けです。 最新のページはこちら

Live2D Cubism SDK for Webでは、スマートフォンなどで描画速度を維持するために、
モデル描画処理の最初に一枚のマスクバッファに対してすべてのマスク形状を描画する『前処理方式』を採用しています。

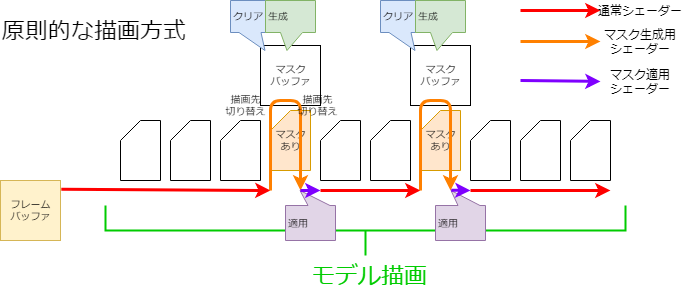
原則的な描画方法では、マスクを必要とするDrawableを描画するタイミングで、その都度マスク形状を描画します(図参照)。
この方法では、高精細なマスクの表現が可能ですが、Drawableがマスクを必要とするたびにレンダーターゲットの切り替え・バッファのクリアなど比較的高コストな処理が発生することになります。
そのため、スマートフォンなどで描画速度が低下する原因になる場合があります。
しかし、前もってマスクを用意するだけではマスクバッファが複数枚必要になり、メモリーを圧迫することになります。
この点を解決するため、一枚のマスクバッファに対して以下の処理を行うことで、まるで複数枚のマスクバッファを利用しているかのように扱いつつ、メモリーの圧迫を抑えることができます。

マスクの統合

前もってすべてのマスクを生成するため、同じマスク指定を受けているDrawableは同一のマスク画像を使うことで生成する枚数を抑えられます。
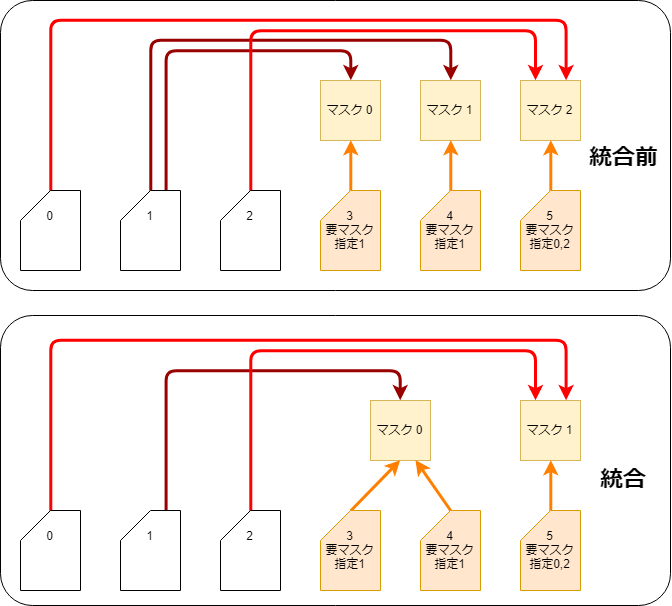
この処理はCubismRenderer_WebGL.initialize関数呼び出しの中で
CubismClippingManager_WebGL.initialize関数によって行われます。

Plain text
Copy to clipboard
Open code in new window
EnlighterJS 3 Syntax Highlighter
public initialize(model: CubismModel, drawableCount: number, drawableMasks: Int32Array[], drawableMaskCounts: Int32Array): void
{
// クリッピングマスクを使う描画オブジェクトをすべて登録する
// クリッピングマスクは、通常数個程度に限定して使うものとする
for(let i: number = 0; i < drawableCount; i++)
{
if(drawableMaskCounts[i] <= 0)
{
// クリッピングマスクが使用されていないアートメッシュ(多くの場合使用しない)
this._clippingContextListForDraw.pushBack(null);
continue;
}
// 既にあるClipContextと同じかチェックする
let clippingContext: CubismClippingContext =
this.findSameClip(drawableMasks[i], drawableMaskCounts[i]);
if(clippingContext == null)
{
// 同一のマスクが存在していない場合は生成する
clippingContext = new CubismClippingContext(this, drawableMasks[i],
drawableMaskCounts[i]);
this._clippingContextListForMask.pushBack(clippingContext);
}
clippingContext.addClippedDrawable(i);
this._clippingContextListForDraw.pushBack(clippingContext);
}
}
public initialize(model: CubismModel, drawableCount: number, drawableMasks: Int32Array[], drawableMaskCounts: Int32Array): void { // クリッピングマスクを使う描画オブジェクトをすべて登録する // クリッピングマスクは、通常数個程度に限定して使うものとする for(let i: number = 0; i < drawableCount; i++) { if(drawableMaskCounts[i] <= 0) { // クリッピングマスクが使用されていないアートメッシュ(多くの場合使用しない) this._clippingContextListForDraw.pushBack(null); continue; } // 既にあるClipContextと同じかチェックする let clippingContext: CubismClippingContext = this.findSameClip(drawableMasks[i], drawableMaskCounts[i]); if(clippingContext == null) { // 同一のマスクが存在していない場合は生成する clippingContext = new CubismClippingContext(this, drawableMasks[i], drawableMaskCounts[i]); this._clippingContextListForMask.pushBack(clippingContext); } clippingContext.addClippedDrawable(i); this._clippingContextListForDraw.pushBack(clippingContext); } }
public initialize(model: CubismModel, drawableCount: number, drawableMasks: Int32Array[], drawableMaskCounts: Int32Array): void
{
    // クリッピングマスクを使う描画オブジェクトをすべて登録する
    // クリッピングマスクは、通常数個程度に限定して使うものとする
    for(let i: number = 0; i < drawableCount; i++)
    {
        if(drawableMaskCounts[i] <= 0)
        {
            // クリッピングマスクが使用されていないアートメッシュ(多くの場合使用しない)
            this._clippingContextListForDraw.pushBack(null);
            continue;
        }

        // 既にあるClipContextと同じかチェックする
        let clippingContext: CubismClippingContext =
            this.findSameClip(drawableMasks[i], drawableMaskCounts[i]);
        if(clippingContext == null)
        {
            // 同一のマスクが存在していない場合は生成する
            clippingContext = new CubismClippingContext(this, drawableMasks[i],
                drawableMaskCounts[i]);
            this._clippingContextListForMask.pushBack(clippingContext);
        }

        clippingContext.addClippedDrawable(i);

        this._clippingContextListForDraw.pushBack(clippingContext);
    }
}

複数枚のマスク用テクスチャの利用

Cubism SDK for Web R6以降では、マスク用テクスチャを任意で複数枚使用することができます。
そのため、R5までに存在したマスクの使用上限数である36枚を超過したマスクをモデルに設定しても、SDK上で正常に表示させることができるようになります。

ただし、マスク用テクスチャを2枚以上使用した場合、マスク用テクスチャ1枚に対して生成されるマスクの上限数は32枚までとなります。
(1枚のみ使用する場合のマスクの上限数は36枚です。こちらの詳細は後述します)
仮にマスク用テクスチャを2枚使用した場合、使用できるマスクの上限数は32 * 2の64枚になります。

マスク用テクスチャを複数枚使用するための設定は以下のようになります。

Plain text
Copy to clipboard
Open code in new window
EnlighterJS 3 Syntax Highlighter
let maskBufferCount = 2;
this._renderer = new CubismRenderer_WebGL();
this._renderer.initialize(this._model, maskBufferCount);
let maskBufferCount = 2; this._renderer = new CubismRenderer_WebGL(); this._renderer.initialize(this._model, maskBufferCount);
let maskBufferCount = 2;

this._renderer = new CubismRenderer_WebGL();
this._renderer.initialize(this._model, maskBufferCount);

CubismRenderer_WebGL.initialize() の第2引数に何も渡さない場合、マスク用テクスチャは1枚のみ生成して使用されます。

Plain text
Copy to clipboard
Open code in new window
EnlighterJS 3 Syntax Highlighter
this._renderer.initialize(this._model);

色情報での分離

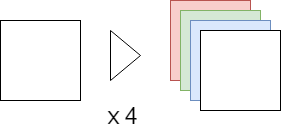
マスクバッファは通常のテクスチャバッファなどと同じようにRGBAの映像用配列です。
通常のマスク処理ではこのAチャンネルのみを使用してマスクを適用しますがRGBのチャンネルは使用しません。
そこでRGBAで別々のマスクデータを持つことによって一枚のマスクバッファを4枚のマスクバッファとして取り扱えるようになります。
分割分離

マスク画像が4枚では足りなくなった時、マスクバッファを2分割、4分割、9分割で取り扱うことによってマスクの枚数を増やします。
色情報での分割もあるので4x9の36枚まで違うマスクを保持できるようになっています。

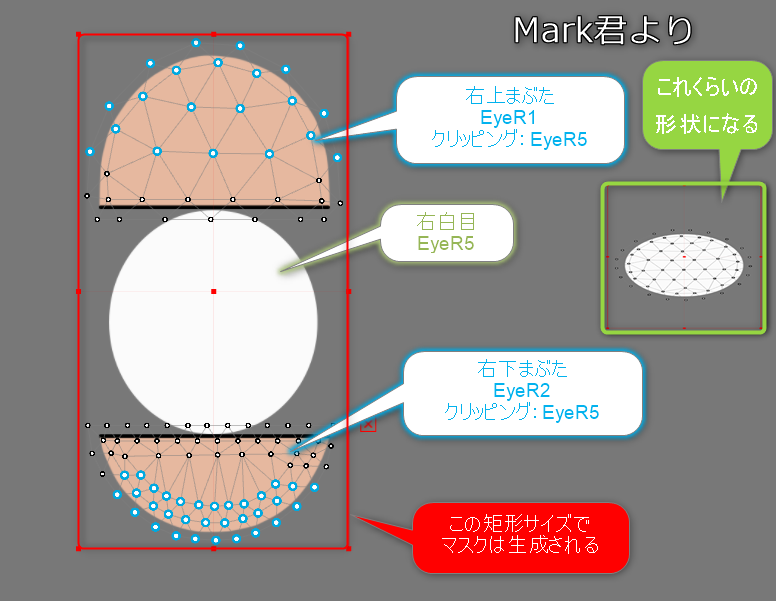
またマスク画像がつぶれるのを防ぐため、マスクの適用を受けるすべてのDrawableの矩形でマスクを描画します。
このため範囲の生成とマスク生成、マスク使用でのマトリックスの生成が必要になります。
マスク用テクスチャを複数枚利用する場合も分割方式はマスク用テクスチャ1枚のみを利用した場合と同様となります。
ただし、マスク用テクスチャを複数枚利用する場合にはマスク用テクスチャ1枚あたりへのマスクの割り当てを可能な限り等分するようになるため、同じモデルでも描画の品質が上がります。(マスク用テクスチャを増やすと、その分処理コストはかかります)
例えば、マスクが32枚のモデルの場合には通常はマスク用テクスチャ1枚で32枚のマスクを描画しようとしますが、マスク用テクスチャを2枚使った場合のマスクの割り当ては「1枚あたり16枚」となります。

矩形の確認

マスク生成の初めのステップで、マスクごとにマスク適用先すべてが収まる矩形を確認します。

Plain text
Copy to clipboard
Open code in new window
EnlighterJS 3 Syntax Highlighter
public calcClippedDrawTotalBounds(model: CubismModel, clippingContext: CubismClippingContext): void
{
// 被クリッピングマスク(マスクされる描画オブジェクト)の全体の矩形
let clippedDrawTotalMinX: number = Number.MAX_VALUE;
let clippedDrawTotalMinY: number = Number.MAX_VALUE;
let clippedDrawTotalMaxX: number = Number.MIN_VALUE;
let clippedDrawTotalMaxY: number = Number.MIN_VALUE;
// このマスクが実際に必要か判定する
// このクリッピングを利用する「描画オブジェクト」がひとつでも使用可能であればマスクを生成する必要がある
const clippedDrawCount: number = clippingContext._clippedDrawableIndexList.length;
for(let clippedDrawableIndex: number = 0; clippedDrawableIndex < clippedDrawCount;
clippedDrawableIndex++)
{
// マスクを使用する描画オブジェクトの描画される矩形を求める
const drawableIndex: number =
clippingContext._clippedDrawableIndexList[clippedDrawableIndex];
const drawableVertexCount: number = model.getDrawableVertexCount(drawableIndex);
let drawableVertexes: Float32Array = model.getDrawableVertices(drawableIndex);
let minX: number = Number.MAX_VALUE;
let minY: number = Number.MAX_VALUE;
let maxX: number = Number.MIN_VALUE;
let maxY: number = Number.MIN_VALUE;
let loop: number = drawableVertexCount * Constant.vertexStep;
for(let pi: number = Constant.vertexOffset; pi < loop; pi += Constant.vertexStep)
{
let x: number = drawableVertexes[pi];
let y: number = drawableVertexes[pi + 1];
if(x < minX)
{
minX = x;
}
if(x > maxX)
{
maxX = x;
}
if(y < minY)
{
minY = y;
}
if(y > maxY)
{
maxY = y;
}
}
// 有効な点が一つも取れなかったのでスキップ
if(minX == Number.MAX_VALUE)
{
continue;
}
// 全体の矩形に反映
if(minX < clippedDrawTotalMinX)
{
clippedDrawTotalMinX = minX;
}
if(minY < clippedDrawTotalMinY)
{
clippedDrawTotalMinY = minY;
}
if(maxX > clippedDrawTotalMaxX)
{
clippedDrawTotalMaxX = maxX;
}
if(maxY > clippedDrawTotalMaxY)
{
clippedDrawTotalMaxY = maxY;
}
if(clippedDrawTotalMinX == Number.MAX_VALUE)
{
clippingContext._allClippedDrawRect.x = 0.0;
clippingContext._allClippedDrawRect.y = 0.0;
clippingContext._allClippedDrawRect.width = 0.0;
clippingContext._allClippedDrawRect.height = 0.0;
clippingContext._isUsing = false;
}
else
{
clippingContext._isUsing = true;
let w: number = clippedDrawTotalMaxX - clippedDrawTotalMinX;
let h: number = clippedDrawTotalMaxY - clippedDrawTotalMinY;
clippingContext._allClippedDrawRect.x = clippedDrawTotalMinX;
clippingContext._allClippedDrawRect.y = clippedDrawTotalMinY;
clippingContext._allClippedDrawRect.width = w;
clippingContext._allClippedDrawRect.height = h;
}
}
}
public calcClippedDrawTotalBounds(model: CubismModel, clippingContext: CubismClippingContext): void { // 被クリッピングマスク(マスクされる描画オブジェクト)の全体の矩形 let clippedDrawTotalMinX: number = Number.MAX_VALUE; let clippedDrawTotalMinY: number = Number.MAX_VALUE; let clippedDrawTotalMaxX: number = Number.MIN_VALUE; let clippedDrawTotalMaxY: number = Number.MIN_VALUE; // このマスクが実際に必要か判定する // このクリッピングを利用する「描画オブジェクト」がひとつでも使用可能であればマスクを生成する必要がある const clippedDrawCount: number = clippingContext._clippedDrawableIndexList.length; for(let clippedDrawableIndex: number = 0; clippedDrawableIndex < clippedDrawCount; clippedDrawableIndex++) { // マスクを使用する描画オブジェクトの描画される矩形を求める const drawableIndex: number = clippingContext._clippedDrawableIndexList[clippedDrawableIndex]; const drawableVertexCount: number = model.getDrawableVertexCount(drawableIndex); let drawableVertexes: Float32Array = model.getDrawableVertices(drawableIndex); let minX: number = Number.MAX_VALUE; let minY: number = Number.MAX_VALUE; let maxX: number = Number.MIN_VALUE; let maxY: number = Number.MIN_VALUE; let loop: number = drawableVertexCount * Constant.vertexStep; for(let pi: number = Constant.vertexOffset; pi < loop; pi += Constant.vertexStep) { let x: number = drawableVertexes[pi]; let y: number = drawableVertexes[pi + 1]; if(x < minX) { minX = x; } if(x > maxX) { maxX = x; } if(y < minY) { minY = y; } if(y > maxY) { maxY = y; } } // 有効な点が一つも取れなかったのでスキップ if(minX == Number.MAX_VALUE) { continue; } // 全体の矩形に反映 if(minX < clippedDrawTotalMinX) { clippedDrawTotalMinX = minX; } if(minY < clippedDrawTotalMinY) { clippedDrawTotalMinY = minY; } if(maxX > clippedDrawTotalMaxX) { clippedDrawTotalMaxX = maxX; } if(maxY > clippedDrawTotalMaxY) { clippedDrawTotalMaxY = maxY; } if(clippedDrawTotalMinX == Number.MAX_VALUE) { clippingContext._allClippedDrawRect.x = 0.0; clippingContext._allClippedDrawRect.y = 0.0; clippingContext._allClippedDrawRect.width = 0.0; clippingContext._allClippedDrawRect.height = 0.0; clippingContext._isUsing = false; } else { clippingContext._isUsing = true; let w: number = clippedDrawTotalMaxX - clippedDrawTotalMinX; let h: number = clippedDrawTotalMaxY - clippedDrawTotalMinY; clippingContext._allClippedDrawRect.x = clippedDrawTotalMinX; clippingContext._allClippedDrawRect.y = clippedDrawTotalMinY; clippingContext._allClippedDrawRect.width = w; clippingContext._allClippedDrawRect.height = h; } } }
public calcClippedDrawTotalBounds(model: CubismModel, clippingContext: CubismClippingContext): void
{
    // 被クリッピングマスク(マスクされる描画オブジェクト)の全体の矩形
    let clippedDrawTotalMinX: number = Number.MAX_VALUE;
    let clippedDrawTotalMinY: number = Number.MAX_VALUE;
    let clippedDrawTotalMaxX: number = Number.MIN_VALUE;
    let clippedDrawTotalMaxY: number = Number.MIN_VALUE;

    // このマスクが実際に必要か判定する
    // このクリッピングを利用する「描画オブジェクト」がひとつでも使用可能であればマスクを生成する必要がある
    const clippedDrawCount: number = clippingContext._clippedDrawableIndexList.length;

    for(let clippedDrawableIndex: number = 0; clippedDrawableIndex < clippedDrawCount;
        clippedDrawableIndex++)
    {
        // マスクを使用する描画オブジェクトの描画される矩形を求める
        const drawableIndex: number =
            clippingContext._clippedDrawableIndexList[clippedDrawableIndex];

        const drawableVertexCount: number = model.getDrawableVertexCount(drawableIndex);
        let drawableVertexes: Float32Array = model.getDrawableVertices(drawableIndex);

        let minX: number = Number.MAX_VALUE;
        let minY: number = Number.MAX_VALUE;
        let maxX: number = Number.MIN_VALUE;
        let maxY: number = Number.MIN_VALUE;

        let loop: number = drawableVertexCount * Constant.vertexStep;
        for(let pi: number = Constant.vertexOffset; pi < loop; pi += Constant.vertexStep)
        {
            let x: number = drawableVertexes[pi];
            let y: number = drawableVertexes[pi + 1];

            if(x < minX)
            {
                minX = x;
            }
            if(x > maxX)
            {
                maxX = x;
            }
            if(y < minY)
            {
                minY = y;
            }
            if(y > maxY)
            {
                maxY = y;
            }
        }

        // 有効な点が一つも取れなかったのでスキップ
        if(minX == Number.MAX_VALUE)
        {
            continue;
        }

        // 全体の矩形に反映
        if(minX < clippedDrawTotalMinX)
        {
            clippedDrawTotalMinX = minX;
        }
        if(minY < clippedDrawTotalMinY)
        {
            clippedDrawTotalMinY = minY;
        }
        if(maxX > clippedDrawTotalMaxX)
        {
            clippedDrawTotalMaxX = maxX;
        }
        if(maxY > clippedDrawTotalMaxY)
        {
            clippedDrawTotalMaxY = maxY;
        }

        if(clippedDrawTotalMinX == Number.MAX_VALUE)
        {
            clippingContext._allClippedDrawRect.x = 0.0;
            clippingContext._allClippedDrawRect.y = 0.0;
            clippingContext._allClippedDrawRect.width = 0.0;
            clippingContext._allClippedDrawRect.height = 0.0;
            clippingContext._isUsing = false;
        }
        else
        {
            clippingContext._isUsing = true;
            let w: number = clippedDrawTotalMaxX - clippedDrawTotalMinX;
            let h: number = clippedDrawTotalMaxY - clippedDrawTotalMinY;
            clippingContext._allClippedDrawRect.x = clippedDrawTotalMinX;
            clippingContext._allClippedDrawRect.y = clippedDrawTotalMinY;
            clippingContext._allClippedDrawRect.width = w;
            clippingContext._allClippedDrawRect.height = h;
        }
    }
}

色分離、分割分離を受けたレイアウト決定

マスクごとに所属するマスクバッファの色チャンネル、分割位置を定めます。

Plain text
Copy to clipboard
Open code in new window
EnlighterJS 3 Syntax Highlighter
public setupLayoutBounds(usingClipCount: number): void
{
// ひとつのRenderTextureを極力いっぱいに使ってマスクをレイアウトする
// マスクグループの数が4以下ならRGBA各チャンネルに1つずつマスクを配置し、5以上6以下ならRGBAを2,2,1,1と配置する
// RGBAを順番に使っていく
let div: number = usingClipCount / ColorChannelCount; // 1チャンネルに配置する基本のマスク
let mod: number = usingClipCount % ColorChannelCount; // 余り、この番号のチャンネルまでに一つずつ配分する
// 小数点は切り捨てる
div = ~~div;
mod = ~~mod;
// RGBAそれぞれのチャンネルを用意していく(0:R, 1:G, 2:B, 3:A)
let curClipIndex: number = 0; // 順番に設定していく
for(let channelNo: number = 0; channelNo < ColorChannelCount; channelNo++)
{
// このチャンネルにレイアウトする数
let layoutCount: number = div + (channelNo < mod ? 1 : 0);
// 分割方法を決定する
if(layoutCount == 0)
{
// 何もしない
}
else if(layoutCount == 1)
{
// 全てをそのまま使う
let clipContext: CubismClippingContext =
this._clippingContextListForMask.at(curClipIndex++);
clipContext._layoutChannelNo = channelNo;
clipContext._layoutBounds.x = 0.0;
clipContext._layoutBounds.y = 0.0;
clipContext._layoutBounds.width = 1.0;
clipContext._layoutBounds.height = 1.0;
}
else if(layoutCount == 2)
{
for(let i: number = 0; i < layoutCount; i++)
{
let xpos: number = i % 2;
// 小数点は切り捨てる
xpos = ~~xpos;
let cc: CubismClippingContext =
this._clippingContextListForMask.at(curClipIndex++);
cc._layoutChannelNo = channelNo;
cc._layoutBounds.x = xpos * 0.5;
cc._layoutBounds.y = 0.0;
cc._layoutBounds.width = 0.5;
cc._layoutBounds.height = 1.0;
// UVを2つに分解して使う
}
}
else if(layoutCount <= 4)
{
// 4分割して使う
for(let i: number = 0; i < layoutCount; i++)
{
let xpos: number = i % 2;
let ypos: number = i / 2;
// 小数点は切り捨てる
xpos = ~~xpos;
ypos = ~~ypos;
let cc = this._clippingContextListForMask.at(curClipIndex++);
cc._layoutChannelNo = channelNo;
cc._layoutBounds.x = xpos * 0.5;
cc._layoutBounds.y = ypos * 0.5;
cc._layoutBounds.width = 0.5;
cc._layoutBounds.height = 0.5;
}
}
else if(layoutCount <= 9)
{
// 9分割して使う
for(let i: number = 0; i < layoutCount; i++)
{
let xpos = i % 3;
let ypos = i / 3;
// 小数点は切り捨てる
xpos = ~~xpos;
ypos = ~~ypos;
let cc: CubismClippingContext =
this._clippingContextListForMask.at(curClipIndex++);
cc._layoutChannelNo = channelNo;
cc._layoutBounds.x = xpos / 3.0;
cc._layoutBounds.y = ypos / 3.0;
cc._layoutBounds.width = 1.0 / 3.0;
cc._layoutBounds.height = 1.0 / 3.0;
}
}
else
{
CubismLogError("not supported mask count : {0}", layoutCount);
}
}
}
public setupLayoutBounds(usingClipCount: number): void { // ひとつのRenderTextureを極力いっぱいに使ってマスクをレイアウトする // マスクグループの数が4以下ならRGBA各チャンネルに1つずつマスクを配置し、5以上6以下ならRGBAを2,2,1,1と配置する // RGBAを順番に使っていく let div: number = usingClipCount / ColorChannelCount; // 1チャンネルに配置する基本のマスク let mod: number = usingClipCount % ColorChannelCount; // 余り、この番号のチャンネルまでに一つずつ配分する // 小数点は切り捨てる div = ~~div; mod = ~~mod; // RGBAそれぞれのチャンネルを用意していく(0:R, 1:G, 2:B, 3:A) let curClipIndex: number = 0; // 順番に設定していく for(let channelNo: number = 0; channelNo < ColorChannelCount; channelNo++) { // このチャンネルにレイアウトする数 let layoutCount: number = div + (channelNo < mod ? 1 : 0); // 分割方法を決定する if(layoutCount == 0) { // 何もしない } else if(layoutCount == 1) { // 全てをそのまま使う let clipContext: CubismClippingContext = this._clippingContextListForMask.at(curClipIndex++); clipContext._layoutChannelNo = channelNo; clipContext._layoutBounds.x = 0.0; clipContext._layoutBounds.y = 0.0; clipContext._layoutBounds.width = 1.0; clipContext._layoutBounds.height = 1.0; } else if(layoutCount == 2) { for(let i: number = 0; i < layoutCount; i++) { let xpos: number = i % 2; // 小数点は切り捨てる xpos = ~~xpos; let cc: CubismClippingContext = this._clippingContextListForMask.at(curClipIndex++); cc._layoutChannelNo = channelNo; cc._layoutBounds.x = xpos * 0.5; cc._layoutBounds.y = 0.0; cc._layoutBounds.width = 0.5; cc._layoutBounds.height = 1.0; // UVを2つに分解して使う } } else if(layoutCount <= 4) { // 4分割して使う for(let i: number = 0; i < layoutCount; i++) { let xpos: number = i % 2; let ypos: number = i / 2; // 小数点は切り捨てる xpos = ~~xpos; ypos = ~~ypos; let cc = this._clippingContextListForMask.at(curClipIndex++); cc._layoutChannelNo = channelNo; cc._layoutBounds.x = xpos * 0.5; cc._layoutBounds.y = ypos * 0.5; cc._layoutBounds.width = 0.5; cc._layoutBounds.height = 0.5; } } else if(layoutCount <= 9) { // 9分割して使う for(let i: number = 0; i < layoutCount; i++) { let xpos = i % 3; let ypos = i / 3; // 小数点は切り捨てる xpos = ~~xpos; ypos = ~~ypos; let cc: CubismClippingContext = this._clippingContextListForMask.at(curClipIndex++); cc._layoutChannelNo = channelNo; cc._layoutBounds.x = xpos / 3.0; cc._layoutBounds.y = ypos / 3.0; cc._layoutBounds.width = 1.0 / 3.0; cc._layoutBounds.height = 1.0 / 3.0; } } else { CubismLogError("not supported mask count : {0}", layoutCount); } } }
public setupLayoutBounds(usingClipCount: number): void
{
    // ひとつのRenderTextureを極力いっぱいに使ってマスクをレイアウトする
    // マスクグループの数が4以下ならRGBA各チャンネルに1つずつマスクを配置し、5以上6以下ならRGBAを2,2,1,1と配置する

    // RGBAを順番に使っていく
    let div: number = usingClipCount / ColorChannelCount; // 1チャンネルに配置する基本のマスク
    let mod: number = usingClipCount % ColorChannelCount; // 余り、この番号のチャンネルまでに一つずつ配分する

    // 小数点は切り捨てる
    div = ~~div;
    mod = ~~mod;

    // RGBAそれぞれのチャンネルを用意していく(0:R, 1:G, 2:B, 3:A)
    let curClipIndex: number = 0; // 順番に設定していく

    for(let channelNo: number = 0; channelNo < ColorChannelCount; channelNo++)
    {
        // このチャンネルにレイアウトする数
        let layoutCount: number = div + (channelNo < mod ? 1 : 0);

        // 分割方法を決定する
        if(layoutCount == 0)
        {
            // 何もしない
        }
        else if(layoutCount == 1)
        {
            // 全てをそのまま使う
            let clipContext: CubismClippingContext =
                this._clippingContextListForMask.at(curClipIndex++);
            clipContext._layoutChannelNo = channelNo;
            clipContext._layoutBounds.x = 0.0;
            clipContext._layoutBounds.y = 0.0;
            clipContext._layoutBounds.width = 1.0;
            clipContext._layoutBounds.height = 1.0;
        }
        else if(layoutCount == 2)
        {
            for(let i: number = 0; i < layoutCount; i++)
            {
                let xpos: number = i % 2;

                // 小数点は切り捨てる
                xpos = ~~xpos;

                let cc: CubismClippingContext =
                    this._clippingContextListForMask.at(curClipIndex++);
                cc._layoutChannelNo = channelNo;

                cc._layoutBounds.x = xpos * 0.5;
                cc._layoutBounds.y = 0.0;
                cc._layoutBounds.width = 0.5;
                cc._layoutBounds.height = 1.0;
                // UVを2つに分解して使う
            }
        }
        else if(layoutCount <= 4)
        {
            // 4分割して使う
            for(let i: number = 0; i < layoutCount; i++)
            {
                let xpos: number = i % 2;
                let ypos: number = i / 2;

                // 小数点は切り捨てる
                xpos = ~~xpos;
                ypos = ~~ypos;

                let cc = this._clippingContextListForMask.at(curClipIndex++);
                cc._layoutChannelNo = channelNo;

                cc._layoutBounds.x = xpos * 0.5;
                cc._layoutBounds.y = ypos * 0.5;
                cc._layoutBounds.width = 0.5;
                cc._layoutBounds.height = 0.5;
            }
        }
        else if(layoutCount <= 9)
        {
            // 9分割して使う
            for(let i: number = 0; i < layoutCount; i++)
            {
                let xpos = i % 3;
                let ypos = i / 3;

                // 小数点は切り捨てる
                xpos = ~~xpos;
                ypos = ~~ypos;

                let cc: CubismClippingContext =
                    this._clippingContextListForMask.at(curClipIndex++);
                cc._layoutChannelNo = channelNo;

                cc._layoutBounds.x = xpos / 3.0;
                cc._layoutBounds.y = ypos / 3.0;
                cc._layoutBounds.width = 1.0 / 3.0;
                cc._layoutBounds.height = 1.0 / 3.0;
            }
        }
        else
        {
            CubismLogError("not supported mask count : {0}", layoutCount);
        }
    }
}

マスク描画、マスク使用のマトリックス生成

描画前に調べた矩形範囲と所属場所に基づいてマスク生成用、マスク使用用の変換マトリックスを用意します。

Plain text
Copy to clipboard
Open code in new window
EnlighterJS 3 Syntax Highlighter
// --- 実際に1つのマスクを描く ---
let clipContext: CubismClippingContext = this._clippingContextListForMask.at(clipIndex);
let allClipedDrawRect: csmRect = clipContext._allClippedDrawRect; // このマスクを使う、すべての描画オブジェクトの論理座標上の囲み矩形
let layoutBoundsOnTex01: csmRect = clipContext._layoutBounds; // この中にマスクを収める
// モデル座標上の矩形を、適宜マージンを付けて使う
const MARGIN: number = 0.05;
this._tmpBoundsOnModel.setRect(allClipedDrawRect);
this._tmpBoundsOnModel.expand(allClipedDrawRect.width * MARGIN,
allClipedDrawRect.height * MARGIN);
//########## 本来は割り当てられた領域の全体を使わず必要最低限のサイズがよい
// シェーダ用の計算式を求める。回転を考慮しない場合は以下のとおり
// movePeriod' = movePeriod * scaleX + offX [[ movePeriod' = (movePeriod - tmpBoundsOnModel.movePeriod)*scale + layoutBoundsOnTex01.movePeriod ]]
const scaleX: number = layoutBoundsOnTex01.width / this._tmpBoundsOnModel.width;
const scaleY: number = layoutBoundsOnTex01.height / this._tmpBoundsOnModel.height;
// マスク生成時に使う行列を求める
{
// シェーダに渡す行列を求める <<<<<<<<<<<<<<<<<<<<<<<< 要最適化(逆順に計算すればシンプルにできる)
this._tmpMatrix.loadIdentity();
{
// layout0..1 を -1..1に変換
this._tmpMatrix.translateRelative(-1.0, -1.0);
this._tmpMatrix.scaleRelative(2.0, 2.0);
}
{
// view to layout0..1
this._tmpMatrix.translateRelative(layoutBoundsOnTex01.x, layoutBoundsOnTex01.y);
this._tmpMatrix.scaleRelative(scaleX, scaleY); // new = [translate][scale]
this._tmpMatrix.translateRelative(-this._tmpBoundsOnModel.x,
-this._tmpBoundsOnModel.y);
// new = [translate][scale][translate]
}
// tmpMatrixForMaskが計算結果
this._tmpMatrixForMask.setMatrix(this._tmpMatrix.getArray());
}
//--------- draw時の mask 参照用行列を計算
{
// シェーダに渡す行列を求める <<<<<<<<<<<<<<<<<<<<<<<< 要最適化(逆順に計算すればシンプルにできる)
this._tmpMatrix.loadIdentity();
{
this._tmpMatrix.translateRelative(layoutBoundsOnTex01.x, layoutBoundsOnTex01.y);
this._tmpMatrix.scaleRelative(scaleX, scaleY); // new = [translate][scale]
this._tmpMatrix.translateRelative(-this._tmpBoundsOnModel.x,
-this._tmpBoundsOnModel.y);
// new = [translate][scale][translate]
}
this._tmpMatrixForDraw.setMatrix(this._tmpMatrix.getArray());
}
clipContext._matrixForMask.setMatrix(this._tmpMatrixForMask.getArray());
clipContext._matrixForDraw.setMatrix(this._tmpMatrixForDraw.getArray());
// --- 実際に1つのマスクを描く --- let clipContext: CubismClippingContext = this._clippingContextListForMask.at(clipIndex); let allClipedDrawRect: csmRect = clipContext._allClippedDrawRect; // このマスクを使う、すべての描画オブジェクトの論理座標上の囲み矩形 let layoutBoundsOnTex01: csmRect = clipContext._layoutBounds; // この中にマスクを収める // モデル座標上の矩形を、適宜マージンを付けて使う const MARGIN: number = 0.05; this._tmpBoundsOnModel.setRect(allClipedDrawRect); this._tmpBoundsOnModel.expand(allClipedDrawRect.width * MARGIN, allClipedDrawRect.height * MARGIN); //########## 本来は割り当てられた領域の全体を使わず必要最低限のサイズがよい // シェーダ用の計算式を求める。回転を考慮しない場合は以下のとおり // movePeriod' = movePeriod * scaleX + offX [[ movePeriod' = (movePeriod - tmpBoundsOnModel.movePeriod)*scale + layoutBoundsOnTex01.movePeriod ]] const scaleX: number = layoutBoundsOnTex01.width / this._tmpBoundsOnModel.width; const scaleY: number = layoutBoundsOnTex01.height / this._tmpBoundsOnModel.height; // マスク生成時に使う行列を求める { // シェーダに渡す行列を求める <<<<<<<<<<<<<<<<<<<<<<<< 要最適化(逆順に計算すればシンプルにできる) this._tmpMatrix.loadIdentity(); { // layout0..1 を -1..1に変換 this._tmpMatrix.translateRelative(-1.0, -1.0); this._tmpMatrix.scaleRelative(2.0, 2.0); } { // view to layout0..1 this._tmpMatrix.translateRelative(layoutBoundsOnTex01.x, layoutBoundsOnTex01.y); this._tmpMatrix.scaleRelative(scaleX, scaleY); // new = [translate][scale] this._tmpMatrix.translateRelative(-this._tmpBoundsOnModel.x, -this._tmpBoundsOnModel.y); // new = [translate][scale][translate] } // tmpMatrixForMaskが計算結果 this._tmpMatrixForMask.setMatrix(this._tmpMatrix.getArray()); } //--------- draw時の mask 参照用行列を計算 { // シェーダに渡す行列を求める <<<<<<<<<<<<<<<<<<<<<<<< 要最適化(逆順に計算すればシンプルにできる) this._tmpMatrix.loadIdentity(); { this._tmpMatrix.translateRelative(layoutBoundsOnTex01.x, layoutBoundsOnTex01.y); this._tmpMatrix.scaleRelative(scaleX, scaleY); // new = [translate][scale] this._tmpMatrix.translateRelative(-this._tmpBoundsOnModel.x, -this._tmpBoundsOnModel.y); // new = [translate][scale][translate] } this._tmpMatrixForDraw.setMatrix(this._tmpMatrix.getArray()); } clipContext._matrixForMask.setMatrix(this._tmpMatrixForMask.getArray()); clipContext._matrixForDraw.setMatrix(this._tmpMatrixForDraw.getArray());
    // --- 実際に1つのマスクを描く ---
    let clipContext: CubismClippingContext = this._clippingContextListForMask.at(clipIndex);
    let allClipedDrawRect: csmRect = clipContext._allClippedDrawRect;   // このマスクを使う、すべての描画オブジェクトの論理座標上の囲み矩形
    let layoutBoundsOnTex01: csmRect = clipContext._layoutBounds; // この中にマスクを収める

    // モデル座標上の矩形を、適宜マージンを付けて使う
    const MARGIN: number = 0.05;
    this._tmpBoundsOnModel.setRect(allClipedDrawRect);
    this._tmpBoundsOnModel.expand(allClipedDrawRect.width * MARGIN,
                                  allClipedDrawRect.height * MARGIN);
    //########## 本来は割り当てられた領域の全体を使わず必要最低限のサイズがよい

    // シェーダ用の計算式を求める。回転を考慮しない場合は以下のとおり
    // movePeriod' = movePeriod * scaleX + offX                  [[ movePeriod' = (movePeriod - tmpBoundsOnModel.movePeriod)*scale + layoutBoundsOnTex01.movePeriod ]]
    const scaleX: number = layoutBoundsOnTex01.width / this._tmpBoundsOnModel.width;
    const scaleY: number = layoutBoundsOnTex01.height / this._tmpBoundsOnModel.height;

    // マスク生成時に使う行列を求める
    {
        // シェーダに渡す行列を求める <<<<<<<<<<<<<<<<<<<<<<<< 要最適化(逆順に計算すればシンプルにできる)
        this._tmpMatrix.loadIdentity();
        {
            // layout0..1 を -1..1に変換
            this._tmpMatrix.translateRelative(-1.0, -1.0);
            this._tmpMatrix.scaleRelative(2.0, 2.0);
        }
        {
            // view to layout0..1
            this._tmpMatrix.translateRelative(layoutBoundsOnTex01.x, layoutBoundsOnTex01.y);
            this._tmpMatrix.scaleRelative(scaleX, scaleY);  // new = [translate][scale]
            this._tmpMatrix.translateRelative(-this._tmpBoundsOnModel.x,
                                              -this._tmpBoundsOnModel.y);
            // new = [translate][scale][translate]
        }
        // tmpMatrixForMaskが計算結果
        this._tmpMatrixForMask.setMatrix(this._tmpMatrix.getArray());
    }

    //--------- draw時の mask 参照用行列を計算
    {
        // シェーダに渡す行列を求める <<<<<<<<<<<<<<<<<<<<<<<< 要最適化(逆順に計算すればシンプルにできる)
        this._tmpMatrix.loadIdentity();
        {
            this._tmpMatrix.translateRelative(layoutBoundsOnTex01.x, layoutBoundsOnTex01.y);
            this._tmpMatrix.scaleRelative(scaleX, scaleY);  // new = [translate][scale]
            this._tmpMatrix.translateRelative(-this._tmpBoundsOnModel.x,
                                              -this._tmpBoundsOnModel.y);
            // new = [translate][scale][translate]
        }
        this._tmpMatrixForDraw.setMatrix(this._tmpMatrix.getArray());
    }
    clipContext._matrixForMask.setMatrix(this._tmpMatrixForMask.getArray());
    clipContext._matrixForDraw.setMatrix(this._tmpMatrixForDraw.getArray());

マスクバッファの動的なサイズ変更
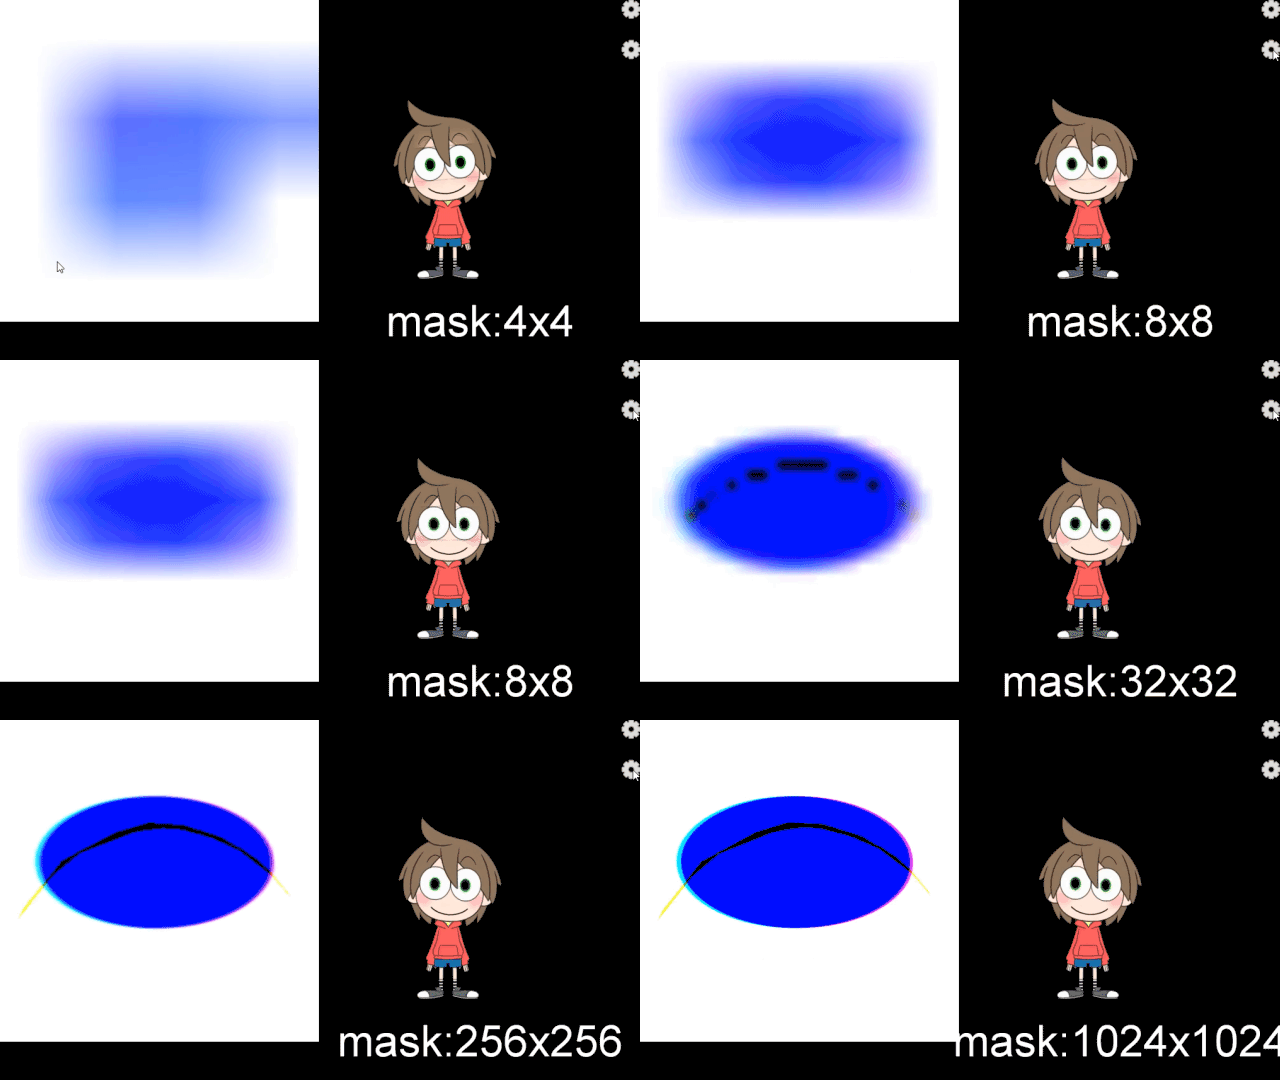
CubismRenderer_WebGLには、実行時にマスクバッファのサイズを変更するAPIを用意してあります。
現状、マスクバッファのサイズは初期値として256*256(ピクセル)を設定していますが、マスク生成領域を9枚に切るような場合、
85*85(ピクセル)の矩形領域に描画したマスク形状を、更に拡大してクリッピング領域として使用します。
その結果、クリッピング結果のエッジがぼやけたり、滲みのような現象が見られます。
それを解決する方法として、マスクバッファのサイズをプログラム実行時に変更するAPIを用意しています。

例えば、マスクバッファのサイズを256*256 ⇒ 1024*1024とすることで、マスク生成領域を9枚に切るような場合、341*341の矩形領域にマスク形状を描画することができるので、
拡大してクリッピング領域として使用しても、クリッピング結果のエッジのぼやけやにじみを解消することができます。

※マスクバッファのサイズを大きくする ⇒ 処理するピクセルが増えると速度は遅くなるが、描画結果は綺麗になる。
※マスクバッファのサイズを小さくする ⇒ 処理するピクセルが減るので速度は速くなるが、描画結果は汚くなる。

Plain text
Copy to clipboard
Open code in new window
EnlighterJS 3 Syntax Highlighter
public setClippingMaskBufferSize(size: number)
{
// FrameBufferのサイズを変更するためにインスタンスを破棄・再作成する
this._clippingManager.release();
this._clippingManager = void 0;
this._clippingManager = null;
this._clippingManager = new CubismClippingManager_WebGL();
this._clippingManager.setClippingMaskBufferSize(size);
this._clippingManager.initialize(
this.getModel(),
this.getModel().getDrawableCount(),
this.getModel().getDrawableMasks(),
this.getModel().getDrawableMaskCounts()
);
}
public setClippingMaskBufferSize(size: number) { // FrameBufferのサイズを変更するためにインスタンスを破棄・再作成する this._clippingManager.release(); this._clippingManager = void 0; this._clippingManager = null; this._clippingManager = new CubismClippingManager_WebGL(); this._clippingManager.setClippingMaskBufferSize(size); this._clippingManager.initialize( this.getModel(), this.getModel().getDrawableCount(), this.getModel().getDrawableMasks(), this.getModel().getDrawableMaskCounts() ); }
public setClippingMaskBufferSize(size: number)
{
    // FrameBufferのサイズを変更するためにインスタンスを破棄・再作成する
    this._clippingManager.release();
    this._clippingManager = void 0;
    this._clippingManager = null;

    this._clippingManager = new CubismClippingManager_WebGL();

    this._clippingManager.setClippingMaskBufferSize(size);

    this._clippingManager.initialize(
        this.getModel(),
        this.getModel().getDrawableCount(),
        this.getModel().getDrawableMasks(),
        this.getModel().getDrawableMaskCounts()
    );
}

マスクの処理を高精細な方式に切り替える

描画の度にマスクを生成する方法だと、低スペック端末ではパフォーマンスに影響があります。

しかし、最終的に動画として出力する場合のように、ランタイムでのパフォーマンスよりも画面の品質の方を重視する場合にはこちらの方式が適しています。

Cubism SDK for Web R6以降では、マスクの処理を高精細な方式に切り替える事ができます。
高精細な方式に切り替えるには、以下のAPIにtrueを渡します。

Plain text
Copy to clipboard
Open code in new window
EnlighterJS 3 Syntax Highlighter
CubismRenderer.useHighPrecisionMask()
この記事はお役に立ちましたか?
はいいいえ
この記事に関するご意見・
ご要望をお聞かせください。