Upload
Updated: 12/17/2025
You can load and use your own files, such as images, audio, videos, and Live2D models, in your project.
You can also check, reuse, replace, delete, and rename loaded files.
Upload settings
Files loaded from the palette can be managed in a list and can be added to, replaced, or deleted from the scene.
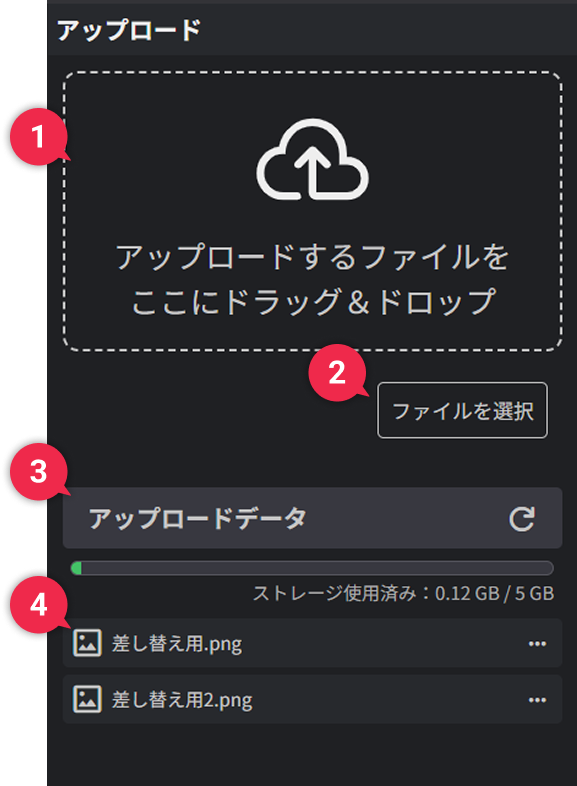
| ➊ | Uploading files | Drag and drop a file into the area enclosed by the dotted line, and the file will be uploaded to the server and usable as a layer on nizima ACTION!! Uploaded files are listed under “Uploaded Data” in the palette. In addition, the corresponding layers (image layer, video layer, audio layer, etc.) are automatically generated and added to the scene as soon as a file is uploaded. |
| ➋ | Selecting files | In addition to the drag-and-drop method above, files can also be uploaded with the “Select file” button and utilized as layers. |
| ➌ | Uploaded data | As files are uploaded, the total usage is reflected here. |
| ➍ | List of uploaded data | Uploaded files, such as images, audio, videos, and Live2D models, are displayed in a list. You can create layers, rename files, delete files, and replace files by clicking “…” on the right. |
Upload by Drag and Drop
The behavior after uploading differs depending on where you drag and drop the file.
You can upload by dragging to the canvas, upload palette, or timeline.
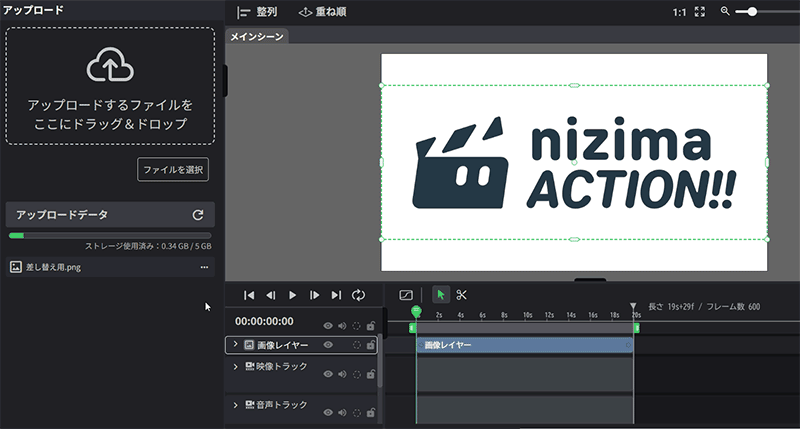
Drag onto Canvas
The file is uploaded and simultaneously added as a layer within the scene.
This is ideal when you want to place a model immediately.
Drag onto Upload Palette
Only the file is uploaded, and no layer is created.
Use this when you want to add only the model, such as when replacing an existing Live2D Layer.
Drag onto Timeline
The file is uploaded and added to the scene where you can specify the start position and layer hierarchy.
This is ideal for assets that you want to position with specific timing.
Once the upload is complete, the file is added to the upload palette and can be shared and reused across all scenes in the project.
Management of uploaded files
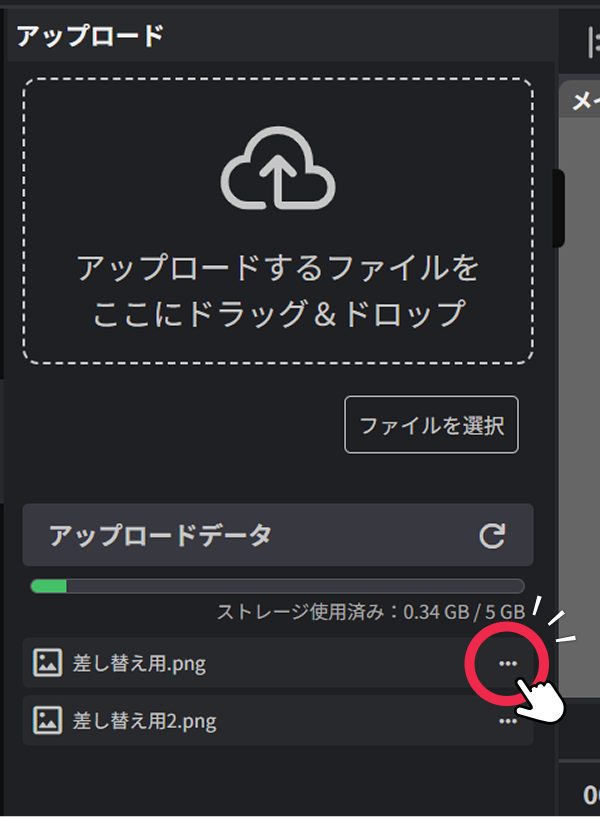
Click “…” (ellipsis points) to the right of the file displayed on the palette to expand the operations menu.
You can manage files by creating, renaming, deleting layers, etc. according to your needs.
Operation menu
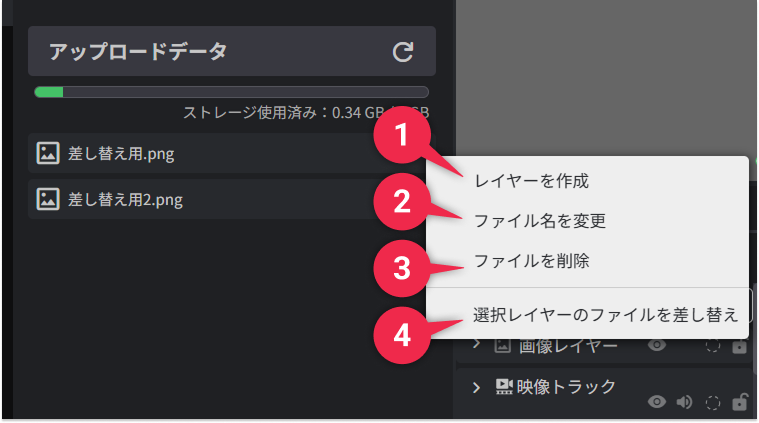
- (1) Create layers
- Add layers (image layer, video layer, etc.) to the current scene according to the file.
- (2) Rename files
- Rename an uploaded file to any name you wish.
A clear name will make it easier to organize the file within the project. - (3) Delete files
- Delete files from the upload palette.
- (4) Replace selected layer file
- Replace the selected layer with the uploaded file.
How to replace uploaded files
Uploaded files can replace already placed layer files.
Follow the steps below.
- Select a layer.
Select a layer to be replaced from either the canvas, timeline, or layer list. - Specify the file to be replaced from the upload palette.
On the palette, click “… (ellipsis points)” to the right of the file you wish to use and select “Replace selected layer file” from the displayed menu.
This completes the replacement of the previously selected layer file.
Notes on replacement (for Live2D models)
- When a Live2D model is replaced, the keyframes and settings configured in the layer are carried over to the new model.
- If the model structure (parameter names, IDs, etc.) is different, they may not be carried over completely.
- Settings (facial expressions, motion, etc.) that exist only in the old models will be deleted when the model is replaced.
Types and formats of files that can be uploaded
Images, videos, audio, Live2D models, etc. in the following formats can be uploaded.
| Images | png, jpg, jpeg, webp, gif, svg, hdr |
| Videos | mp4 (h.264 codec), webm (vp8, vp9, av1 video codecs and opus audio codec) |
| Voice | mp3, wav, ogg, m4a, flac |
| Live2D | Folders containing Live2D models (such as model3.json) or those compressed in ZIP format. (An uncompressed folder can only be uploaded via drag & drop.) Included exp3.json (expressions) and motion3.json (motions) will be automatically extracted. The extracted expressions and motions will be added to the “Live2D Facial Expressions” and “Live2D Motions” lists in the palette that appears when selecting Live2D layers. |
Files that cannot be uploaded
| Subtitle files (SubRip/.srt) | srt Files can be dragged and dropped and selected but not uploaded. They are used in a way that creates a text layer upon selection. |