Workspace
Updated: 05/12/2025
The Workspace area is for various operations such as video editing and animation creation.
This page describes the basic functions, buttons, etc. of the Workspace.
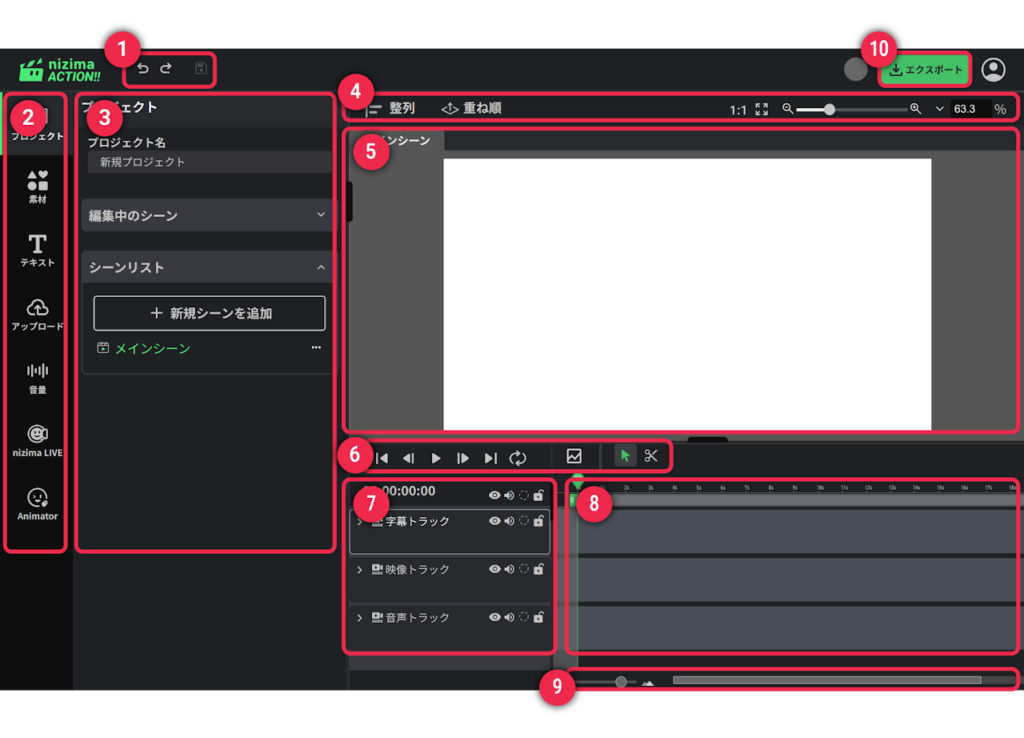
- (1) Undo/Redo/Save
- Allows you to undo, redo, or save the operation during editing.
- (2) Sidebar
- Selecting an item displays its setting items and editing items in (3) Palette.
- (3) Palette
- Allows advanced settings and editing for the item selected in the sidebar.
Editing and setting items for a layer selected on the Timeline also appear in the Palette. - (4) Option bar
- Allows you to adjust the alignment, arrange, and zoom out/zoom in of objects placed on the canvas.
- (5) Canvas
- Displays video, audio, and Live2D models in the scene’s Timeline.
Images, videos, audio, and Live2D models prepared in advance can be dragged and dropped onto the canvas to add layers.
If multiple scenes are created, they can be switched with tabs. - (6) Timeline toolbar
- Allows scene playback, loop playback, and layer cut editing.
- (7) Track/Layer list
- Lists layers and tracks added to the scene being edited.
- (8) Timeline
- Allows you to adjust the display timing and duration of each layer (video, image, Live2D model, text, audio, etc.) added to the scene being edited, as well as cut and animation settings.
Transitions can also be set on the Timeline.
You can switch between two editing modes: Dope Sheet and Curve Editor. - (9) Timeline zoom
- Reduce/expand the timeline.
- (10) Export
- Allows you to output the created video.
You can select the saving format from MP4, WebM, WebP, GIF, PNG (sequential number), and PNG (current frame).
Sidebar Description
[Project]
Click to open the Project Palette.
You can set the screen size and video length.
[Assets]
Click to open the Assets Palette.
You can set the screen size and video length.
[Text]
Click to open the Text Palette.
Click the “Add Text” button to add a text layer on the canvas.
A text layer can also be created by right-clicking on the canvas or in the Layer list > New Layer > Text.
[Upload]
Click to open the Upload Palette.
Files can be uploaded via drag and drop or “Select file.”
[Volume]
Click to open the Volume Palette.
The All volume and the volume of the layer with the sound are displayed.
[nizima LIVE]
Click to open the nizima LIVE Palette.
nizima ACTION!! can work with nizima LIVE.
[Animator]
Click to open the Animator Palette.
Live2D animations can be generated automatically.
Palette Description
[Project]
Project name
You can name the project you are editing.
Scene being edited
| Scene name | Allows you to name the currently displayed scene. |
| Width | Allows you to set the horizontal size of the scene. |
| Height | Allows you to set the vertical size of the scene. |
| Length | Allows you to set the playback time of the scene. |
| Frame | Allows you to set the frame. |
| Frame Rate | Allows you to set the frame rate. |
| Background color | Allows you to set the background color of the scene. |
Scene list
You can add new scenes and manage scenes within a project.
[Assets]
| History | Displays the assets used so far. |
| Video | Displays the video files that can be used in the project. |
| Photo | Displays the still image that can be used in the project. |
| Illustrations, Animations, etc. | Displays illustration and animation assets that can be used in the project. |
| Live2D | Displays the Live2D models that can be used in the project. |
| Live2D Action Frames | Displays assets made by Live2D. |
| Audio | Displays music and audio assets that can be used in the project. |
| nizima | Displays Live2D works sold by “nizima.” Clicking on a thumbnail will take you to “nizima.” |
| Shapes | Displays the shapes that can be used in the project. |
[Text]
Add text
A text layer is added to the scene being edited.
[Upload]
- Files can be uploaded via drag and drop or “Select file.”
- You can check the storage capacity.
[Volume]
The All volume and the volume of the layer with the sound are displayed.
[nizima LIVE]
- Register for nizima LIVE plug-in.
The plug-in will be displayed on the nizima LIVE side. Click the toggle to enable the plug-in. When the toggle turns green, the plug-in registration is complete. - Connect to nizima LIVE
After plug-in registration is complete, click this to link with nizima LIVE. - Playback during recording
If this setting is checked, the motion will be recorded while playing back the video during recording. - Recording voice during recording
If this setting is checked, voice will be recorded during recording. - Live2D Layers that work together
Select the Live2D model you wish to connect to nizima LIVE.
[Animator]
Live2D models can be automatically moved to match the uploaded music layer.
- Audio Layer
You can select the music layer to be used for Auto Generation. - Live2D Layer
You can select a Live2D model to move.
Settings
| Offset with volume | Specify the number of frames for the amount of offset (the amount of time lag) to delay or advance the timing of the Live2D character’s “Mouth open/close motion” that should be synchronized with “Voice.” The default value is 4 (frames). Adjust the timing of the mouth open/close motion when it is not synchronized with the voice. When a positive value is set, the mouth open/close motion starts first, followed by the voice. When a negative value is set, the voice starts first, followed by the mouth open/close motion. |
| Lip-sync Interval | Specify the number of frames for the interval of the lip-sync key setting. The smaller the value, the finer the mouth motion. |
Adjustment Parameters
| Volume application rate | The higher the application rate, the wider the mouth open/close motion in response to volume. |
| Default mouth shape | This is the standard shape for the lip-sync function. |
| Motion compatibility | The higher the compatibility, the greater the motion. |
Automated Motion
Random motion can be automatically generated on the model set in the Live2D layer according to the audio layer.