마스크 전처리 방식(Native)
업데이트: 2023/02/21
Live2D Cubism SDK for Native에서는 스마트폰 등에서 그리기 속도를 유지하기 위해, 모델 묘화 처리의 최초로 1매의 마스크 버퍼에 대해서 모든 마스크 형상을 묘화하는 「전처리 방식」을 채용하고 있습니다.
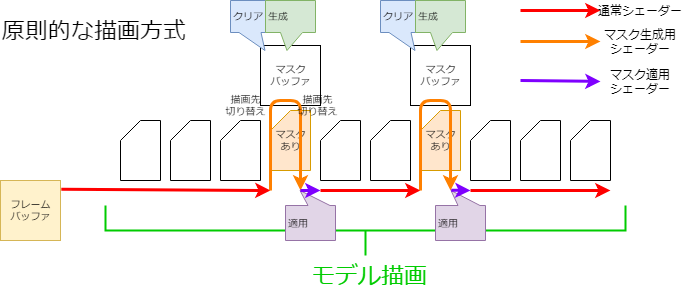
원칙적인 드로잉 방법은 마스크가 필요한 Drawable을 그릴 때마다 마스크 모양을 그립니다(그림 참조).
이 방법에서는 Drawable이 마스크를 필요로 할 때마다 렌더 타깃의 전환·버퍼의 클리어 등 비교적 고비용의 처리가 발생하게 됩니다.
따라서 스마트폰 등에서 그리기 속도가 저하되는 원인이 될 수 있습니다.
그러나 미리 마스크를 준비하는 것만으로는 마스크 버퍼가 여러 장 필요하게 되어, 메모리를 압박하게 됩니다.
이 점을 해결하기 위해 1장의 마스크 버퍼에 대해서 이하의 처리를 실시함으로써, 마치 여러 장의 마스크 버퍼를 이용하고 있는 것처럼 취급하면서 메모리의 압박을 억제할 수 있습니다.
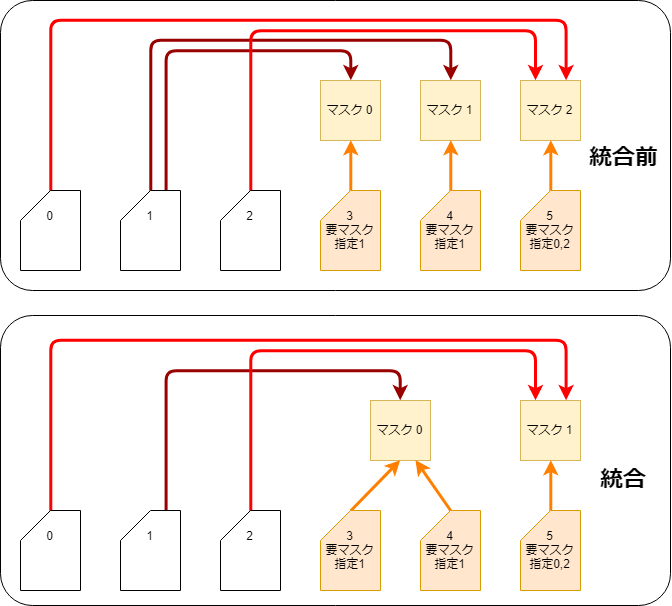
마스크 통합
미리 모든 마스크를 생성하기 때문에 동일한 마스크 지정을 받은 Drawable은 동일한 마스크 이미지를 사용하여 생성하는 매수를 줄일 수 있습니다.
이 처리는 CubismRenderer_OpenGLES2::Initialize 함수 호출 중에서 CubismClippingManager_OpenGLES2::Initialize 함수에 의해 수행됩니다.
void CubismClippingManager_OpenGLES2::Initialize(CubismModel& model, csmInt32 drawableCount, const csmInt32** drawableMasks, const csmInt32* drawableMaskCounts)
{
    // 클리핑 마스크를 사용하는 모든 그리기 오브젝트를 등록
    // 클리핑 마스크는 일반적으로 몇 개 정도로 한정하여 사용
    for (csmInt32 i = 0; i < drawableCount; i++)
    {
        if (drawableMaskCounts[i] <= 0)
        {
            // 클리핑 마스크를 사용하지 않은 아트메쉬(대부분의 경우 사용하지 않음)
            _clippingContextListForDraw.PushBack(NULL);
            continue;
        }

        // 이미 있는 ClipContext와 같은지 확인
        CubismClippingContext* cc = FindSameClip(drawableMasks[i], drawableMaskCounts[i]);
        if (cc == NULL)
        {
            // 동일한 마스크가 존재하지 않으면 생성
            cc = CSM_NEW CubismClippingContext(this, drawableMasks[i], drawableMaskCounts[i]);
            _clippingContextListForMask.PushBack(cc);
        }

        cc->AddClippedDrawable(i);

        _clippingContextListForDraw.PushBack(cc);
    }
}
여러 장의 마스크용 텍스쳐 사용
Cubism SDK for Native R6 이상에서는 마스크용 텍스쳐를 임의로 여러 장 사용할 수 있습니다.
이로 인해 R5까지 존재한 마스크의 사용 상한수인 36장을 초과하는 마스크를 모델로 설정해도 SDK상에서 정상적으로 표시할 수 있게 됩니다.
단, 마스크용 텍스쳐를 2장 이상 사용했을 경우 마스크용 텍스쳐 1장에 대해 생성되는 마스크의 상한수는 32장까지입니다.
(1장만 사용하는 경우의 마스크 상한수는 36장입니다. 이에 대한 자세한 내용은 후술합니다)
만약 마스크용 텍스쳐를 2장 사용했을 경우 사용할 수 있는 마스크의 상한수는 32*2인 64장이 됩니다.
마스크용 텍스쳐를 여러 장 사용하기 위한 설정은 다음과 같습니다.
int maskBufferCount = 2;

CubismRenderer renderer = Rendering::CubismRenderer::Create();
renderer->Initialize(cubismModel, maskBufferCount);
CubismRenderer::Initialize()의 제2인수에 아무것도 전달하지 않을 경우 마스크용 텍스쳐는 1장만 생성, 사용됩니다.
renderer->Initialize(cubismModel);
색상 정보로 분리
마스크 버퍼는 실체로서 통상의 텍스쳐 버퍼 등과 마찬가지로 RGBA의 영상용 배열입니다.
일반 마스크 처리에서는 이 A 채널만을 사용하여 마스크를 적용하지만 RGB 채널은 사용하지 않습니다.
따라서 RGBA에서 별개의 마스크 데이터를 가짐으로써 1매의 마스크 버퍼를 4장의 마스크 버퍼로서 취급할 수 있게 됩니다.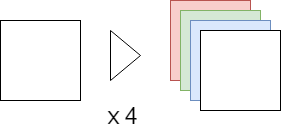
분할 분리
마스크 이미지가 4장으로는 부족해졌을 때 마스크 버퍼를 2분할, 4분할, 9분할로 취급함으로써 마스크의 매수를 늘립니다.
색 정보에 의한 분할도 있으므로 4×9의 36장까지 다른 마스크를 유지할 수 있게 되어 있습니다.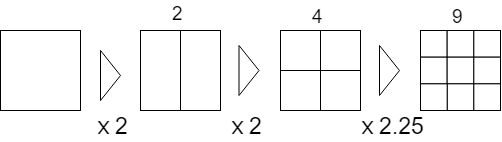
또한 마스크 이미지가 깨지는 것을 방지하기 위해 마스크 적용을 받는 모든 Drawable 직사각형으로 마스크를 그립니다.
이 때문에 범위의 생성과 마스크 생성, 마스크 사용으로 매트릭스의 생성이 필요하게 됩니다.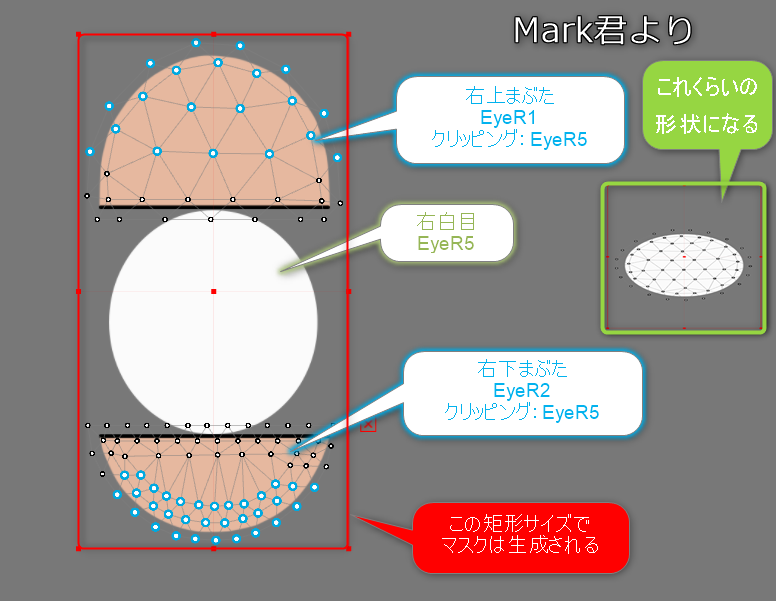
마스크용 텍스쳐를 여러 장 이용하는 경우도 분할 방식은 마스크용 텍스쳐 1장만을 이용한 경우와 동일합니다.
단, 마스크용 텍스쳐를 여러 장 이용하는 경우에는 마스크용 텍스쳐 1장에 대한 마스크의 할당을 가능한 한 등분하게 되기 때문에, 같은 모델에서도 그리기 품질이 향상됩니다. (마스크용 텍스쳐를 늘리면 그만큼 처리 비용이 듭니다)
예를 들면, 마스크가 32장의 모델인 경우 일반적으로는 마스크용 텍스쳐 1장으로 32장의 마스크를 그리려고 하지만, 마스크용 텍스쳐를 2장 사용했을 경우의 마스크 할당은 「1장당 16장」이 됩니다.
직사각형 확인
마스크 생성의 첫 번째 단계에서 마스크별로 마스크 적용 대상이 모두 들어가는 직사각형을 확인합니다.
void CubismClippingManager_OpenGLES2::CalcClippedDrawTotalBounds(CubismModel& model, CubismClippingContext* clippingContext)
{
    // 피 클리핑 마스크(마스킹되는 그리기 오브젝트)의 전체 직사각형
    csmFloat32 clippedDrawTotalMinX = FLT_MAX, clippedDrawTotalMinY = FLT_MAX;
    csmFloat32 clippedDrawTotalMaxX = FLT_MIN, clippedDrawTotalMaxY = FLT_MIN;

    // 이 마스크가 실제로 필요한지 판정한다
    // 이 클리핑을 이용하는 「그리기 오브젝트」가 하나라도 사용 가능하면 마스크를 생성할 필요가 있다

    const csmInt32 clippedDrawCount = clippingContext->_clippedDrawableIndexList->GetSize();
    for (csmInt32 clippedDrawableIndex = 0; clippedDrawableIndex < clippedDrawCount; clippedDrawableIndex++)
    {
        // 마스크를 사용하는 그리기 오브젝트가 그려지는 직사각형을 구한다
        const csmInt32 drawableIndex = (*clippingContext->_clippedDrawableIndexList)[clippedDrawableIndex];

        const csmInt32 drawableVertexCount = model.GetDrawableVertexCount(drawableIndex);
        csmFloat32* drawableVertexes = const_cast<csmFloat32*>(model.GetDrawableVertices(drawableIndex));

        csmFloat32 minX = FLT_MAX, minY = FLT_MAX;
        csmFloat32 maxX = FLT_MIN, maxY = FLT_MIN;

        csmInt32 loop = drawableVertexCount * Constant::VertexStep;
        for (csmInt32 pi = Constant::VertexOffset; pi < loop; pi += Constant::VertexStep)
        {
            csmFloat32 x = drawableVertexes[pi];
            csmFloat32 y = drawableVertexes[pi + 1];
            if (x < minX) minX = x;
            if (x > maxX) maxX = x;
            if (y < minY) minY = y;
            if (y > maxY) maxY = y;
        }

        //
        if (minX == FLT_MAX) continue; //유효한 점이 하나도 잡히지 않았기 때문에 건너뛴다

        // 전체 직사각형에 반영
        if (minX < clippedDrawTotalMinX) clippedDrawTotalMinX = minX;
        if (minY < clippedDrawTotalMinY) clippedDrawTotalMinY = minY;
        if (maxX > clippedDrawTotalMaxX) clippedDrawTotalMaxX = maxX;
        if (maxY > clippedDrawTotalMaxY) clippedDrawTotalMaxY = maxY;
    }
    if (clippedDrawTotalMinX == FLT_MAX)
    {
        clippingContext->_allClippedDrawRect->X = 0.0f;
        clippingContext->_allClippedDrawRect->Y = 0.0f;
        clippingContext->_allClippedDrawRect->Width = 0.0f;
        clippingContext->_allClippedDrawRect->Height = 0.0f;
        clippingContext->_isUsing = false;
    }
    else
    {
        clippingContext->_isUsing = true;
        csmFloat32 w = clippedDrawTotalMaxX - clippedDrawTotalMinX;
        csmFloat32 h = clippedDrawTotalMaxY - clippedDrawTotalMinY;
        clippingContext->_allClippedDrawRect->X = clippedDrawTotalMinX;
        clippingContext->_allClippedDrawRect->Y = clippedDrawTotalMinY;
        clippingContext->_allClippedDrawRect->Width = w;
        clippingContext->_allClippedDrawRect->Height = h;
    }
}
색 분리, 분할 분리를 받은 레이아웃 결정
마스크마다 소속되는 마스크 버퍼의 색 채널, 분할 위치를 정합니다.
void CubismClippingManager_OpenGLES2::SetupLayoutBounds(csmInt32 usingClipCount) const
{
    // 하나의 RenderTexture를 최대한 많이 사용하여 마스크를 레이아웃
    // 마스크 그룹의 수가 4 이하이면 RGBA 각 채널에 하나씩 마스크를 배치하고, 5 이상 6 이하이면 RGBA를 2,2,1,1로 배치한다

    // RGBA를 차례로 사용한다.
    const csmInt32 div = usingClipCount / ColorChannelCount; //한 채널에 배치할 기본 마스크 개수
    const csmInt32 mod = usingClipCount % ColorChannelCount; //나머지는 이 번호의 채널까지 하나씩 할당

    // RGBA 각 채널을 준비한다(0:R, 1:G, 2:B, 3:A, )
    csmInt32 curClipIndex = 0; //순서대로 설정

    for (csmInt32 channelNo = 0; channelNo < ColorChannelCount; channelNo++)
    {
        // 이 채널에 배치할 수
        const csmInt32 layoutCount = div + (channelNo < mod ? 1 : 0);

        // 분할 방법 결정
        if (layoutCount == 0)
        {
            // 아무것도 하지 않는다
        }
        else if (layoutCount == 1)
        {
            // 모든 것을 그대로 사용
            CubismClippingContext* cc = _clippingContextListForMask[curClipIndex++];
            cc->_layoutChannelNo = channelNo;
            cc->_layoutBounds->X = 0.0f;
            cc->_layoutBounds->Y = 0.0f;
            cc->_layoutBounds->Width = 1.0f;
            cc->_layoutBounds->Height = 1.0f;
        }
        else if (layoutCount == 2)
        {
            for (csmInt32 i = 0; i < layoutCount; i++)
            {
                csmInt32 xpos = i % 2;

                CubismClippingContext* cc = _clippingContextListForMask[curClipIndex++];
                cc->_layoutChannelNo = channelNo;

                cc->_layoutBounds->X = xpos * 0.5f;
                cc->_layoutBounds->Y = 0.0f;
                cc->_layoutBounds->Width = 0.5f;
                cc->_layoutBounds->Height = 1.0f;
                // UV를 2개로 분해하여 사용
            }
        }
        else if (layoutCount <= 4)
        {
            //4분할하여 사용
            for (csmInt32 i = 0; i < layoutCount; i++)
            {
                csmInt32 xpos = i % 2;
                csmInt32 ypos = i / 2;

                CubismClippingContext* cc = _clippingContextListForMask[curClipIndex++];
                cc->_layoutChannelNo = channelNo;

                cc->_layoutBounds->X = xpos * 0.5f;
                cc->_layoutBounds->Y = ypos * 0.5f;
                cc->_layoutBounds->Width = 0.5f;
                cc->_layoutBounds->Height = 0.5f;
            }
        }
        else if (layoutCount <= 9)
        {
            //9분할하여 사용
            for (csmInt32 i = 0; i < layoutCount; i++)
            {
                csmInt32 xpos = i % 3;
                csmInt32 ypos = i / 3;

                CubismClippingContext* cc = _clippingContextListForMask[curClipIndex++];
                cc->_layoutChannelNo = channelNo;

                cc->_layoutBounds->X = xpos / 3.0f;
                cc->_layoutBounds->Y = ypos / 3.0f;
                cc->_layoutBounds->Width = 1.0f / 3.0f;
                cc->_layoutBounds->Height = 1.0f / 3.0f;
            }
        }
        else
        {
            CubismLogError("not supported mask count : %d", layoutCount);
        }
    }
}
마스크 그리기, 마스크 사용의 매트릭스 생성
그리기 전에 조사한 직사각형 범위와 소속 장소에 근거해 마스크 생성용, 마스크 사용용 변환 매트릭스를 준비합니다.
           // --- 실제로 하나의 마스크를 그리기 ---
            CubismClippingContext* clipContext = _clippingContextListForMask[clipIndex];
            csmRectF* allClippedDrawRect = clipContext->_allClippedDrawRect; //이 마스크를 사용하는 모든 그리기 오브젝트의 논리 좌표상의 둘러싼 직사각형
            csmRectF* layoutBoundsOnTex01 = clipContext->_layoutBounds; // 이 안에 마스크를 넣는다

            // 모델 좌표상의 직사각형을, 적절히 마진을 붙여 사용한다
            csmFloat32 MARGIN = 0.05f;
            _tmpBoundsOnModel.SetRect(allClippedDrawRect);
            _tmpBoundsOnModel.Expand(allClippedDrawRect->Width * MARGIN, allClippedDrawRect->Height * MARGIN);
            //########## 본래는 할당된 영역 전체를 사용하지 않고 필요 최소한의 크기가 좋다

            // 셰이더용 계산식을 구한다. 회전을 고려하지 않는 경우는 다음과 같음
            // movePeriod' = movePeriod * scaleX + offX		  [[ movePeriod' = (movePeriod - tmpBoundsOnModel.movePeriod)*scale + layoutBoundsOnTex01.movePeriod ]]
            csmFloat32 scaleX = layoutBoundsOnTex01->Width / _tmpBoundsOnModel.Width;
            csmFloat32 scaleY = layoutBoundsOnTex01->Height / _tmpBoundsOnModel.Height;

            // 마스크를 생성할 때 사용할 행렬을 구한다
            {
                // 셰이더에 전달하는 행렬을 구한다 <<<<<<<<<<<<<<<<<<<<<<<< 최적화 필요(역순으로 계산하면 간단하게 할 수 있음)
                _tmpMatrix.LoadIdentity();
                {
                    // Layout0..1을 -1..1로 변환
                    _tmpMatrix.TranslateRelative(-1.0f, -1.0f);
                    _tmpMatrix.ScaleRelative(2.0f, 2.0f);
                }
                {
                    // view to Layout0..1
                    _tmpMatrix.TranslateRelative(layoutBoundsOnTex01->X, layoutBoundsOnTex01->Y); //new = [translate]
                    _tmpMatrix.ScaleRelative(scaleX, scaleY); //new = [translate][scale]
                    _tmpMatrix.TranslateRelative(-_tmpBoundsOnModel.X, -_tmpBoundsOnModel.Y);
                    //new = [translate][scale][translate]
                }
                // tmpMatrixForMask의 계산 결과
                _tmpMatrixForMask.SetMatrix(_tmpMatrix.GetArray());
            }

            //--------- draw 시의 mask 참조용 행렬을 계산
            {
                // 셰이더에 전달하는 행렬을 구한다 <<<<<<<<<<<<<<<<<<<<<<<< 최적화 필요(역순으로 계산하면 간단하게 할 수 있음)
                _tmpMatrix.LoadIdentity();
                {
                    _tmpMatrix.TranslateRelative(layoutBoundsOnTex01->X, layoutBoundsOnTex01->Y); //new = [translate]
                    _tmpMatrix.ScaleRelative(scaleX, scaleY); //new = [translate][scale]
                    _tmpMatrix.TranslateRelative(-_tmpBoundsOnModel.X, -_tmpBoundsOnModel.Y);
                    //new = [translate][scale][translate]
                }

                _tmpMatrixForDraw.SetMatrix(_tmpMatrix.GetArray());
            }

            clipContext->_matrixForMask.SetMatrix(_tmpMatrixForMask.GetArray());

            clipContext->_matrixForDraw.SetMatrix(_tmpMatrixForDraw.GetArray());
마스크 버퍼의 동적 크기 변경
GLES2 렌더러는 실행 시에 마스크 버퍼의 크기를 변경하는 API를 제공합니다.
현재 마스크 버퍼의 사이즈는 초기값으로 256*256(픽셀)을 설정하고 있는데 마스크 생성 영역을 9매로 자르는 경우 85*85(픽셀)의 직사각형 영역에 묘화한 마스크 형상을 한층 더 확대해 클리핑 영역으로서 사용합니다.
그 결과 클리핑 결과의 가장자리가 흐리거나 번지는 현상이 나타납니다.
이를 해결하는 방법으로 마스크 버퍼의 크기를 프로그램 실행 시에 변경하는 API를 제공합니다.
예를 들어, 마스크 버퍼의 크기를 256*256 ⇒ 1024*1024로 함으로써 마스크 생성 영역을 9매로 자르는 경우 341*341의 직사각형 영역에 마스크 형상을 그릴 수 있으므로,
클리핑 영역으로 확대하여 사용해도 클리핑 결과의 가장자리의 흐림이나 번짐을 없앨 수 있습니다.
※마스크 버퍼의 사이즈를 크게 한다 ⇒ 처리하는 픽셀이 증가하면 속도는 느려지지만, 묘화 결과는 깨끗해진다.
※마스크 버퍼의 사이즈를 작게 한다 ⇒ 처리하는 픽셀이 줄어들기 때문에 속도는 빨라지지만, 묘화 결과는 더러워진다.
void CubismRenderer_OpenGLES2::SetClippingMaskBufferSize(csmInt32 size)
{
    //FrameBuffer의 크기를 변경하기 위해 인스턴스를 파기하고 다시 작성
    CSM_DELETE_SELF(CubismClippingManager_OpenGLES2, _clippingManager);

    _clippingManager = CSM_NEW CubismClippingManager_OpenGLES2();

    _clippingManager->SetClippingMaskBufferSize(size);

    _clippingManager->Initialize(
        *GetModel(),
        GetModel()->GetDrawableCount(),
        GetModel()->GetDrawableMasks(),
        GetModel()->GetDrawableMaskCounts()
    );
}
전처리 방식으로 성능 향상을 기대할 수 있는 이유
휴대 단말기 특유의 사정으로 GPU에 대한 Clear 명령이나 렌더링 타깃 전환 명령의 처리 비용이 다른 명령보다 높을 수 있습니다.
원칙적인 방식으로 그릴 때는 이러한 처리 비용이 높은 명령을 마스크가 필요한 Drawable의 수만큼 실행하게 됩니다.
그러나 전처리 방식의 경우에는 이러한 명령을 실행하는 횟수를 줄일 수 있으므로 스마트폰 등에서의 성능 향상을 기대할 수 있습니다.
실제로 그 효과를 파악하기 위해, 렌더링에 있어서의 각 처리 단위로 시간 코스트를 측정해 보겠습니다.
측정 방법으로서 아래에 표시된 소스 코드로 확인합니다. 레이어는 빌드별로 분리하여 측정합니다.
또 테스트 대상의 모델은 Haru 1개입니다.
측정하는 단말로서는 Android 기기를 2종류, Windows 기기를 1종류 준비했습니다.
측정은 Android 측에서 clock_gettime 함수, Windows 측에서 QueryPerformanceCounter 함수를 사용하여 버퍼에 결과를 캐시하여 평균값을 계산한다는 방침으로 측정합니다.
클리핑 마스크 생성부(레이어 1)
void CubismClippingManager_OpenGLES2::SetupClippingContext(CubismModel& model, CubismRenderer_OpenGLES2* renderer)
{
  ・
  ・
  ・
        {	// ★그리기 타깃 전환 측정
            P_TIME1(ProcessingTime cl(s_switch);)
            // ---------- 마스크 그리기 처리 -----------
            // 마스크용 RenderTexture를 active로 설정
            glBindFramebuffer(GL_FRAMEBUFFER, _maskRenderTexture);
        }

        {	// ★버퍼 클리어(채우기 처리)의 측정
            P_TIME1(ProcessingTime cl(s_clear);)
            // 마스크 지우기
            // (임시 사양) 1이 무효(그려지지 않는) 영역, 0이 유효(그려지는) 영역. (셰이더로 Cd*Cs에서 0에 가까운 값을 곱하여 마스크를 만든다. 1을 걸면 아무 일도 일어나지 않는다)
            glClearColor(1.0f, 1.0f, 1.0f, 1.0f);
            glClear(GL_COLOR_BUFFER_BIT);
        }
 ・
 ・
 ・
        {	// ★그리기 타깃 전환 측정 2
            P_TIME1(ProcessingTime cl(s_switch);)
            // --- 후처리 ---
            glBindFramebuffer(GL_FRAMEBUFFER, oldFBO); // 그리기 대상 반환
        }
  ・
  ・
  ・
}
CubismClippingManager_OpenGLES2::SetupClippingContext는 그리기 타깃의 전환과 채우기 시간을 측정합니다.
모델 그리기 전체(레이어 1, 2 혼재)
void CubismRenderer_OpenGLES2::DoDrawModel()
{


    {	// ★ 마스크 버퍼 생성 전체 측정
        P_TIME2(ProcessingTime makemask(s_maskmake);)
        if (_clippingManager ! = NULL)
        {
            PreDraw();
            _clippingManager->SetupClippingContext(*GetModel(), this);
        }
    }

    { // ★그리기 전처리 측정
        P_TIME1(ProcessingTime makemask(s_predraw);)
        // 상기 클리핑 처리 내에서도 한 번 PreDraw를 호출하므로 주의!!
        PreDraw();
    }


    const csmInt32 drawableCount = GetModel()->GetDrawableCount();
    const csmInt32* renderOrder = GetModel()->GetDrawableRenderOrders();


    { // ★정렬 시간 측정
        P_TIME1(ProcessingTime makemask(s_sort);)
        // 인덱스를 그리기 순서로 정렬
        for (csmInt32 i = 0; i < drawableCount; ++i)
        {
            const csmInt32 order = renderOrder[i];
            _sortedDrawableIndexList[order] = i;
        }
    }

    { // ★마스크 이외의 그리기 시간 측정
        P_TIME2(ProcessingTime makemask(s_draw);)
        // 그리기
        for (csmInt32 i = 0; i < drawableCount; ++i)
        {
            const csmInt32 drawableIndex = _sortedDrawableIndexList[i];

            // 클리핑 마스크 설정
            SetClippingContextBufferForDraw((_clippingManager ! = NULL)
                ? (*_clippingManager->GetClippingContextListForDraw())[drawableIndex]
                : NULL);

            IsCulling(GetModel()->GetDrawableCulling(drawableIndex) ! = 0);

            DrawMesh(
                GetModel()->GetDrawableTextureIndices(drawableIndex),
                GetModel()->GetDrawableVertexIndexCount(drawableIndex),
                GetModel()->GetDrawableVertexCount(drawableIndex),
                const_cast<csmUint16*>(GetModel()->GetDrawableVertexIndices(drawableIndex)),
                const_cast<csmFloat32*>(GetModel()->GetDrawableVertices(drawableIndex)),
                reinterpret_cast<csmFloat32*>(const_cast<Core::csmVector2*>(GetModel()->GetDrawableVertexUvs(drawableIndex))),
                GetModel()->GetDrawableOpacity(drawableIndex),
                GetModel()->GetDrawableBlendMode(drawableIndex)
            );
        }
    }

    { // ★그리기 후처리 측정
        P_TIME1(ProcessingTime makemask(s_post);)
        //
        PostDraw();
    }
}
그리기 전, 정렬, 그리기 후처리의 측정을 합니다.
레이어를 나누어 마스크 생성과 그 이외의 묘화라는 큰 틀에서도 측정합니다.
메쉬 그리기(레이어 1)
void CubismRenderer_OpenGLES2::DrawMesh(csmInt32 textureNo, csmInt32 indexCount, csmInt32 vertexCount
                                        , csmUint16* indexArray, csmFloat32* vertexArray, csmFloat32* uvArray
                                        , csmFloat32 opacity, CubismBlendMode colorBlendMode)
{
 ・
 ・
 ・
    { // ★셰이더에 데이터 설정 시간을 측정
        P_TIME1(ProcessingTime sharder(s_sharder);)
        CubismShader_OpenGLES2::GetInstance()->SetupShaderProgram(
            this, drawTextureId, vertexCount, vertexArray, uvArray
            , opacity, colorBlendMode, modelColorRGBA, IsPremultipliedAlpha()
            , GetMvpMatrix()
        );
    }

    { // ★그리기 명령 단일 시간 측정
        P_TIME1(ProcessingTime gldraw(s_gldraw);)
        // 폴리곤 메쉬 그리기
        glDrawElements(GL_TRIANGLES, indexCount, GL_UNSIGNED_SHORT, indexArray);
    }

    // 후처리
    glUseProgram(0);
    SetClippingContextBufferForDraw(NULL);
    SetClippingContextBufferForMask(NULL);
}
CubismRenderer_OpenGLES2::DrawMesh는 셰이더에 대한 설정 시간과 그리기 명령 단일 시간을 측정합니다.
레이어 3
void LAppModel::Update()
{
    {
        P_TIME3(ProcessingTime up(s_paramup);)
        const csmFloat32 deltaTimeSeconds = LAppPal::GetDeltaTime();
        _userTimeSeconds += deltaTimeSeconds;
      ・
      ・
      ・
        // 포즈 설정
        if (_pose ! = NULL)
        {
            _pose->UpdateParameters(_model, deltaTimeSeconds);
        }
    }
    {
        P_TIME3(ProcessingTime ren(s_modelup);)

        _model->Update();

    }
}
void LAppModel::Draw(CubismMatrix44& matrix)
{
    P_TIME3(ProcessingTime ren(s_rendering);)

    matrix.MultiplyByMatrix(_modelMatrix);

    GetRenderer<Rendering::CubismRenderer_OpenGLES2>()->SetMvpMatrix(&matrix);

    DoDraw();
}
대략적인 Update 흐름 파라미터 계산, 모델 업데이트, 렌더링의 세 가지로 나누어 살펴보겠습니다.
결과
| Android1 | Android2 | Winpc1 | |
| L1clear | 1781.20 | 218.80 | 26.80 |
| L1gldraw | 45.47 | 51.63 | 10.58 |
| L1sharder | 12.31 | 9.34 | 5.37 |
| L1post | 1.50 | 1.00 | 0.10 |
| L1switch | 10.70 | 56.30 | 7.80 |
| L1predraw | 15.90 | 8.20 | 2.20 |
| L1sort | 7.60 | 7.00 | 0.60 |
| L2MaskMake | 2686.80 | 1357.60 | 318.50 |
| L2draw | 4004.10 | 4013.20 | 1217.00 |
| L3paramupdate | 392.00 | 375.40 | 89.70 |
| L3modelupdate | 1357.50 | 1410.90 | 1070.40 |
| L3rendering | 6715.70 | 5233.70 | 1892.00 |
위의 표는 앞에서 설명한 부분의 실행 시간입니다.
휴대 단말기는 Clear의 비용이 높거나 렌더링 타깃의 전환이 다른 명령에 비해 무거운 것을 알 수 있습니다.
이 무거운 명령이 원칙적인 방식으로 그릴 때 마스크가 필요한 Drawable의 수만큼 실행됩니다.
이 계산이 한 번으로 끝나기 때문에 스마트폰 등에서의 퍼포먼스의 향상을 기대할 수 있습니다.
마스크 처리를 고선명 방식으로 전환
앞서 언급했듯이, 그릴 때마다 마스크를 생성하는 방식이라면 낮은 사양 단말기에서는 성능에 영향이 있습니다.
그러나 최종적으로 동영상으로서 출력하는 경우와 같이, 런타임에서의 퍼포먼스보다 화면의 품질을 중시하는 경우는 이쪽 방식이 더 적합합니다.
2018/12/20 이후의 SDK에서는 마스크 처리를 고선명 방식으로 전환할 수 있습니다.
고선명 방식으로 전환하려면 다음 API에 true를 전달합니다.
CubismRenderer::UseHighPrecisionMask()