머티리얼 커스터마이징
업데이트: 2017/09/19
by Traitam
전체 개요
Cubism 모델을 Unity에서 사용하는 방법을 설명합니다.
또 모델 가져오기 기능을 활용하여 실제 예시에서 머티리얼을 커스터마이징합니다.
Cubism 모델이 Unity에서 사용 가능하기까지
Cubism 모델이 Unity Editor에 어떻게 표시되는지 설명합니다.
개요
Unity Editor상에서는, 일반적으로 Live2D/Cubism/Materials/Unlit*.mat라고 하는 머티리얼을 이용해 표시를 실시하고 있습니다.
모델에 머티리얼이 적용되는 타이밍은 모델을 가져올 때입니다.
상세
Unity에서 Cubism 모델을 표시할 때 일반적으로 Live2D/Cubism/Materials/Unlit*.mat 머티리얼을 사용합니다.
이렇게 하면 Cubism Editor의 표시에 가까운 표시가 됩니다.
Cubism 모델에 머티리얼이 적용되는 타이밍은 Unity Editor에서 모델을 가져온 타이밍입니다.
따라서 Unity Editor로 모델을 드래그 앤 드롭한 타이밍에 표시에 필요한 머티리얼이 적용됩니다.
Cubism 모델을 Unity로 가져올 때 CubismImporter.cs의 OnPickMaterial이 호출됩니다.
여기에서는 대리자를 사용하여 CubismBuiltinPickers.MaterialPicker를 사용합니다.
이 메서드 내에서 Cubism 모델의 각 Drawable에 머티리얼이 적용됩니다.
그리고 나서, 프리팹화되어 UnityEditor상에서 자유롭게 취급할 수 있게 됩니다.
스크립트에서 머티리얼을 커스터마이징하고 싶다면, OnPickMaterial은 대리자이기 때문에 메서드를 별도로 작성해 그 메서드를 OnPickMaterial에 적용하면 머티리얼을 커스터마이징할 수 있습니다.
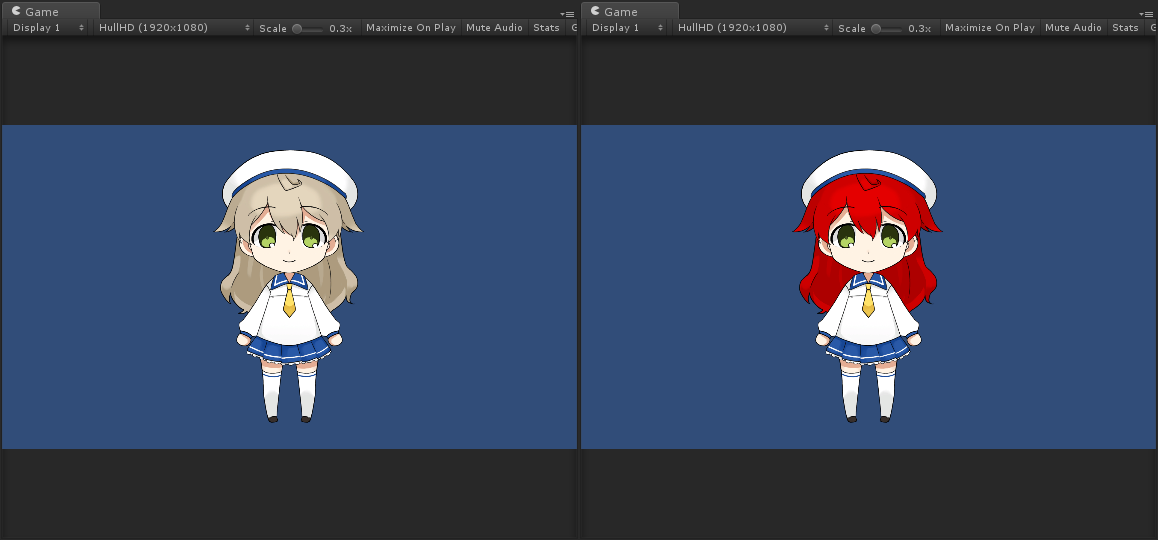
그런 다음 스크립트로 지정 Drawable 머티리얼을 커스터마이징하고 표시하도록 합니다.
그림: 정 Drawable 머티리얼 커스터마이징
스크립트에서 모델을 가져오는 타이밍에, 지정한 Drawable 머티리얼을 변경합니다.
개요
지정할 머티리얼을 만들고 지정 Drawable의 이름을 참조합니다.
지정 Drawable의 경우 지정한 머티리얼을 사용하고, 그 이외는 커스터마이징하지 않고 일반 머티리얼을 이용합니다.
상기의 처리를 실시하는 메서드를 기술해 OnPickMaterial에 대입합니다.
상세
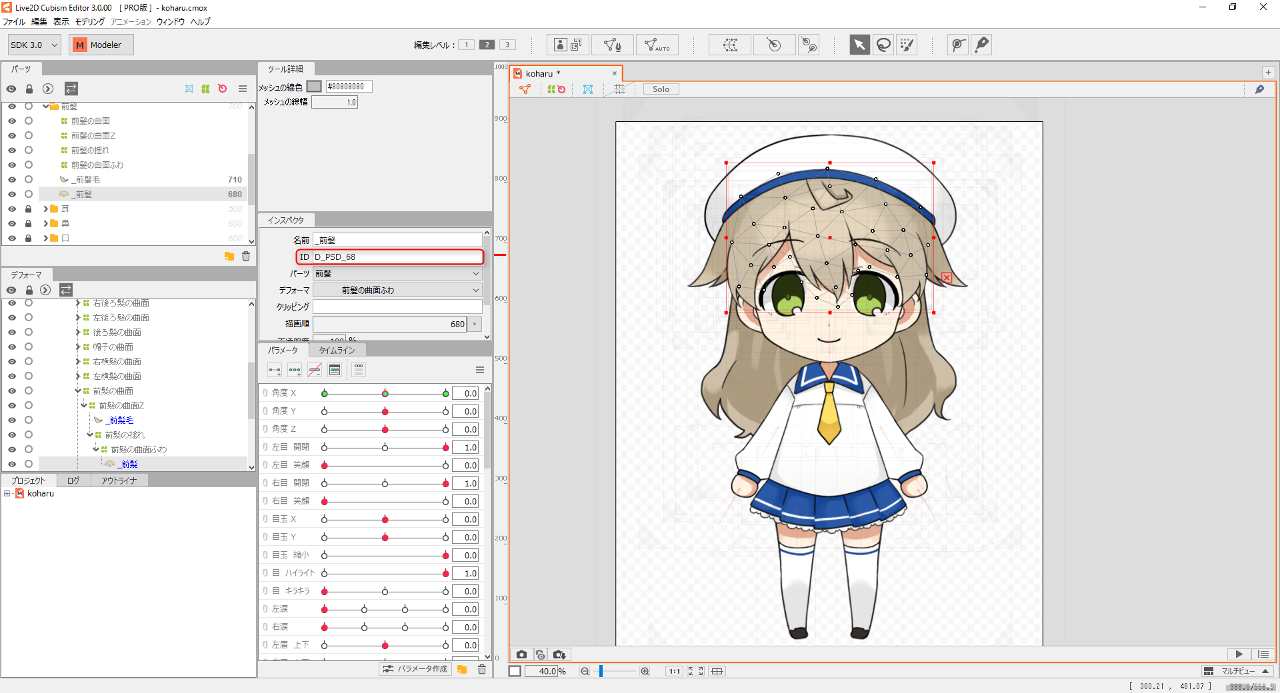
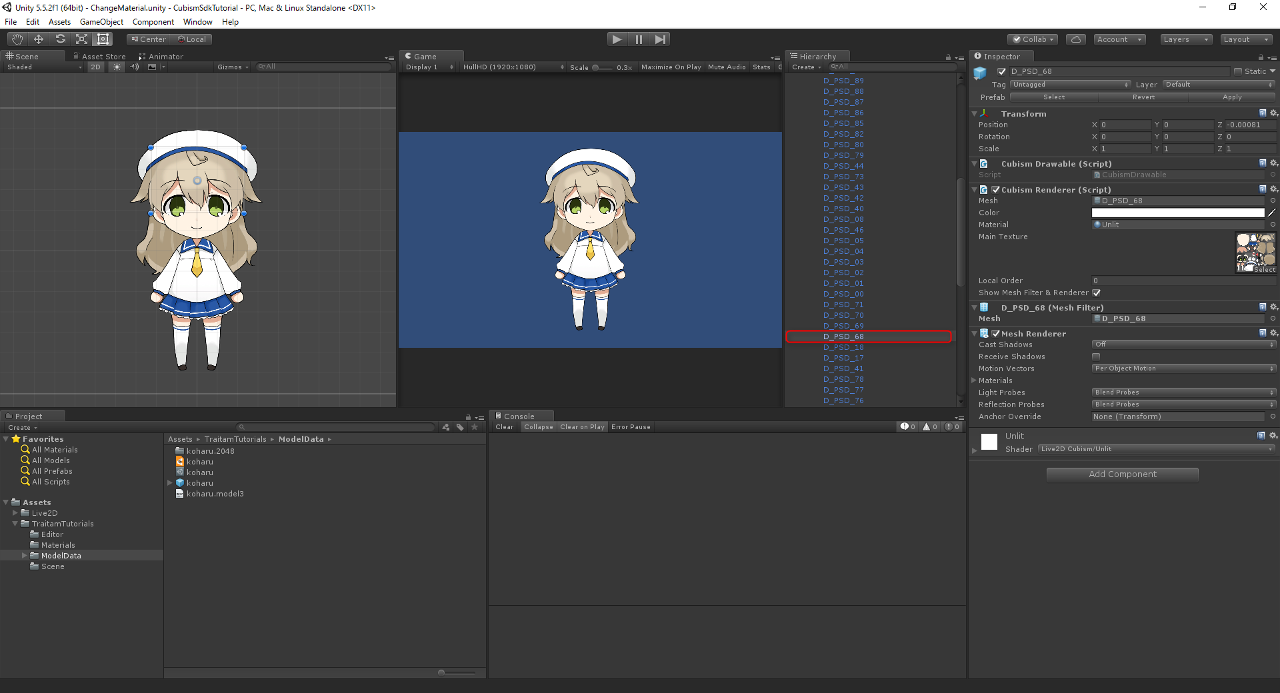
Unity Editor에서 지정하는 Drawable 이름은 Cubism Editor에서 확인할 수 있는 아트메쉬의 ID를 지정합니다.


Unity Editor의 Drawable 이름은 Cubism Editor에서 확인할 수 있는 아트메쉬 ID와 연관되어 있으므로 Unity Editor에서 변경할 수 없습니다.
따라서 Drawable 이름을 변경하려면 Cubism Editor에서 ID 이름을 변경해야 합니다.
이번에는 머리카락 전체의 색상을 변경하므로 머리카락의 Drawable을 사용합니다.
머리의 Drawable에 머티리얼을 적용할 때 커스터마이징된 머티리얼을 적용합니다.
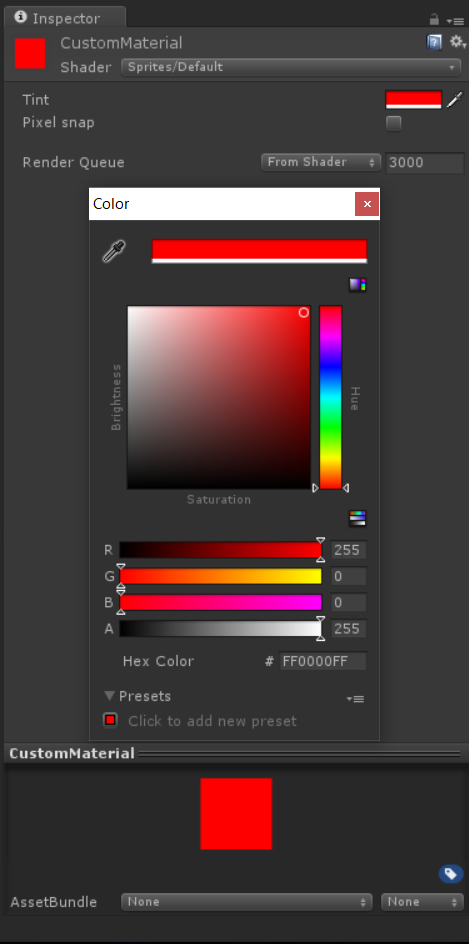
그런 다음 Unity Editor에서 Material 폴더를 만들고 새 머티리얼을 만듭니다.
이 머티리얼 이름을 CustomMaterial이라고 합니다. 이 머티리얼의 셰이더를 Sprites/Default로 변경합니다.
여기에서는 Tint의 색상을 빨간색으로 변경합니다.

마지막으로 Editor 폴더를 만들고 폴더 내에 새 C# 스크립트를 만듭니다.
여기에서는 MaterialCustomizer라는 이름으로 합니다.
스크립트 내에서 지정한 Drawable을 참조하여 만약 같은 이름의 Drawable일 경우 앞서 만든 머티리얼을 적용합니다.
다른 Drawable에는 일반 머티리얼(Live2D/Cubism/Materials/Unlit*.mat)을 사용합니다.
그 기능을 넣은 것이 다음 코드입니다.
using UnityEditor;
using UnityEngine;
using Live2D.Cubism.Core;
using Live2D.Cubism.Framework.Json;
using Live2D.Cubism.Editor.Importers;
using System.Linq;

namespace TraitamTutorials
{
    /// <summary>
    /// Customizes materials of Cubism models from code.
    /// </summary>
    public static class MaterialCustomizer
    {
        /// <summary>
        /// IDs of drawables to customize.
        /// </summary>
        private static string[] _drawablesToCustomize = { "D_PSD_01" ,"D_PSD_02" ,"D_PSD_03" ,"D_PSD_04" ,"D_PSD_05" ,"D_PSD_68" ,"D_PSD_69" ,"D_PSD_70" ,"D_PSD_71"};

        /// <summary>
        /// Custom material to assign.
        /// </summary>
        private static Material _customMaterial;

        /// <summary>
        /// Make custom material available.
        /// And select <see cref="Material"/> as custom material or model default material.
        /// </summary>
        [InitializeOnLoadMethod]
        private static void RegisterMaterialInitialize()
        {
            _customMaterial = AssetDatabase.LoadAssetAtPath<Material>("Assets/TraitamTutorials/Materials/CustomMaterial.mat");
            CubismImporter.OnPickMaterial = CustomizeMaterial;
        }

        /// <summary>
        /// When <see cref="CubismDrawable.name"/> and <see cref="_drawablesToCustomize"/> the same, use custom material.
        /// Otherwise, use model default material.
        /// </summary>
        /// <param name="sender">Event source.</param>
        /// <param name="drawable">Drawable to pick for.</param>
        /// <returns><see cref="Material"/> for using the model.</returns>
        private static Material CustomizeMaterial(CubismModel3Json sender, CubismDrawable drawable)
        {
            //use custom material.
            if (_drawablesToCustomize.Any(n => n == drawable.Id))
            {
                return _customMaterial;
            }


            //use default material.
            return CubismBuiltinPickers.MaterialPicker(sender, drawable);
        }
    }
}
이제 모델을 가져올 때 지정된 Drawable 머티리얼을 커스터마이징할 수 있습니다.

