Add Models to Sample Projects
Updated: 09/04/2019
This page describes the steps to add a Live2D Cubism model to the Live2D Cubism SDK for Native sample.
Samples should be built in advance with reference to “Build Samples.”
Prepare Editor and Cubism Viewer (for OW)
When adding a model to a project, various data processing is required.
Prepare the Editor. When installed, “Cubism Viewer (for OW)” will also be installed.
Prepare Models
First, prepare the model to be added.
In this tutorial, add the sample model “Miara” to the sample project.
When adding the model, the model is also processed to match the sample program at the same time.
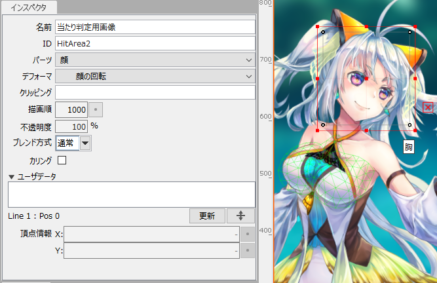
Adding collision detection
The sample program has the following elements.
• Clicking on the area set as “Head” in the model changes the facial expression.
• Clicking on the area set as “Body” in the model will play a random motion.
Since these are not present in the sample Miara, add collision detection for the head and body.
See “Preparation for Setting Up Collision Detection” for operations on the Editor side.
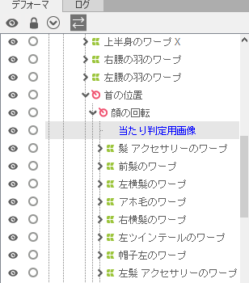
Add two ArtMeshes for the collision detection as follows.
1. Collision detection
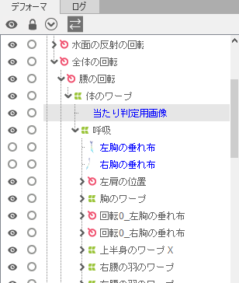 |  |
2. Collision detection 2
 |  |
Adding user data
The sample program using Cocos2d-x has the ability to display the user data area as well as the collision detection.
In this case, use this feature with additional user data.
Create an ArtMesh to which user data will be set and configure it as follows.
See “User Data and Events” for more information on adding user data.
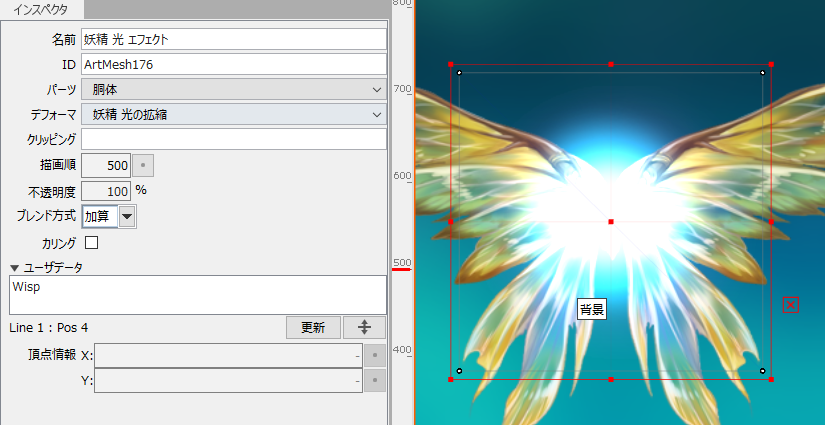
The user data ‘Wisp’ is added to the fairy light effect part.
Adding parameter settings
No parameters for eye blinking or lip-sync are specified in the model data for Miara. These settings are also added in the Editor.
See “Eye Blinking Setting” for the setting method.
In this case, the following settings were made.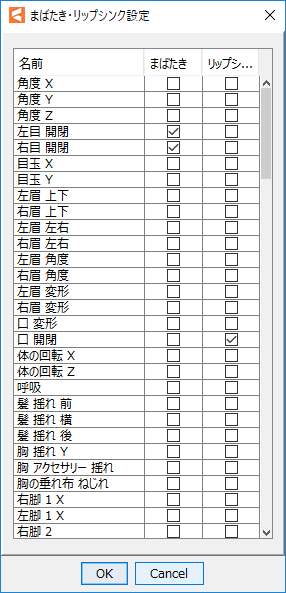
Adding motion for facial expressions
Miara has motion for walking and actions, but no motion for facial expressions so add the motion for facial expressions.
To create motions for facial expressions, please refer to the following. The process is almost the same for version 3.1.
“Create Facial Expressions in Animation View”
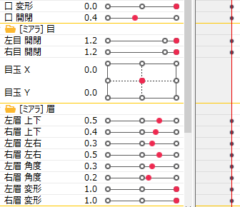
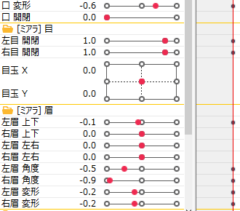
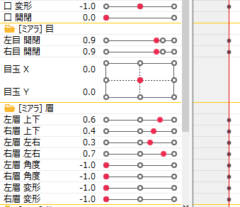
In this case, the following three expressions have been added.
| happy | normal | sad |
 |  |  |
 |  |  |
Working with Cubism Viewer (for OW)
Some of the model data available in the Framework is created in Cubism Viewer (for OW) as well as in the Editor.
HitArea settings
Simply defining a HitArea on an ArtMesh in the Editor is not enough for the application to recognize it.
Add information to the .model3.json file for the application to recognize it.
Using the Cubism Viewer (for OW) feature, this information can be automatically populated.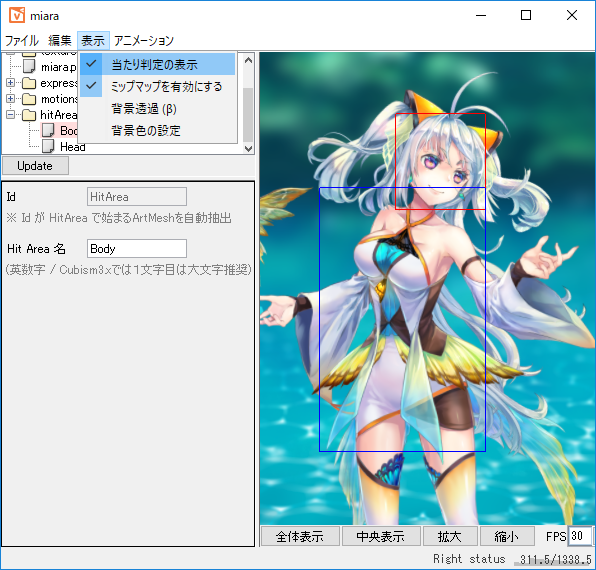
Adding pose files
The Pose function is configured in Cubism Viewer (for OW).
See “About Pose” and “Pose Settings” for more information on the Pose function.
In this model, there are no parts to be switched, so no settings are made.
Converting and registering facial expressions
The motion for facial expressions created in Animator earlier cannot be used as is as a facial expression file.
It must be converted to an .exp3.json file in Cubism Viewer (for OW).
To create a file for expression, please refer to the following. The process is almost the same for versions 3.1 and later.
“Expression Settings and Export”
In this case, the setting for opening and closing of both eyes is changed to Multiply Mode.
Registering a motion
The motion file registers how the model is used in the program.
See “Motion Settings” for details on how to register motions in Cubism Viewer (for OW).
In this case, the group settings are set to Scene1.motion3.json as Idle and Scene2.motion3.json and Scene3.motion3.json as TapBody.
Other settings are left at default values.
Output Final Model Files
After each setting is completed, export the model settings (.model3.json files).
At this time, unsaved .exp3.json and .pose3.json files are written out at the same time.
See “Exporting Model Setting Files” for detailed export instructions.
According to the specifications of the sample program, the file name should be the same as the name of the folder to be written.
This is a setting that matches the specification to read the [folder name].model3.json file by specifying it in the folder name string.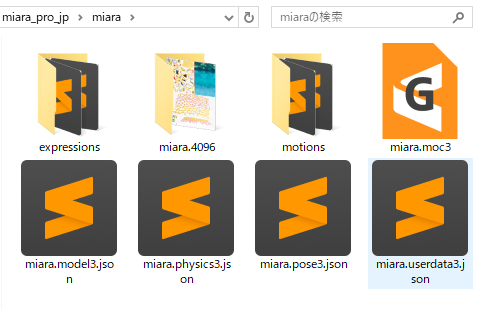
Exporting results in a file similar to the one shown above.
Checking the contents of the JSON file
Before moving on to the program, let’s take a peek at the model3.json file.
Open miara.model3.json with a text editor to see the following code.
{
	"Version": 3,
	"FileReferences": {
		"Moc": "miara.moc3",
		"Textures": [
			"miara.4096/texture_00.png"
		],
		"Physics": "miara.physics3.json",
		"UserData": "miara.userdata3.json",
		"Pose": "miara.pose3.json",
		"Expressions": [
			{
				"Name": "happy.exp3.json",
				"File": "expressions/happy.exp3.json"
			},
			{
				"Name": "normal.exp3.json",
				"File": "expressions/normal.exp3.json"
			},
			{
				"Name": "sad.exp3.json",
				"File": "expressions/sad.exp3.json"
			}
		],
		"Motions": {
			"Idle": [
				{
					"File": "motions/Scene1.motion3.json"
				}
			],
			"TapBody": [
				{
					"File": "motions/Scene2.motion3.json"
				},
				{
					"File": "motions/Scene3.motion3.json"
				}
			]
		}
	},
	"Groups": [
		{
			"Target": "Parameter",
			"Name": "EyeBlink",
			"Ids": [
				"ParamEyeLOpen",
				"ParamEyeROpen"
			]
		},
		{
			"Target": "Parameter",
			"Name": "LipSync",
			"Ids": [
				"ParamMouthOpenY"
			]
		}
	],
	"HitAreas": [
		{
			"Id": "HitArea",
			"Name": "Body"
		},
		{
			"Id": "HitArea2",
			"Name": "Head"
		}
	]
}
All settings are output in JSON format and can be created and edited in a text editor as long as the formatting of each setting is followed.
The specifications of each JSON file can be checked at “CubismSpecs” on GitHub.
Program-side Changes
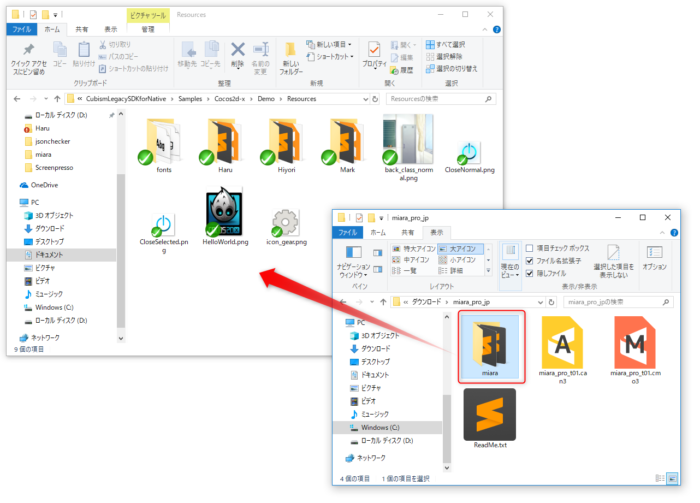
First, add the folder of the finished model to the resources folder.
When adding to the Cocos2d-x sample, add to the [root]SamplesCocos2d-xDemoResources folder.
When adding to the OpenGL sample, add to the [root]SamplesOpenGLDemoResources folder.
Then, add the string ‘miara’ to ModelDir in LAppDefine.cpp.
    // Model definition------------------------------------------
    // Array of directory names where models are located
    // Match the directory name with the name of model3.json
    const csmChar* ModelDir[] = {
        "Haru",
        "Hiyori",
        "Mark",
        "miara"	//< add
    };
This completes the process of adding a model.
Let’s build and run it. Press the gear icon in the upper right corner of the screen for the number of times it is matched to ModelDir[], and Miara will appear in the center of the screen.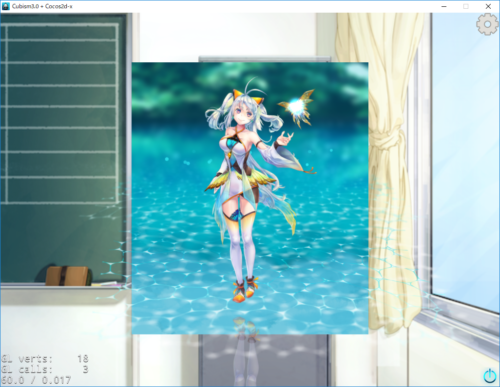
Verifying data
If it is a Cocos2d-x project, you can visualize the range of the collision detection and Userdata.
Check to see if the various data are really loaded.
First, change DebugDrawRectEnable in LAppDefine.cpp to true.
    // Display options for debug logs
    const csmBool DebugLogEnable = true;
    const csmBool DebugTouchLogEnable = false;
    const csmBool DebugDrawRectEnable = true;//< change
This code will display the range of the ArtMesh where the collision decision and user data are located.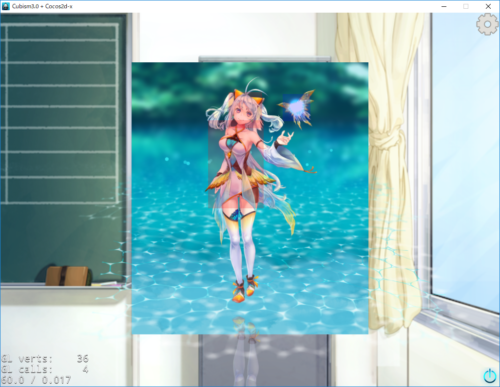
Red is the HitArea and blue is the range where user data is located.
Is the information actually loaded correctly?
Let’s add debug output and check it out.
Add the following to the LAppModel::GetUserDataAreas function in LAppModel.cpp.
const csmVector<csmRectF>& LAppModel::GetUserDataAreas(const CubismMatrix44& vpMatrix, const CubismVector2& windowSize)
{
    _userArea.Clear();

    if ( _modelUserData == NULL)
    {
        return    _userArea;
    }

    const csmVector<const CubismModelUserData::CubismModelUserDataNode*>& ans = _modelUserData->GetArtMeshUserDatas();

    for ( csmUint32 i = 0; i < ans.GetSize(); ++i)
    {
        _userArea.PushBack(GetDrawableArea(GetModel()->GetDrawableIndex(ans[i]->TargetId), vpMatrix, windowSize));
        CubismLogInfo("userdata %s in %s", ans[i]->Value.GetRawString(), ans[i]->TargetId->GetString().GetRawString());        //< add
    }

    return _userArea;
}
When executed with range display enabled, the contents of the user data will be output to the VisualStudio output window.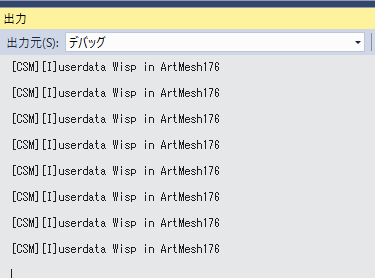
CubismLogInfo is a macro for debugging output to extract and examine internal movements.